 Introduction
The system which permits admin to handle all the transactions related to orders is known as the payment provider gateway. The payment gateway secure all the transaction data between merchant and customers. Following are the major concepts covered in this chapter.
- Payment Gateway structure
- PCI compliance
 Description
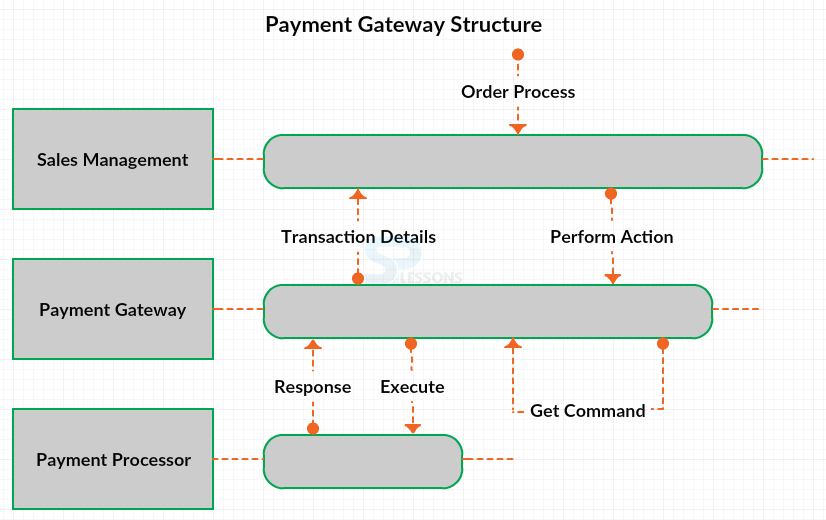
The payment gateway secure all the account and transaction details of the customers by acting as the checkpoint between the customers and merchants. The figure below demonstrate the basic structure of a payment gateway in Magento.
Every payment gateway providers in Magento have following operations.
Sale -
The authorized transactions are processed and automatically captured. The funds can be withdrawn.
Refund -
Refunds the customer fund.
Capture -
The previously authorized amount is withdrawn
Void -
The transferred funds are canceled from the customer’s account
Authorize -
The authorized transaction is processed and the funds are blocked on the customer’s account and cannot be withdrawn.
 Description
The PCI stands for Payment Card Industry and is used for accepting the payments through credit cards in online. To setup the PCI payment method, go to the path Store -> Configuration.
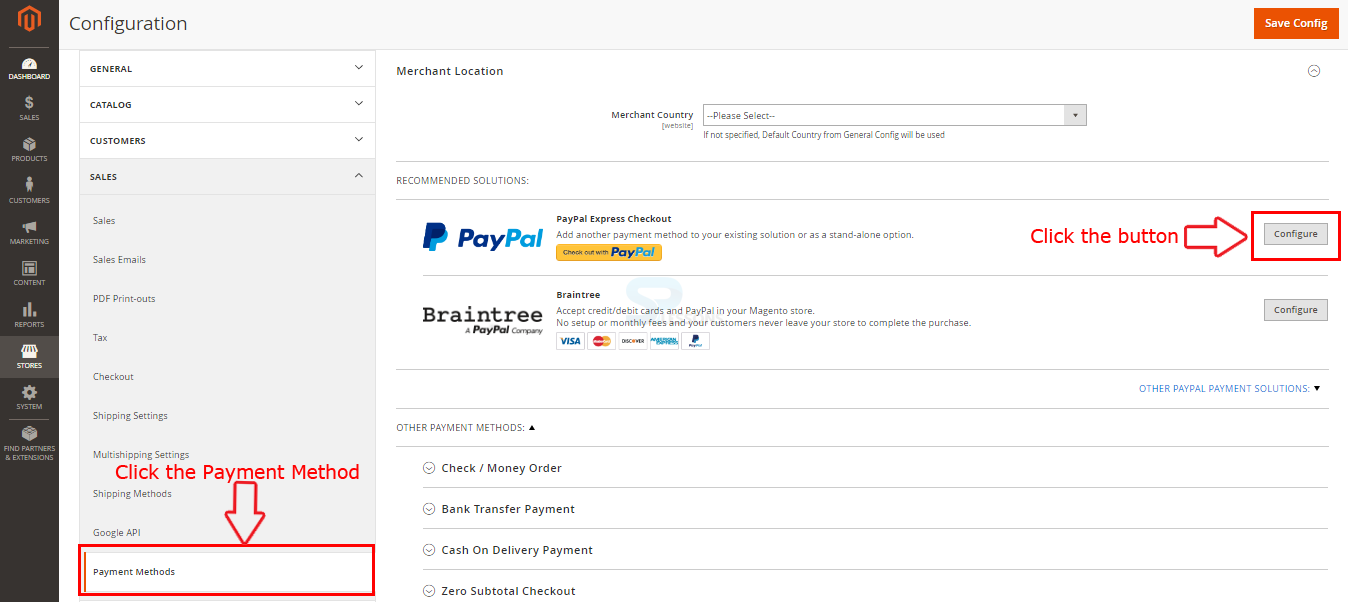
Now in the Configuration interface, click on the Payment methods available under Sales section in the left panel and click on Configure button for Paypal as indicated in the image below.
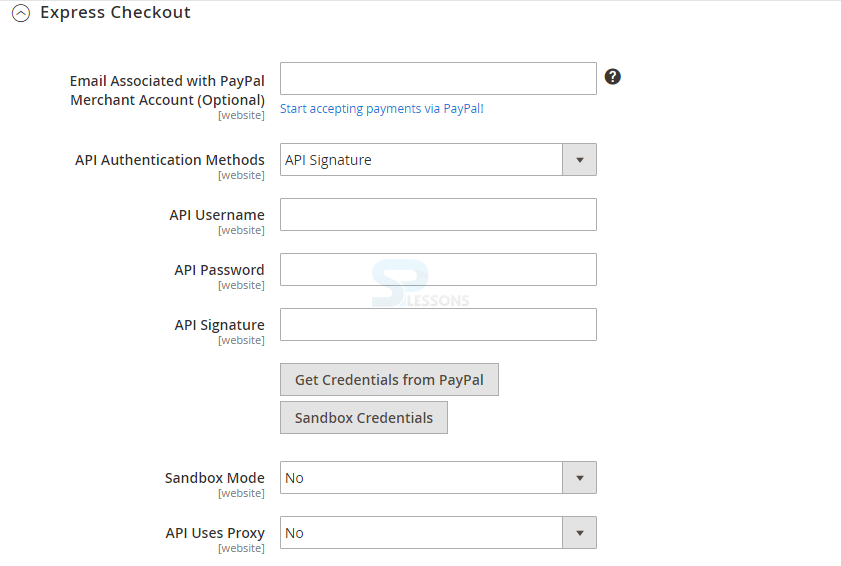
Under Paypal settings, click on express checkout and fill the required details and click on the Get Credentials from Paypal button.
Now in Basic Settings section fill the required details like Title for payment method, Sort Order for payment order, Payment Action for immediate payment actions and Display payment on every product details page.
 Description
Braintree offers a completely adjustable checkout involvement with fraud detection and PayPal integration. Braintree lessens the PCI consistence load for vendors in light of the fact that the transaction happens on the Braintree system.
In order to configure the Braintree navigate to Store -> Configuration -> Sales -> Payment Methods
Click on the Configure button which is available under the Braintree section in order to setup the Braintree configuration.
Now follow the steps below for the complete Braintree setup.
 Step 1
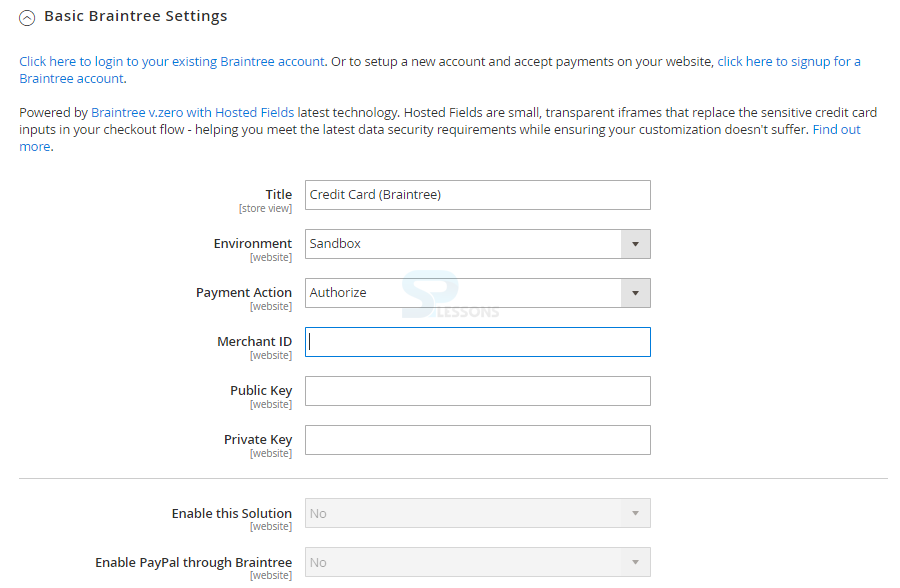
One can to create or login using the existing Braintree account using the links provide on the Basic Braintree settings.
After successful login complete the Basic Settings by filling the required information.
Title -
Give the preferred title for identifying Braintree as a payment choice.
Environment -
Set the environment as either Sandbox or Production for the transactions, click on the dropdown box to select.
Payment Action -
Set the Payment Action either Authorize Only or Authorize and Capture, by selecting the Authorize Only the amount will not withdrawn from the customer’s bank account until the sale is captured by the merchant. By selecting the Authorized and Capture, the purchased amount is authorized and can immediately withdrawn from the customer’s account.
Merchant ID -
Give the merchant ID from the Braintree account.
Public Key -
Set up the Public Key.
Private Key -
Set up the Private Key.
Enable this Solution -
Set the Enable this solution to Yes.
Enable Paypal through Braintree -
Set the option to Yes in order to enable the payment via paypal through Braintree.
 Step 2
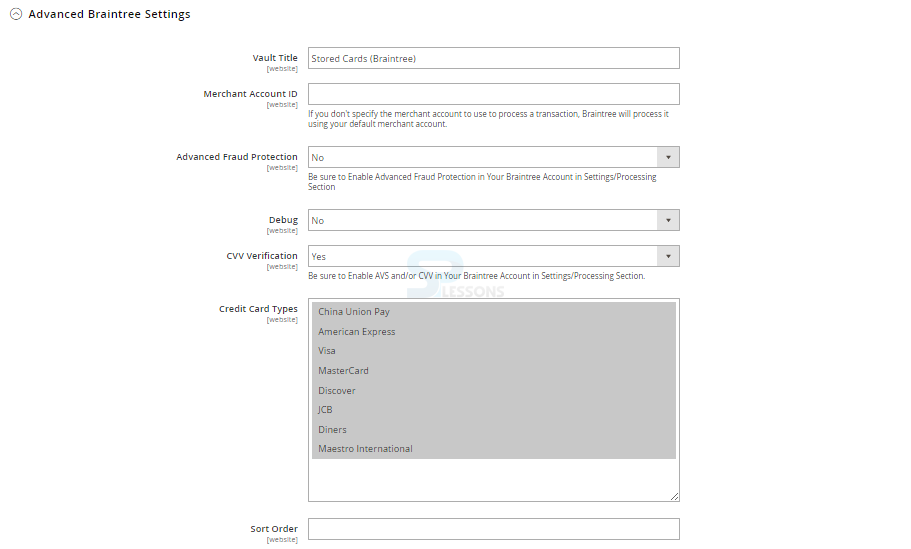
Fill the following required information under the Advanced Settings.
Vault Title -
Set up the Title for the Vault.
Merchant Account ID -
Give the Merchant ID details from the Braintree account.
Advanced Fraud Protection -
Set the option as Yes, in order to apply Braintree fraud protection to transactions.
Debug -
Set Debug to Yes, in order to save the log file details between the Braintree and store.
CVV Verification -
Set the option to Yes, in order to provide the customers a 3-digit code form the back of credit card.
Credit Card Types -
Select the credit card type from the available list by holding the Ctrl Key.
Sort Order -
Give the preferred number for setting the Braintree sequence with other payment methods.
 Step 3
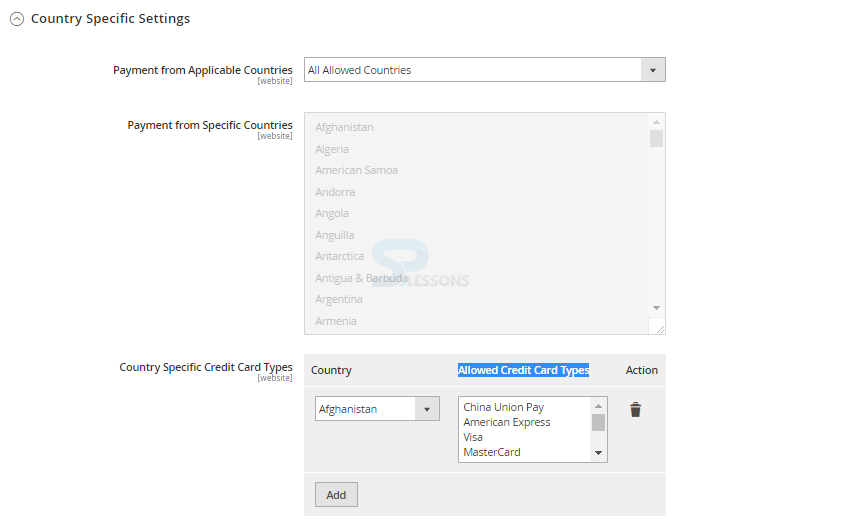
Set up the required information under the Country Specific Settings.
Payment from Applicable Countries -
Set the applicable countries from the list using Specific Countries option or select all the countries by using the All Allowed Countries option
Payment from Specific Countries -
Select the specific countries from the available list using the Ctrl button.
Country Specific Credit Card Types -
In order to set up the specific credit card type, click on Add button select the preferred country from the dropdown list and click on the card type from the Allowed Credit Card Types list.
 Step 4
Set the required information under the PayPal through Braintree section.
Title -
Give the title for identifying the Braintree payments by Paypal option.
Vault Enabled -
Set the option to Yes, in order to enable the vault.
Sort Order -
In the order filed give the number to specify the sequence for the Braintree payment through PayPal.
Override Merchant Name -
Enter the merchant name if one want to display the name different from the name available in the store.
Payment Action -
Set the Payment Action either Authorize Only or Authorize and Capture, by selecting the Authorize Only the amount will not withdrawn from the customer’s bank account until the sale is captured by the merchant. By selecting the Authorized and Capture, the purchased amount is authorized and can immediately withdrawn from the customer’s account.
Payment from Applicable Countries -
Set the applicable countries from the list using Specific Countries option or select all the countries by using the All Allowed Countries option.
Payment from Specific Countries -
Select the specific countries from the available list using the Ctrl button.
Require Customer's Billing Address -
Set the option to Yes, if one want to ask customer to provide a billing address.
Allow to Edit Shipping Address Entered During Checkout on PayPal Side -
Set the option to Yes, if one want the customer to edit the shipping address while performing the transactions through PayPal.
Debug -
Set the option to Yes, if one want to save all the information or transaction details between the store and PayPal through Braintree.
Display on Shopping Cart -
Set the option to Yes, if one want the PayPal button to appear on the shopping car page.
Skip Order Review -
Set the option to Yes, if one want the customer to review the order before proceeding to the payment using PayPal.
 Step 5
Set up the following required information under the 3D Verification Settings.
3D Secure Verification -
Set the option to Yes, if one want to add a verification step for all the customers using the credit cards which are used for a verification program such as the Verified by VISA.
Threshold Amount -
Set up the preferred threshold amount in the given filed.
Verify for Applicable Countries -
Set the applicable countries from the list using Specific Countries option or select all the countries by using the All Allowed Countries option.
Verify for Specific Countries -
Select the specific countries from the available list using the Ctrl button.
 Step 6
Set up the following required information under the Dynamic descriptors. The dynamic descriptors are sent on a per-transactions basis and is defined what will appear on the credit card stamen of a customer while purchasing a specific product.
Name -
Give the business name available in the customer’s statement.
Phone -
Give the phone number available in the customer’s statement.
URL -
Give the URL/Web address filed available in the customer’s statement.
 Key Points
- Gateway is the mechanism which provide integration between the store and the payment sevice providers.
- Various payment methods can be configured for customer convenience in Magento.
- Magento implements integration with all the authorized.Net payment service providers such as PayPal, Braintree and more.


