


 Introduction
Now-a-days online business is getting huge, Magento is one of the best Ecommerce system based on open source technology, Magento isn’t the easiest platform when compared to other Ecommerce platforms but it is the best option for a user who are looking for a professional Ecommerce solution. Following are the major concepts covered in this chapter.
- System requirement
- Installing XAMPP and Magento locally
- Installing Magento
Description
The procedure of introducing Magento on PC is called as setting up a server environment or localhost. Usually, topic originators and module designers introduce Magento on a neighborhood server environment to accelerate their improvement process. A normal client can utilize the nearby server environment to test modules and/or roll out improvements to the site before making it live for audience. This chapter illustrates how to introduce Magento on your Windows PC utilizing XAMPP. Following are the main requirements for running Magento on Windows.
- Operating System Cross-platform
- Database MySQL 5.6 or greater PHP 5.6 or greater
- Web Server WAMP LAMP XAMPP MAMP
- Supported Browsers Chrome Firefox Internet explorer (IE 8+) Safari Opera
Description
XAMPP is a prominent web server utilized as a part of PHP advanced environment. Using XAMPP is not much difficult and Apache distribution containing PHP, MariaDB can be installed easily.
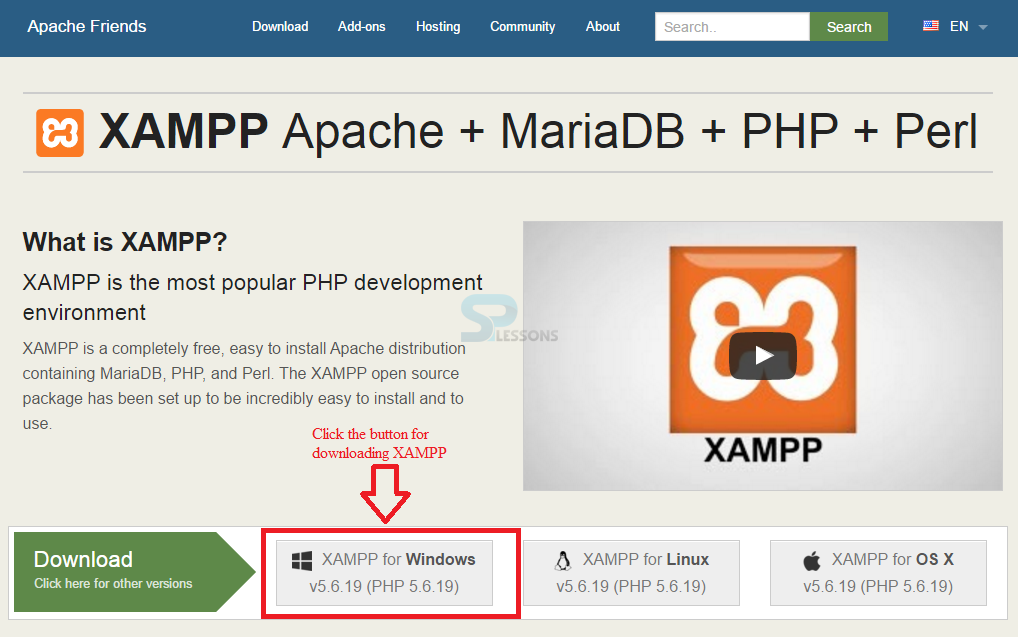
In order to install the XAMPP, download the PC software from Apache friends website.
Now, click the download button XAMPP for Windows as shown in the image below. After downloading, run the XAMPP installer with the default setting.
 Follow the below steps for downloading and installing XAMPP on windows.
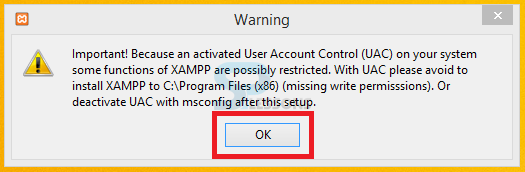
Step 1
Run the XAMPP installer application, the image below shows the error that occurs while running the applications. Click OK to install.
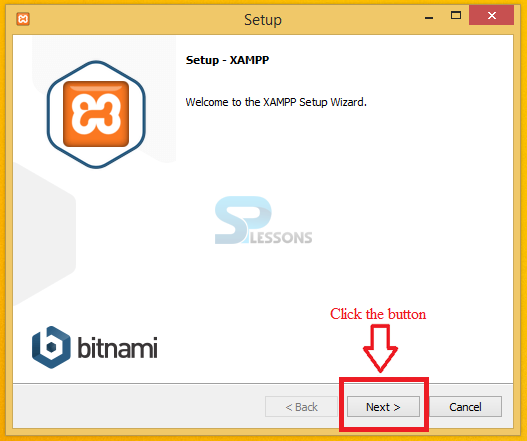
Step 2
By clicking OK, a Setup wizard window appears as shown in the image below. Click the Next button.
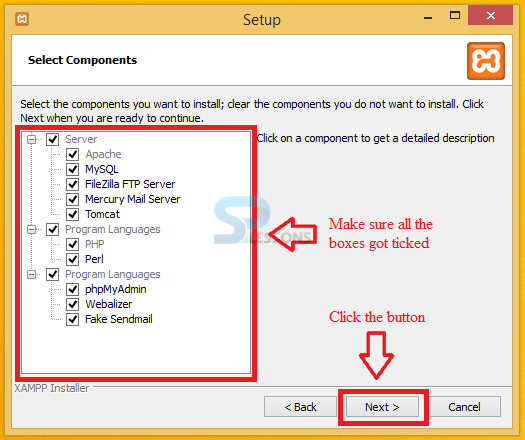
Step 3
On clicking the Next button, a Select Components window appears. Select all the components and proceed by clicking the Next button as shown in the image below.
Step 4
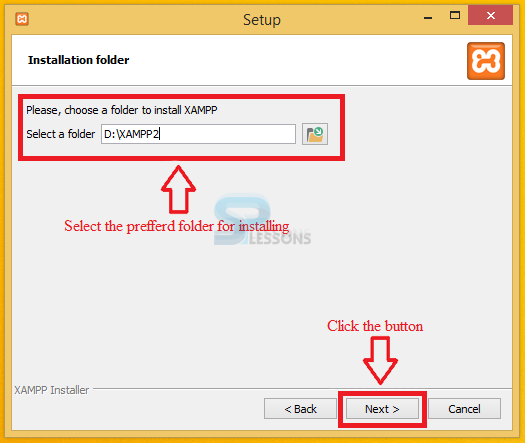
Now, a Installation folder window appears. Select the preferred folder for installing the XAMPP and proceed by clicking the Next button as shown in the image below.
Step 5
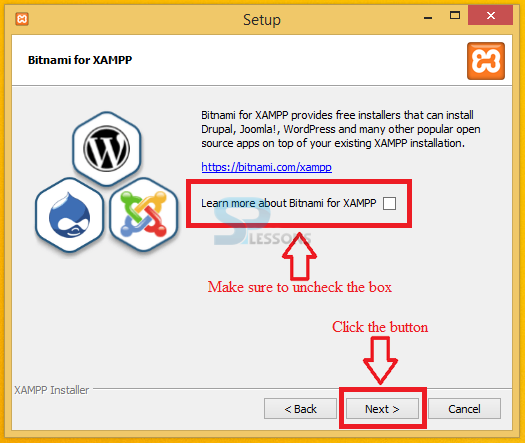
Now, a Bitnami for XAMPP window appears. Uncheck the check box in the window and proceed by clicking the Next button as shown in the image below.
Step 6
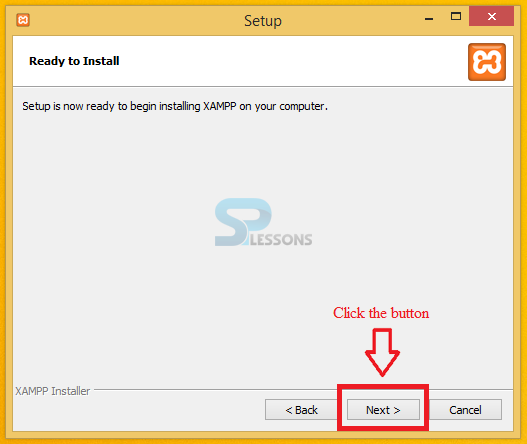
By clicking next, a Ready to Install window appears. Click the Next button as shown in the image below.
Step 7
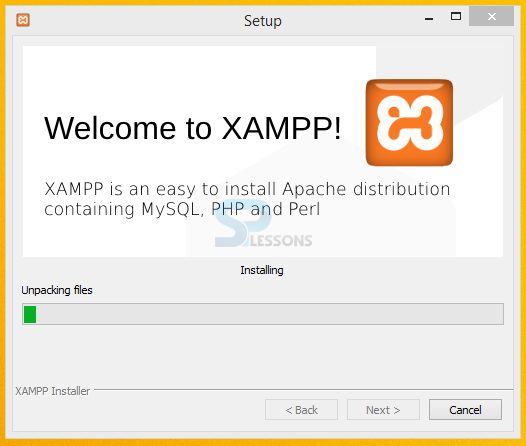
Now, a window appears installing the XAMPP as shown in the image below.
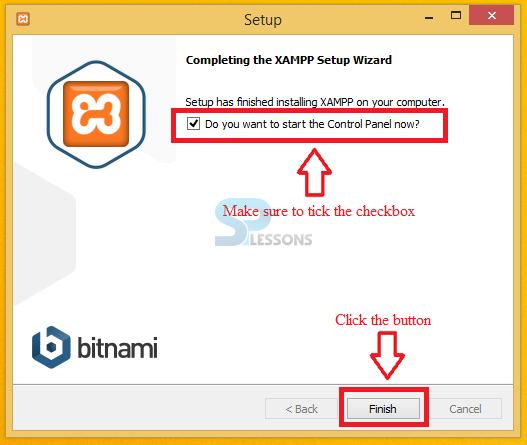
Step 8
After completing the installation part, a Completing the XAMPP Setup window appears. Select the check box and proceed by clicking the Finish button.
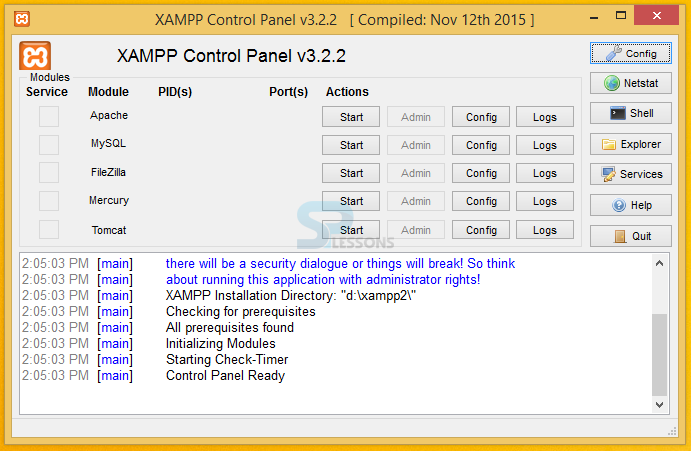
Step 9
Finally after completing the above process, the XAMPP control panel gets displayed as shown in the image below.
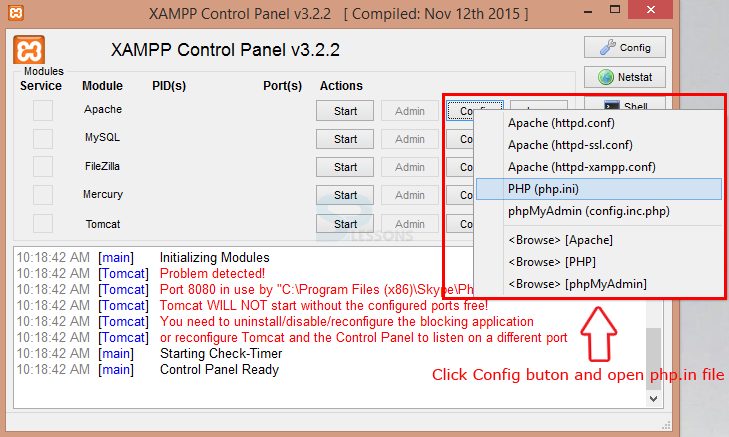
Step 10
Before starting Xampp, click on the “Config” button of “Apache” and open “php.in” file.
 Now, turn on the extensions shown below by simply removing the “;” at the beginning of each line in order to enable the extensions.
[c]
;extension=php_curl.dll
;extension=php_mcrypt.dll
;extension=php_pdo_sqlite.dll
;extension=php_pdo_mysql.dll
;extension=php_soap.dll
;extension=php_intl.dll
;extension=php_xsl.dll
[/c]
Now, turn on the extensions shown below by simply removing the “;” at the beginning of each line in order to enable the extensions.
[c]
;extension=php_curl.dll
;extension=php_mcrypt.dll
;extension=php_pdo_sqlite.dll
;extension=php_pdo_mysql.dll
;extension=php_soap.dll
;extension=php_intl.dll
;extension=php_xsl.dll
[/c]
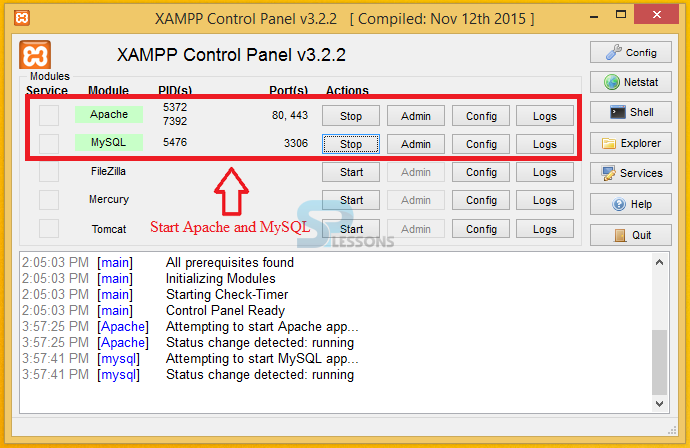
Step 11
Click start for both Apache and MySQL, where Apache is a web server and MySQL is a data base.
Description
Download latest Magento & sample data zip file from the official Magento website.
Select the preferred format from the drop down list and click on the Download button as indicated in the above image.
 Extract the Magento zip file in the preferred folder and drag the entire folder into the XAMPP -> htdocs folder as shown in the image below.

Description
To setup the configuration for Magento, first create a database. The following steps explain the procedure for creating a database.
Step 1
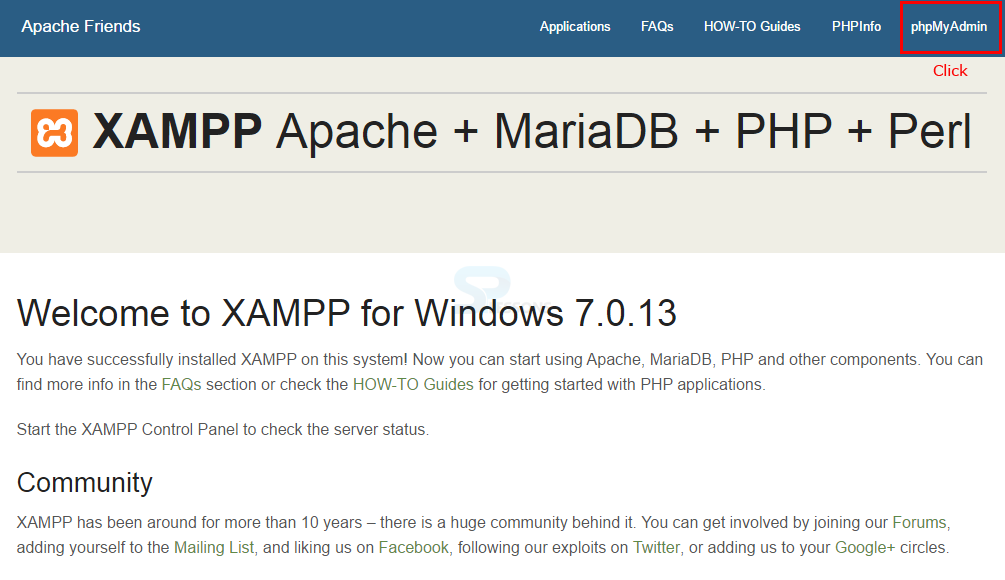
Open the browser and type localhost to get the XAMPP control board. Click phpMyAdmin option on the page available at the top of the page as shown in the image below.
Step 2
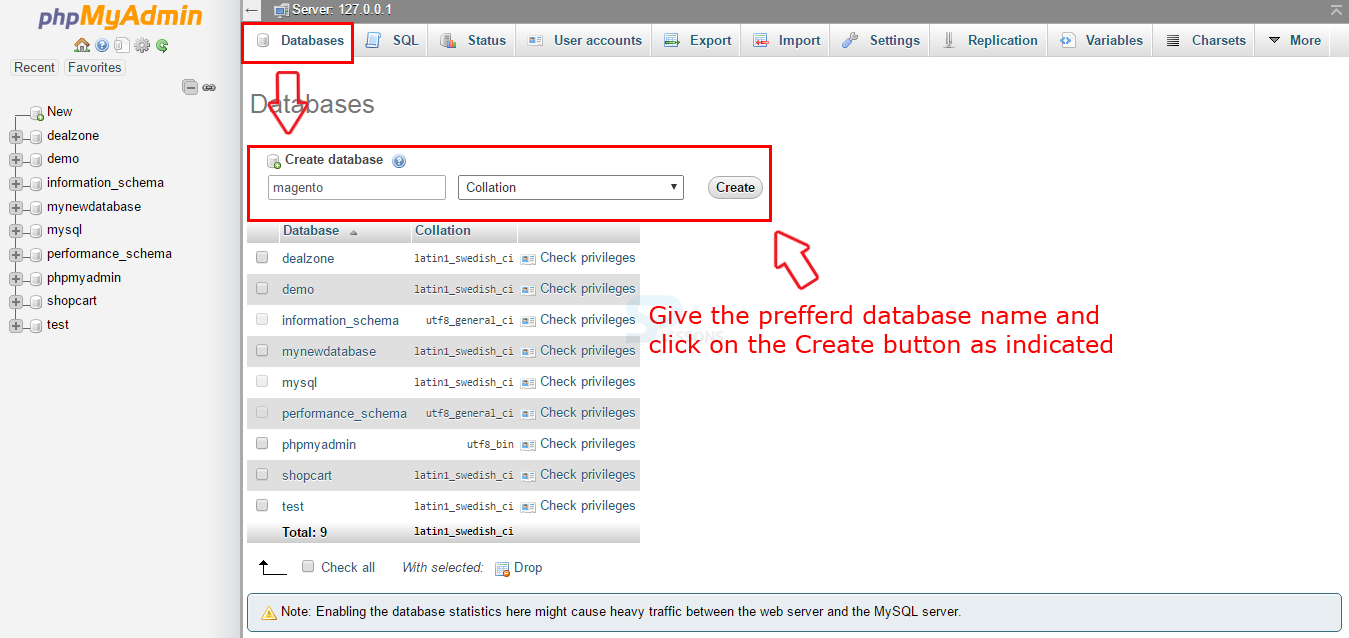
By clicking the option phpMyAdmin, a page appears where the user can create database by clicking the Database button on the top of the page, Give the preferred name for the database and click the button Create as shown in the image below.
Step 3
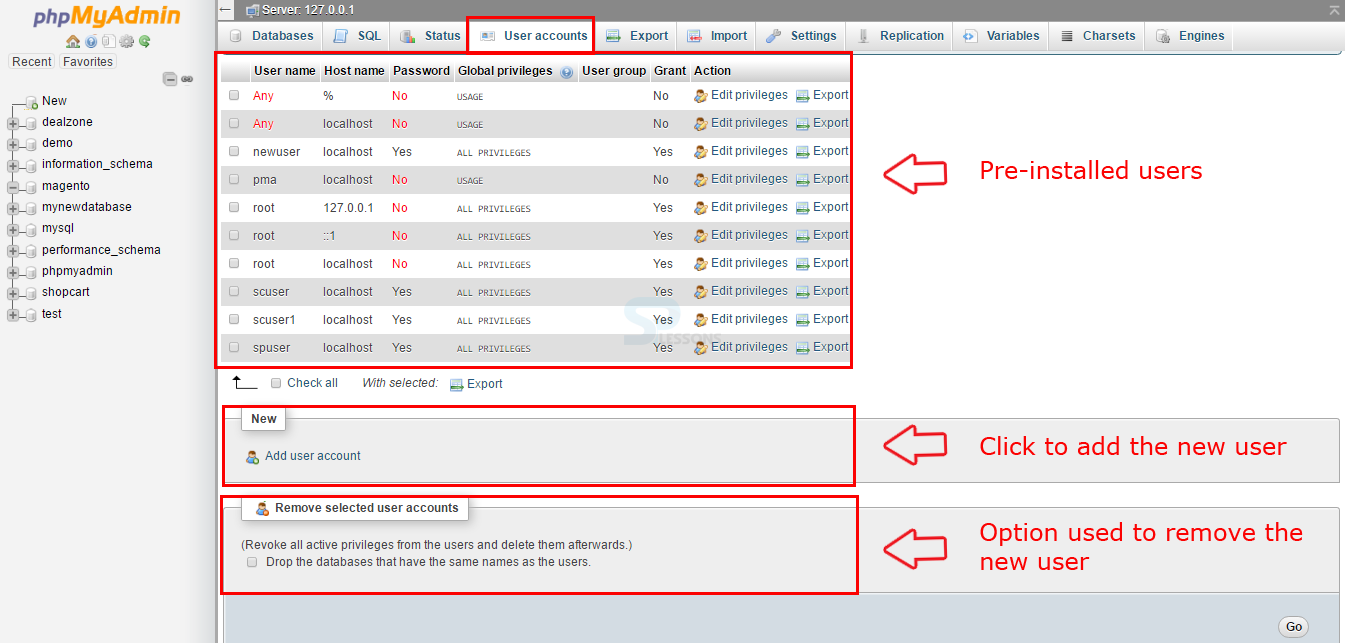
To add a new user, go back to the phpMyAdmin page and click User accounts option present on the top of the page. A page containing some pre-installed users and some options for creating or removing the users will appear. Click the option Add user account.
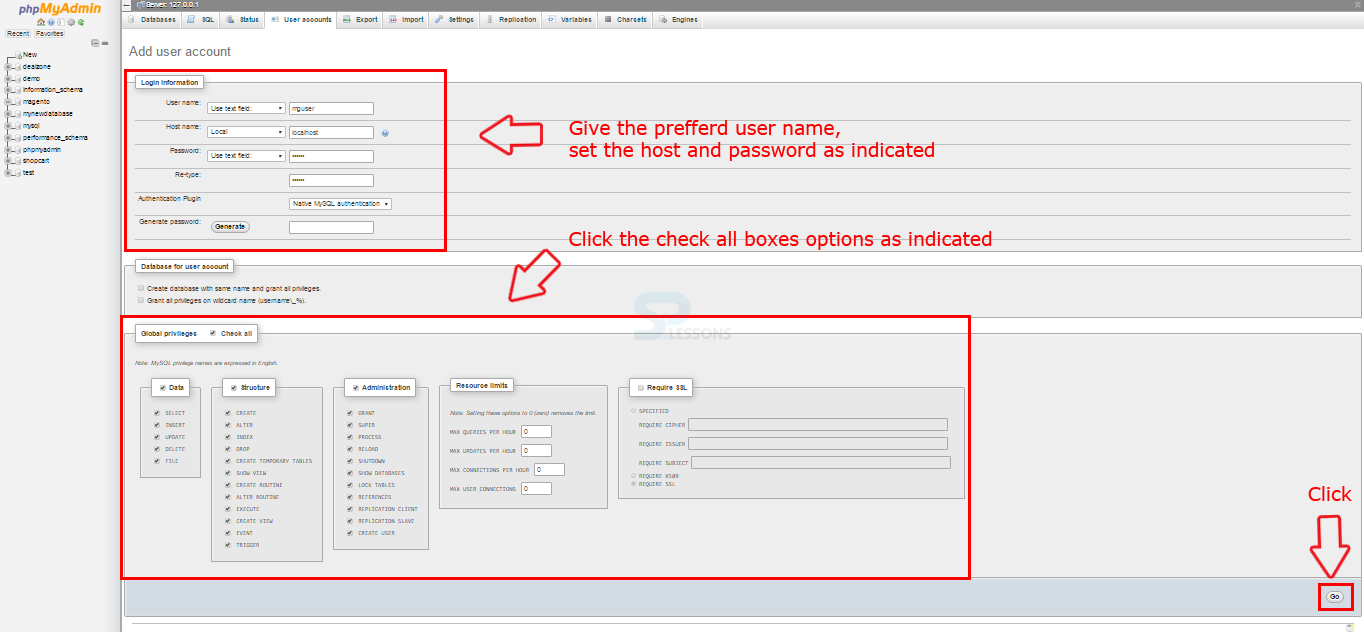
 A page containing some options like user name, password will appear. Give the preferred user name and password and click the check all box and click on Go button at the bottom as shown in the image below.
Step 4
To allocate a new user, go back to the created data base and click the option called Privileges. By clicking, a page containing the users in that data base will appear. Even clients can create a new user by clicking the Add user account option as shown in the image below.

Description
Now, open a new tab in browser and go to the following path
127.0.0.1/magento
The above path navigates to a setup wizard for Magento. The steps below demonstrate the procedure of Magento installation.
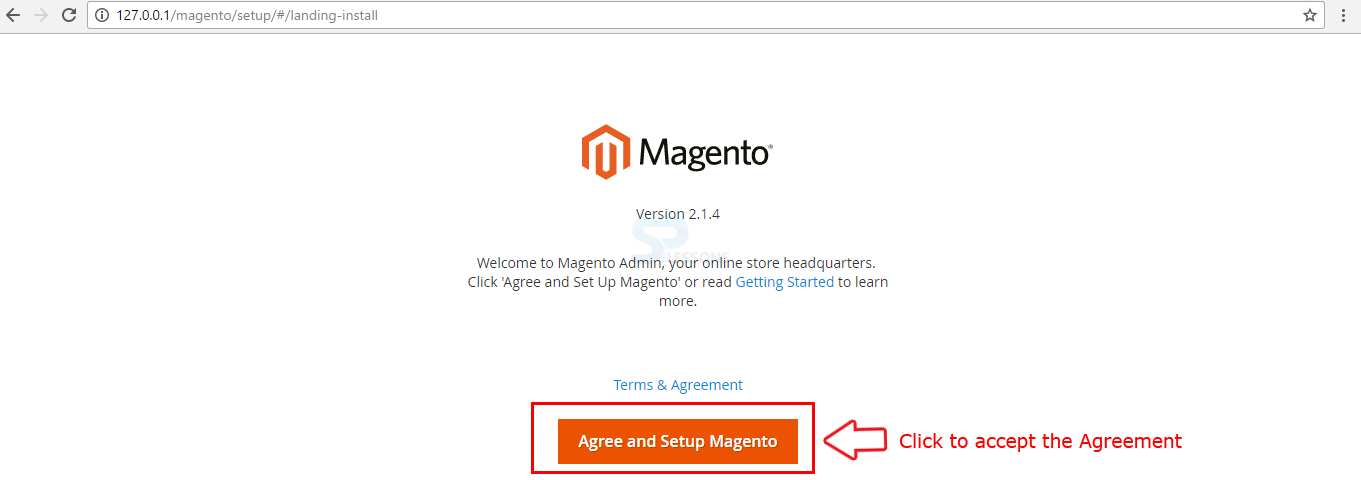
Step 1
Accept the agreement by clicking the Agree and Setup Magento button as shown in the image below.
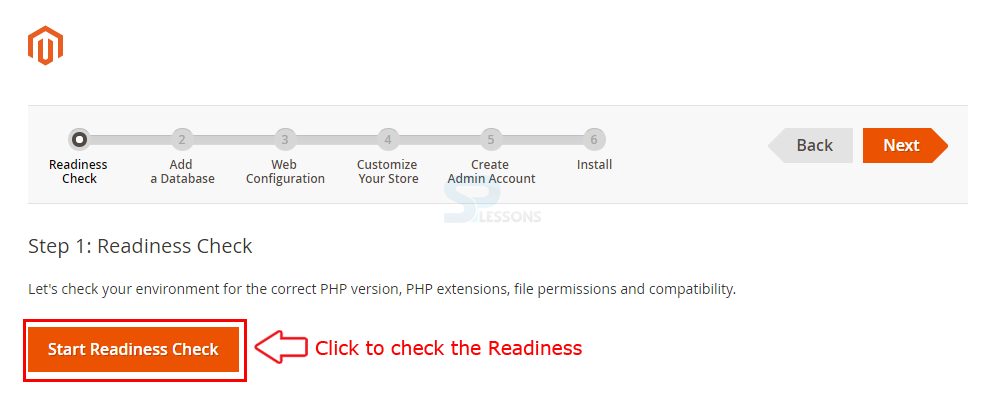
Step 2
Now the page redirect and display the steps for installing Magento and the first step called as Readiness Check, click on the button Start Readiness Check for checking the correct PHP version, PHP extensions, file permissions and compatibility as shown in the image below.
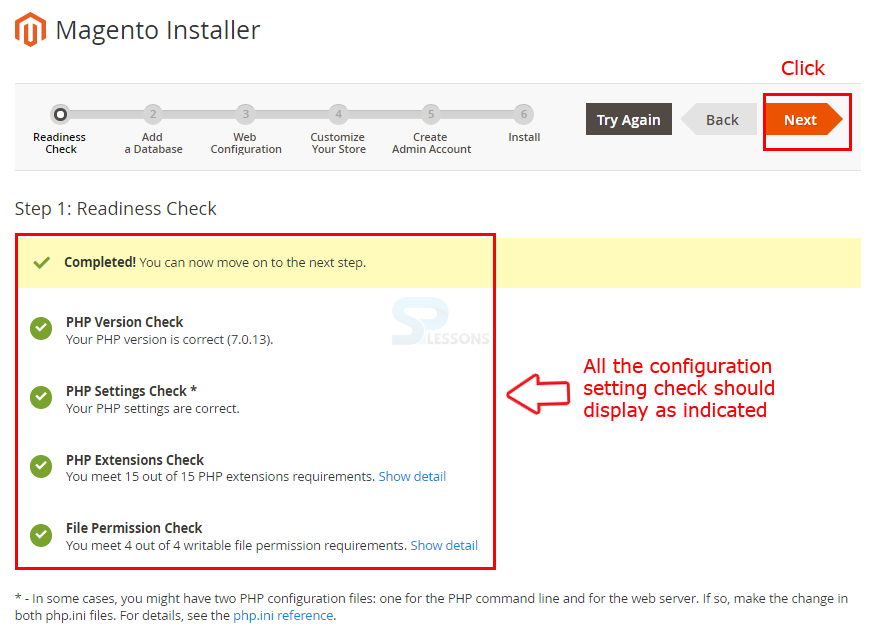
 Once Completing the Readiness Check the page should display the tick marks with green color as indicated in the image below, once done proceed by clicking Next button.
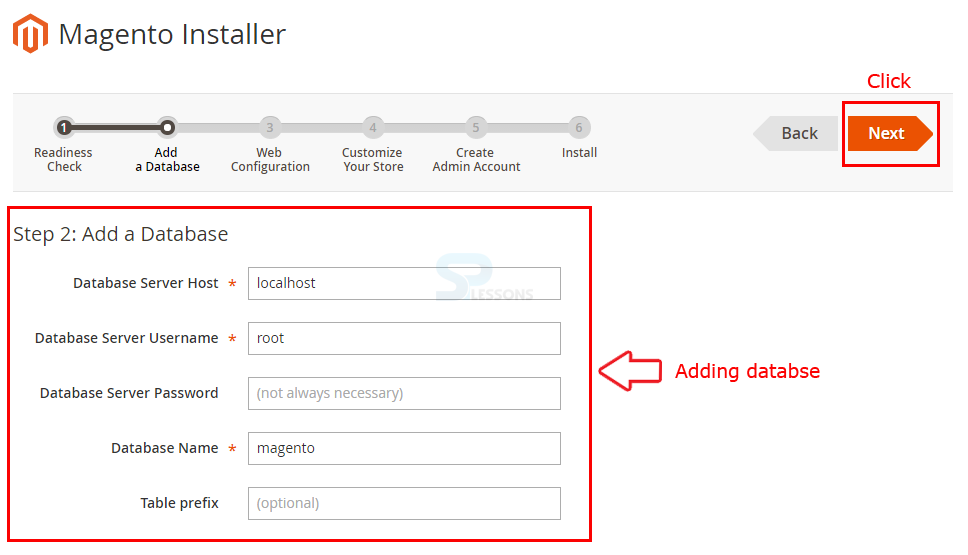
Step 3
The page now redirect to the next step, one can add the Database in this step once done click on the Next button to proceed as shown in the image below.
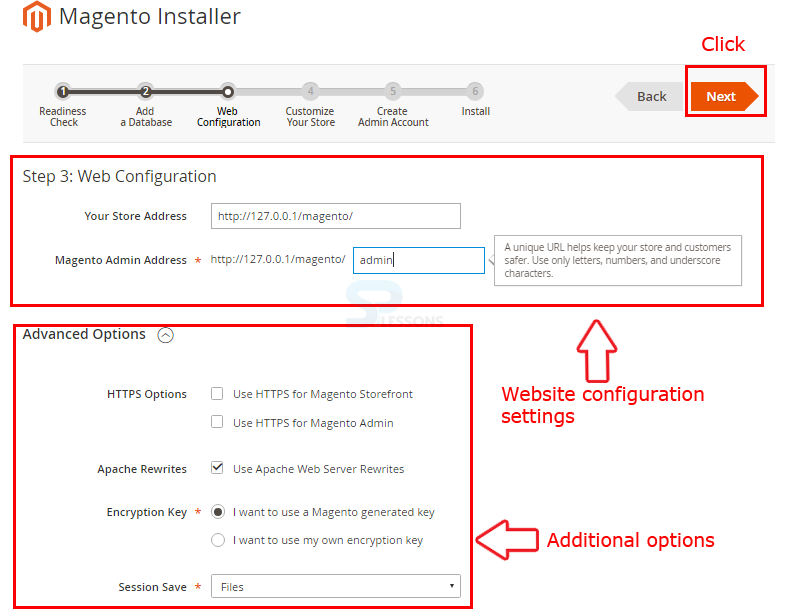
Step 4
The page now redirect to the next step, one can setup the store and admin address along with few additional options or continue with the default settings, once done click on the Next button to proceed as shown in the image below.
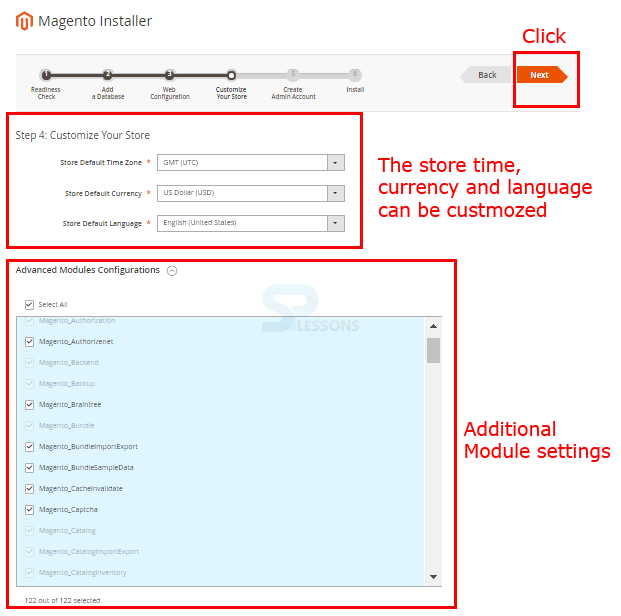
Step 5
The page now redirect to the next step, one can customize the store Time, Currency and the Language or continue with the default settings and can also select few additional modules from the drop down list, once done click on the next button to proceed as shown in the image below.
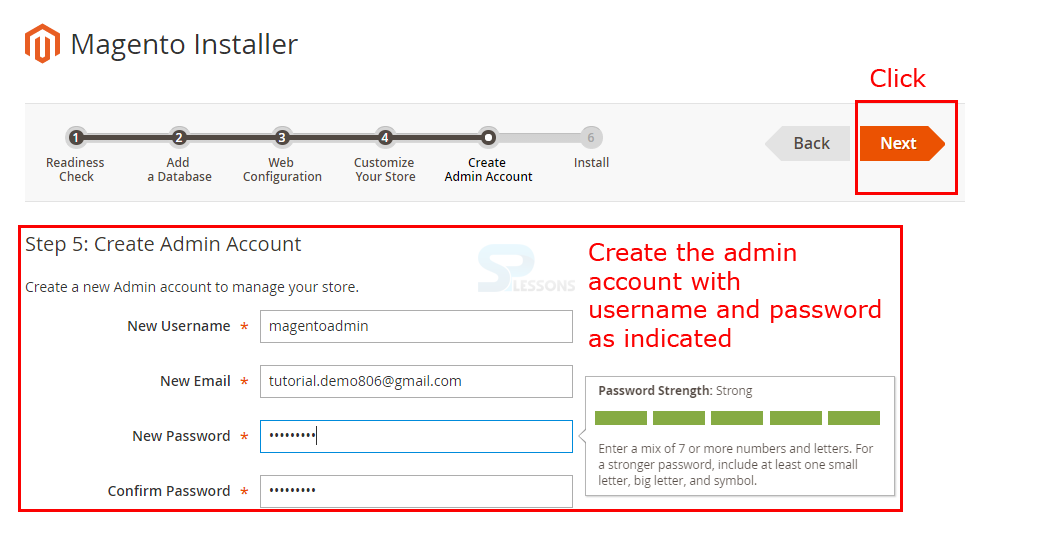
Step 6
The page now redirect to the next step, here one can create Username and Password for the Admin account, once done click on the Next button to proceed as shown in the image below.
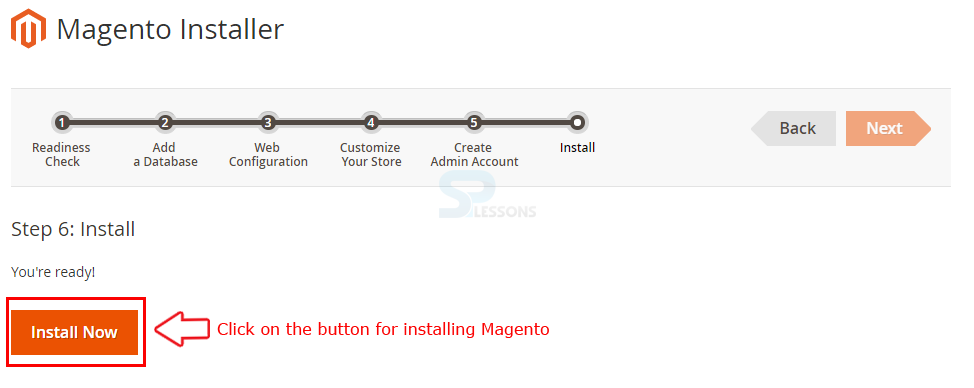
Step 7
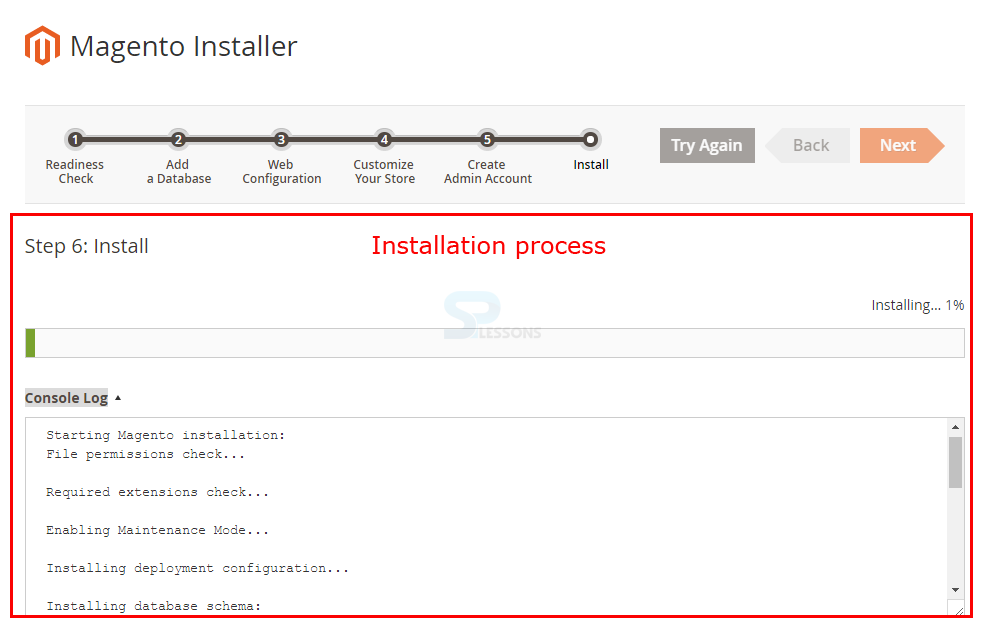
The page now redirect to the final step of installation, click on the Install Now button to install Magento as shown in the image below.
 The page starts installing the Magento and one can click on Console Log to check the installation process as shown in the image below.
Step 8
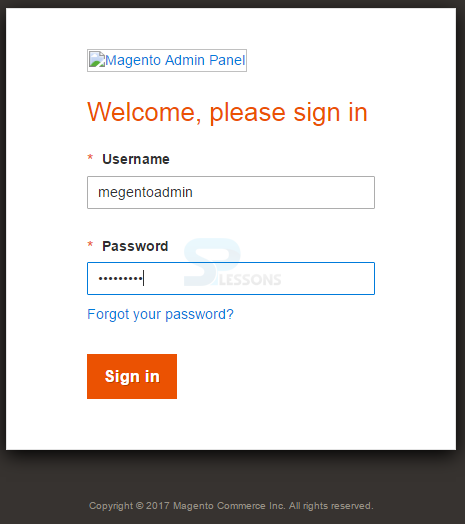
After completing the installation the page display the Success message along with the admin details and click on the button Lunch Magento Admin to lunch the Magento Admin as indicated in the image.

Step 9
The page redirect and opens a new tab, give the username and password given while installing the Magento in the username and password fields and click Sign in button for accessing the admin panel.
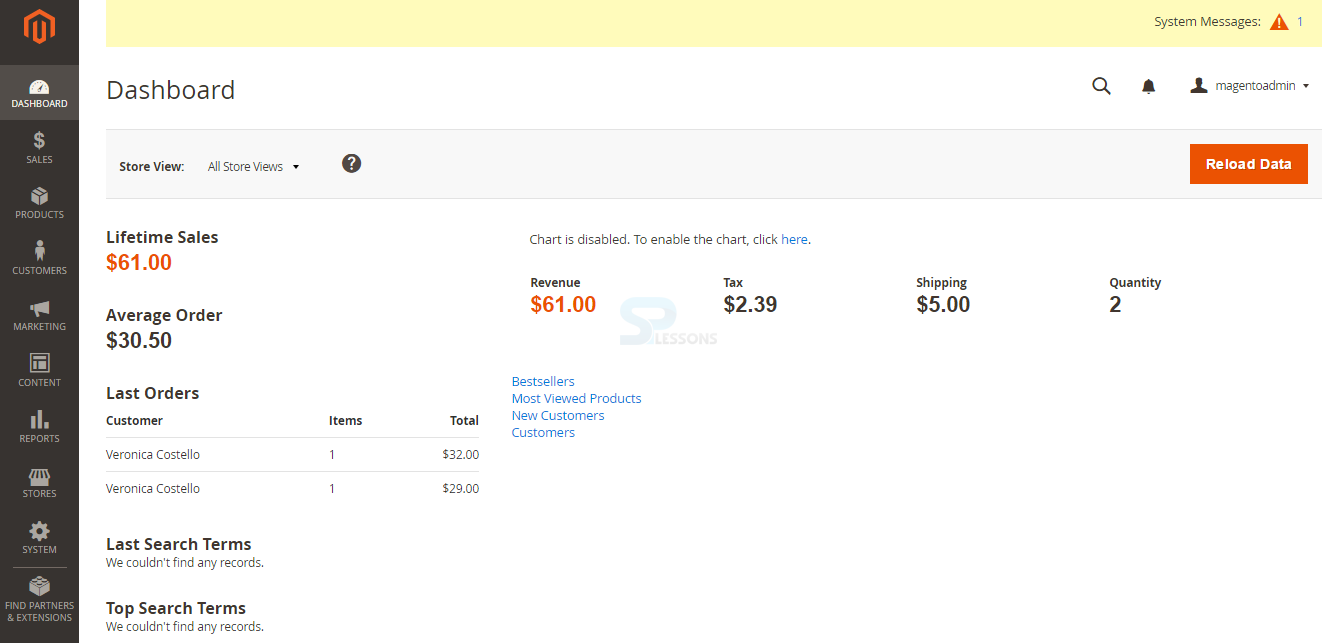
Step 10
The page now display the Admin panel as shown in the image below.
Key Points
- Magento is not easy to work when compare to other platforms.
- XAMPP is a prominent web server utilized as a part of PHP advanced environment.
- One need to create a database in order to configure Magento.