 Introduction
From the Admin view, attributes are the fields that ought to be completed while adding a product. The input type that is allocated to an attributes decides the kind of information that can be entered and the filed format or input control. From the customers view, attributes give information about the product, for example, data entry fields and few options for buying an item. Following are the major concepts covered in this chapter.
- Attributes
- Creating a Product Attribute
 Description
Attributes are pieces of data that may show up as fields in products, reports, forms, email messages and reviews. A few attributes are incorporated with the framework, and others can be built to address particular needs. It is most important that the Magento utilizes attributes to deal with the data related with products, product ratings, and customers.
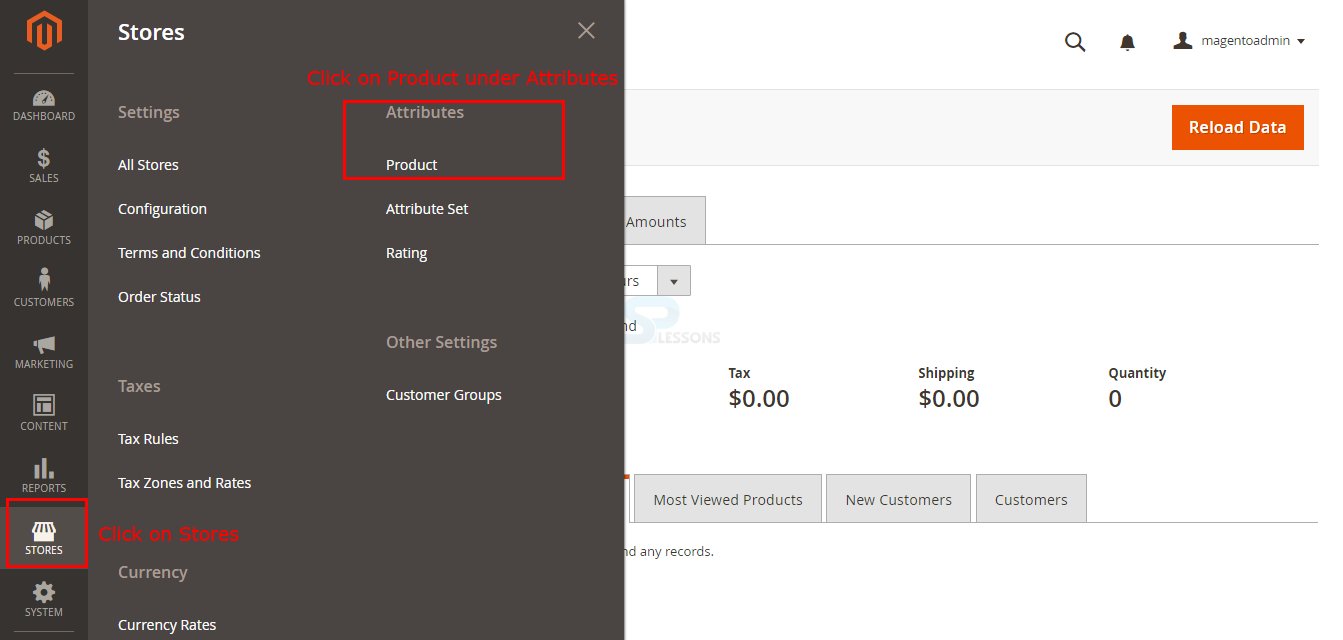
The Magento store is predefined with few attributes like name, description and price which can be utilized for all products. One can likewise create another custom attributes to help the customers. In order to build a new attribute, first login to the admin dashboard and go to the path Stores -> Attributes -> Product section as shown in the image below.
 Description
By navigating to Store -> Attributes -> Product section will open up a page containing the list of all the available current attributes, in order to create a new attribute click on the Add New Attribute button as indicated in the below image.
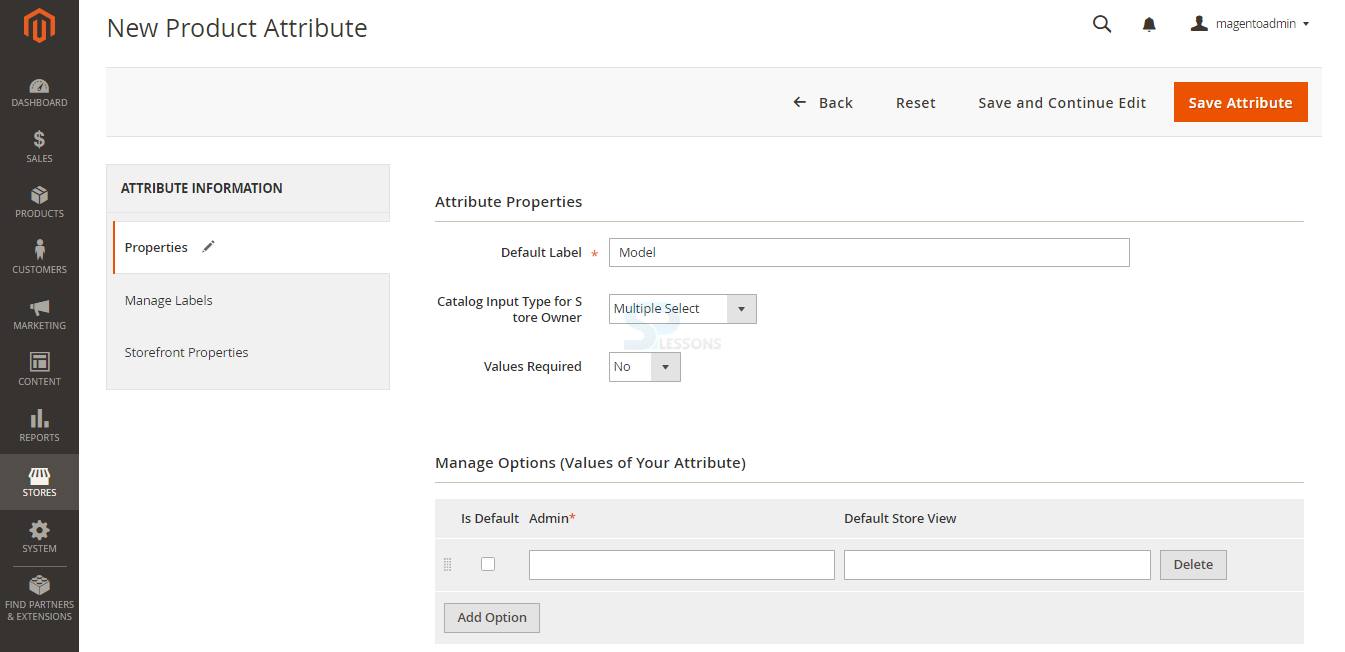
The page now redirect and display few tabs named Properties, Manage Labels and Storefront Properties for creating an attribute, under the Attribute Properties setup the following information.
Attribute Properties -
Default label -
Give a default label in order to identify the attribute.
Catalog Input Type for Store Owner -
Set the input control type for data entry.
Values Required -
Set the Value Required to yes, if one want the customer to choose an option before purchasing the product or else set the value as No.
Manage Options -
Manage Options are enabled in some special cases when selecting Multiple Select Input Types or Dropdown from the Catalog Input Type for Store Owner option. Click on Add Option and enter the first value which is to be appeared in the list. Enter one value for the admin and a value translation for each store view. Select the Is Default check box to use the default value.
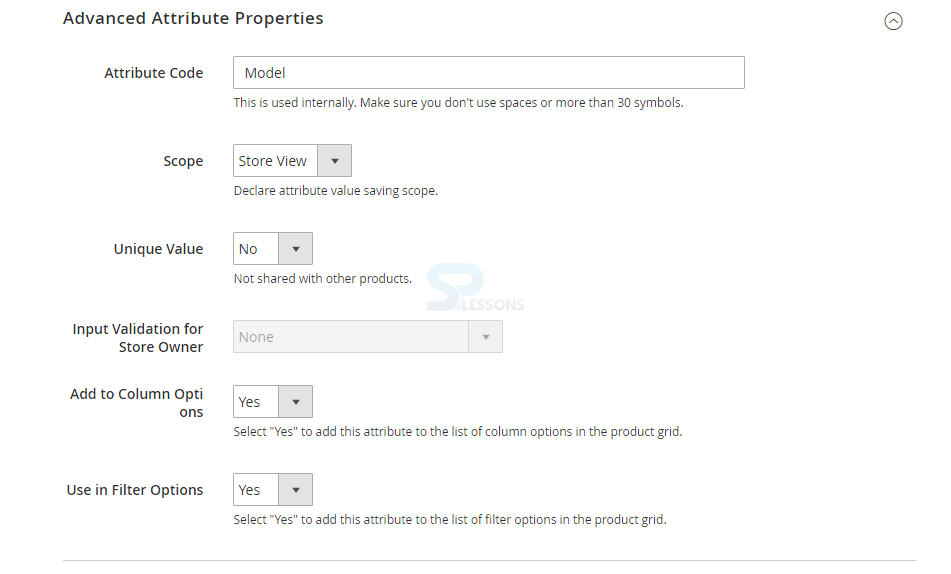
Under the Advance Attribute Properties setup the following information.
Attribute code -
Give the attribute name used by the system.
Scope -
Select the attribute value saving scope from the dropdown box, by selecting the Store View the value of the product attribute will be different in all the websites, by selecting the Website the value of the product attribute will be different in different websites but should be same between the Store views which contained under the same website. By selecting the Global the value of the product attribute should be same for all the stores and websites.
Unique Value -
Set the value to Yes, if one want to save the attribute data unique for each product or set the value to No if having the different products with the same features.
Input Validation for Store Owner -
Set the value to yes, if one want to validate the data before assigning to the attribute.
Add to Column Options -
Set the value to yes, if want to add the attribute to the list of the column options in the product grid.
Use in Filter Options -
Set the value to yes, if want to add the attribute to the list of filter options in the product grid.
Manage Labels -
In this section, give the title which is to be used as a label for the filed as indicated in the image below.
Storefront Properties -
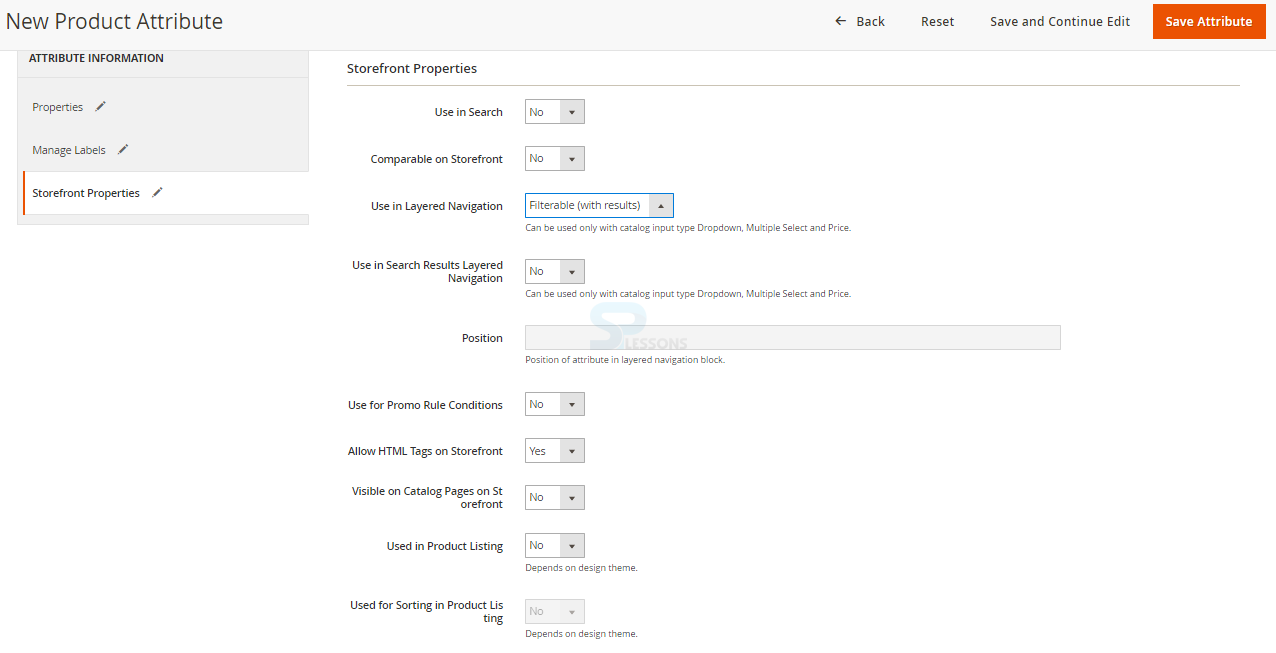
In the Storefront Properties section one can configure the attribute behavior in the frontend, the following information need to be set in this section for creating an attribute.
Use in Search -
Set the value to Yes, if need the attribute available while searching or set as default.
Comparable on Storefront -
Set the value to Yes, if need to include the attribute while comparing any product or set as default.
Use in Layered Navigation -
Set the value to Yes or set as default and can be used only with catalog input type Dropdown, Multiple Select and price.
Use in Search Results Layered Navigation -
Set the value to Yes or set as default and can be used only with catalog input type Dropdown, Multiple Select and price.
Position -
The option is used to set the Position of the attribute in the layered navigation block.
Use for Promo Rule Conditions -
Set the value to Yes, if need to use the attribute in the price rules.
Allow HTML Tags on Storefront -
Set the value to Yes, if need to allow the text formatted to HTML.
Visible on Catalog Pages on Storefront -
Set the value to Yes, to allow the attribute to visible in the catalog pages.
Used in Product Listing -
Set the value to Yes, in order to allow the attribute in listing the products.
Used for Sorting in Product Listing -
Set the value to Yes, in order to use an attribute as a selected parameter for product listing.
After performing all the required set up information click on the Save Attribute button available on the top right corner of the page as indicated in the below image.
 Key Points
- Attributes are useful for providing information regarding products for the customers.
- Attributes are considers as the important part of a product catalog in Magento.
- Magento have few predefine attributes such as price, name and dexcription.


