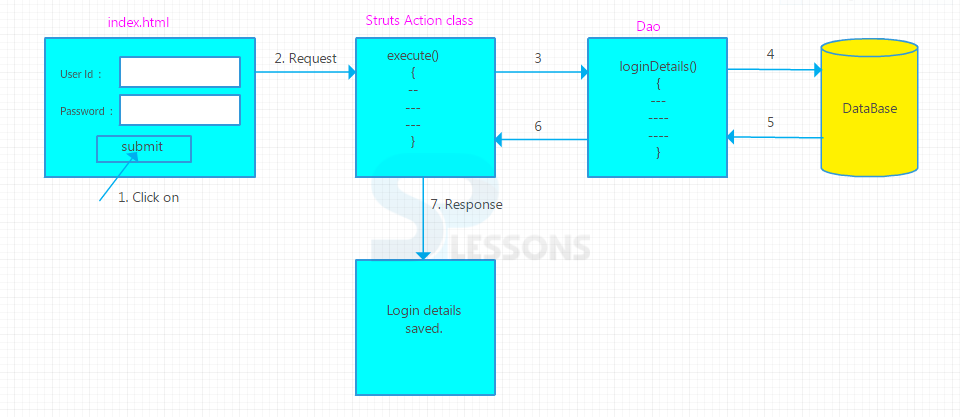
- Create the index.jsp and formBean class and configure in struts_config.XML file.
index.jsp
[java]
<html>
<body>
<form action="Login.do">
UserId:<input type="text" name = "userId"/>
password:<input type=&"password" name="password"/>
<input type="submit" value="submit"/>
</form>
</body>
</html>
[/java]
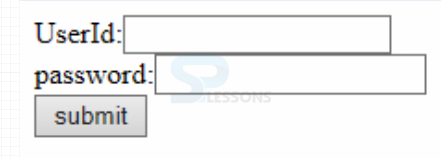
Here the developer just created two text boxes for enter the UserID, password, and also created submit button.
web.xml
[xml]
<servlet>
<servlet-name>struts</servlet-name>
<servlet-class>org.apache.struts.action.ActionServlet</servlet-class>
<init-param>
<param-name>config</param-name>
<param-value>structs_config.xml</param-value>
</init-param>
</servlet>
<servlet-mapping>
<servlet-name>struts</servlet-name>
<url-pattern>*.do</url-pattern>
</servlet-mapping>
[/xml]
Here make sure that
servlet-name should be same and struts configuration file has mentioned in the .
FormBeanClass.java
[java]package com.itoolsinfo;
import org.apache.struts.action.ActionForm;
public class FormBeanClass extends ActionForm
{
private int userId;
private String password;
public int getUserId() {
return userId;
}
public void setUserId(int userId) {
this.userId = userId;
}
public String getPassword() {
return password;
}
public void setPassword(String password) {
this.password = password;
}
}
[/java]
Here created the class FormBeanClass that is extending the ActionForm with the variables of userId, password. Set and Get methods are used here, this keyword is used to refer the current object.
structs_config.xml
[xml]
<struts-config>
<form-beans>
<form-bean name="FormBeanClass" type="com.itoolsinfo.FormBeanClass"/>
</form-beans>
"action-mappings>
<action path="/Login" name="FormBeanClass" type="com.itoolsinfo.LoginAction" scope="request">
<forward name="success" path="/success.jsp"></forward>
<forward name="failure" path="/failure.jsp"></forward>
</action>
</action-mappings>
</struts-config>
[/xml]
Here forward tag is used to call the success file and failure file.
- Create the persistence class.
UserLogin.java
[java]package com.itoolsinfo.model;
public class UserLogin
{
private int userId;
private String password;
public int getUserId() {
return userId;
}
public void setUserId(int userId) {
this.userId = userId;
}
public String getPassword() {
return password;
}
public void setPassword(String password) {
this.password = password;
}
}
[/java]
Here created another class with the name UserLogin and also used Set and Get methods, this keyword is used refer the current object.
- To map the persistence class in mapping file.
userlogin.hbm.xml
[xml] <hibernate-mapping>
<class name="com.itoolsinfo.model.UserLogin" table="userlogindetails" >
<id name="userId">
<generator class="assigned"></generator>
</id>
<property name="password"></property>
</class>
</hibernate-mapping>
[/xml]
The
generator class subelement of id utilized to produce the unique identifier for the objects of persistence class. There are numerous generator classes characterized in the Hibernate Framework. All the generator classes actualizes the
org.hibernate.id.IdentifierGenerator interface.
- Configure the mapping file in Configuration file.
hibernate.cfg.xml
[xml]
<?xml version='1.0' encoding='UTF-8'?>
<!DOCTYPE hibernate-configuration PUBLIC "-//Hibernate/Hibernate Configuration DTD 3.0//EN" "http://hibernate.sourceforge.net/hibernate-configuration-3.0.dtd">
<hibernate-configuration>
<session-factory>
<property name="connection.driver_class">oracle.jdbc.driver.OracleDriver</property>
<property name="connection.url">jdbc:oracle:thin:@localhost:1521:XE</property>
<property name="connection.username">system</property>
<property name="connection.password">system</property>
<property name="dialect">org.hibernate.dialect.Oracle10gDialect</property>
<property name="hibernate.hbm2ddl.auto">create</property>
<property name="show_sql">true</property>
<mapping resource="userlogin.hbm.xml"/>
</session-factory>
</hibernate-configuration>
[/xml]
| Properties |
Description |
| hibernate.connection.driver_class |
The JDBC driver class. |
| hibernate.dialect |
This property makes Hibernate generate the suitable SQL for the picked database. |
| hibernate.connection.url |
The JDBC URL to the database instance. |
| hibernate.connection.username |
The database username. |
| hibernate.connection.password |
The database password. |
| hibernate.connection.pool_size |
Limits the number of connections waiting in the Hibernate database connection pool. |
| hibernate.connection.autocommit |
Allows autocommit mode to be used for the JDBC connection. |
- Create the LoginForm class. It will get request from ActionForm class and give the input values.
LoginForm.java
[java]package com.itoolsinfo.model;
import org.hibernate.Session;
import org.hibernate.SessionFactory;
import org.hibernate.Transaction;
import org.hibernate.cfg.Configuration;
public class LoginForm
{
public boolean loginDetails(int userId, String password)
{
boolean flag=true;
SessionFactory factory=new Configuration().configure("hibernate.cfg.xml").buildSessionFactory();
Session session=factory.openSession();
UserLogin userLogin = new UserLogin();
userLogin.setUserId(userId);
userLogin.setPassword(password);
Transaction transaction=session.beginTransaction();
try
{
session.save(userLogin);
transaction.commit();
}catch(Exception e)
{
transaction.rollback();
flag=false;
}
session.close();
return flag;
}
}
[/java]
This is the log in page, Application acquires session objects from Session Factory.
SessionFactory is for the most part arranged as Singleton in application, SessionFactory stores produce SQL statements and other mapping metadata that Hibernate utilizes at runtime.
- Create the LoginAction class and create the Dao class object in Action class to give the response success or failure JSP pages.
LoginAction.java
[java]package com.itoolsinfo;
import javax.servlet.http.HttpServletRequest;
import javax.servlet.http.HttpServletResponse;
import org.apache.struts.action.Action;
import org.apache.struts.action.ActionForm;
import org.apache.struts.action.ActionForward;
import org.apache.struts.action.ActionMapping;
import com.iquickinfo.model.LoginForm;
public class LoginAction extends Action
{
public ActionForward execute(ActionMapping mapping, ActionForm form, HttpServletRequest request, HttpServletResponse response)
{
FormBeanClass formBean = (FormBeanClass) form;
ActionForward af = null;
int userId= formBean.getUserId();
String password = formBean.getPassword();
LoginForm loginForm = new LoginForm();
boolean b = loginForm.loginDetails(userId, password);
if(b){
af = mapping.findForward("success");
}else{
af = mapping.findForward("failure");
}
return af;
}
}
[/java]
This is action page if it correct then it access success page otherwise it access failure page.
success.jsp
[java]
<html>
<head>
<meta http-equiv="Content-Type" content="text/html; charset=ISO-8859-1">
<title>Insert title here</title>
</head>
<body>
<h1>SpLessons Login Details successfully saved.</h1>
</body>
</html>
[/java]
This page is used to display the text that
SpLessons Login Details successfully saved.
failure.jsp
[java]
<html>
<head>
<meta http-equiv="Content-Type" content="text/html; charset=ISO-8859-1">
<title>Insert title here</title>
</head>
<body>
<h1>Invalid userId and password. </h1>
</body>
</html>
[/java]
This page is used to display the text that
Invalid userId and password.
- Add all the jar files in lib folder.
- Hibernate jars,
- struts jars,
- ojdbc14.jar
- Run the application in server and display the JSP page.
- Enter the userId and password. After displaying the output in command line, give the response on browser.
- One can check the output in database table for conformation whether the data will be saved or not.
[sql]select * from userlogindetails;[/sql]
Output
 Description
  Conceptual
figure
  Examples
  Key Points


