 Introduction
ANT NetBeans should be installed to run a project. The following topics are covered in ANT NetBeans chapter:
- Running Java Code
- Running Project
 Description
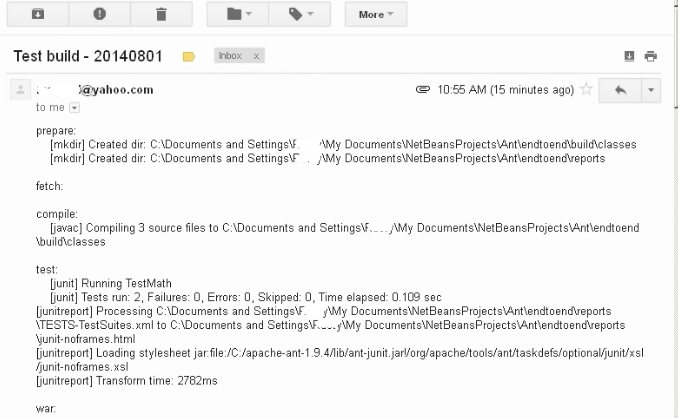
Sending mails is the last process. Before sending, one has to stop report recording process as it depends on halting the recorder.
If they are multiple files, users need to zip the files to send along with the files of the report directory. And, the file name should be same as of the project name.
SMTP server is required to use mail task, which defines the host machine where host address, date, from/to addresses can be included.
 Examples
[java]
<target name="sendmail" depends="deploy, stoprecorder">
<zip destfile="${name}-${DSTAMP}-reports.zip" basedir="${reports.dir}" excludes="**/*.xml" />
<mail mailhost="${mail.host}" user="${mail.user}" password="${mail.pass}" ssl="true" mailport="${mail.port}" subject="Test build - ${DSTAMP}">
<from address="${mail.from.address}"/>
<to address="${mail.to.address}"/>
<message src="${name}-${DSTAMP}-log.txt" />
<attachments>
<fileset dir=".">
<include name="${name}-${DSTAMP}-reports.zip"/>
</fileset>
</attachments>
</mail>
</target>
[/java]
 Description
Take sample java code and name it as TestMath.java, Math.java and HelloWorld.java. All these files are to be created under src folder.
 Examples
TestMath.java
[java]
import junit.framework.*;
public class TestMath extends TestCase {
public void testAdd() {
int num1 = 3;
int num2 = 2;
int total = 5;
int sum = Math.add(num1, num2);
assertEquals(sum, total);
}
public void testMulitply() {
int num1 = 3;
int num2 = 7;
int total = 21;
int sum = Math.multiply(num1, num2);
assertEquals("Problem with multiply", sum, total);
}
}[/java]
Math.java
[java]
public class Math {
static public int add(int a, int b) {
return a + b;
}
static public int multiply ( int a, int b) {
return a * b;
}
}[/java]
HelloWorld.java
[java]
public class HelloWorld {
public static void main(String[] args) {
System.out.println("Hello, world!");
System.out.println(args[0]);
}
}[/java]
 Description
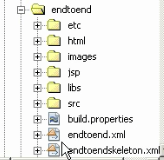
Build the project in NetBeans by creating a new project. The code will look like:
 Step-1
Initially, place all the files in the respective folder.
endtoend.xml
[java]
<?xml version="1.0" encoding="UTF-8"?>
<project name="End to End Build" default="sendmail" basedir=".">
<target name="init">
<tstamp />
<property file="build.properties" />
<path id="classpath">
<pathelement path="${servlet.jar}" />
<pathelement path="${junit.jar}" />
</path>
<property name="classpath" refid="classpath" />
</target>
<target name="startrecorder">
<record name="${name}-${DSTAMP}-log.txt" action="start" append="false" />
</target>
<target name="prepare" depends="init, startrecorder">
<mkdir dir="${build.dir.classes}" />
<mkdir dir="${reports.dir}" />
</target>
<target name="fetch" depends="init">
<!-- <cvs dest="${src.dir}" cvsRoot="${cvs.root}" command="update -P -d" failonerror="true" />
/> -->
</target>
<target name="compile" depends="prepare, fetch">
<javac srcdir="${src.dir}" destdir="${build.dir.classes}" classpath="${classpath}" compiler="${build.compiler}" debug="on" includeantruntime="false" />
</target>
<target name="test" depends="compile">
<junit failureproperty="testsFailed" />
<junit printsummary="yes" haltonfailure="yes" showoutput="yes" >
<classpath>
<pathelement path="${classpath}" />
<pathelement path="${build.dir.classes}" />
</classpath>
<formatter type="xml" />
<batchtest fork="yes" todir="${reports.dir}/">
<fileset dir="${src.dir}">
<include name="**/*Test*.java"/>
</fileset>
</batchtest>
</junit>
<junitreport todir="${reports.dir}">
<fileset dir="${reports.dir}" includes="TEST-*.xml"/>
<report format="noframes" todir="${reports.dir}"/>
</junitreport>
</target>
<target name="war" depends="test" unless="testsFailed">
<war destfile="${build.dir}/${war.name}" webxml="${etc.dir}/web.xml">
<fileset dir="html"/>
<fileset dir="jsp"/>
<lib dir="libs"/>
<classes dir="${build.dir.classes}">
<include name="**/*.class" />
<exclude name="**/*Test*.class" />
</classes>
<zipfileset dir="images" prefix="images"/>
</war>
</target>
<target name="deploy" depends="war" unless="testsFailed">
<ftp server="${server.name}" remotedir="${remote.dir}" userid="${user.id}" password="${password}" passive="yes" binary="yes" verbose="yes">
<fileset dir="${build.dir}">
<include name="${war.name}"/>
</fileset>
</ftp>
</target>
<target name="stoprecorder">
<record name="${name}-${DSTAMP}-log.txt" action="stop" />
</target>
<target name="sendmail" depends="deploy, stoprecorder">
<zip destfile="${name}-${DSTAMP}-reports.zip" basedir="${reports.dir}" excludes="**/*.xml" />
<mail mailhost="${mail.host}" user="${mail.user}" password="${mail.pass}" ssl="true" mailport="${mail.port}" subject="Test build - ${DSTAMP}">
<from address="${mail.from.address}"/>
<to address="${mail.to.address}"/>
<message src="${name}-${DSTAMP}-log.txt" />
<attachments>
<fileset dir=".">
<include name="${name}-${DSTAMP}-reports.zip"/>
</fileset>
</attachments>
</mail>
</target>
<target name="clean" depends="init">
<delete dir="${build.dir}" />
<delete dir="${reports.dir}" />
</target>
</project>[/java]
main.jsp in jsp folder.
[html]
<html>
<head><title>First JSP</title></head>
<body>
<% double num = Math.random(); if (num > 0.95) {
%>
<h2>You'll have a lucky day!</h2>
(<%= num %>)
<% } else { %>
<h2>Well, life goes on ... </h2>
(<%= num %>)
<% } %>
<a href="<%= request.getRequestURI() %>">
<h3>Try Again</h3>
</a>
</body>
</html>[/html]
index.html in html folder.
[html]
<!-- To change this template, choose Tools | Templates and open the template in the editor. -->
<!DOCTYPE html>
<html>
<head>
<title></title>
<meta http-equiv="Content-Type" content="text/html; charset=UTF-8">
</head>
<body>
<div>TODO write content</div>
</body>
</html>[/html]
web.xml in etc folder.
[java]
<?xml version="1.0" encoding="ISO-8859-1" ?>
<web-app xmlns="http://java.sun.com/xml/ns/j2ee" xmlns:xsi="http://www.w3.org/2001/XMLSchema-instance" xsi:schemaLocation="http://java.sun.com/xml/ns/j2ee http://java.sun.com/xml/ns/j2ee/web-app_2_4.xsd" version="2.4">
<display-name>HelloWorld Application</display-name>
<description>
This is a simple web application with a source code organization
based on the recommendations of the Application Developer's Guide.
</description>
<servlet>
<servlet-name>SimpleServlet</servlet-name>
<servlet-class>examples.Hello</servlet-class>
</servlet>
<servlet-mapping>
<servlet-name>SimpleServlet</servlet-name>
<url-pattern>/hello</url-pattern>
</servlet-mapping>
</web-app> [/java]
 Step-2
 Key Points
- Java codes are placed in src folder.
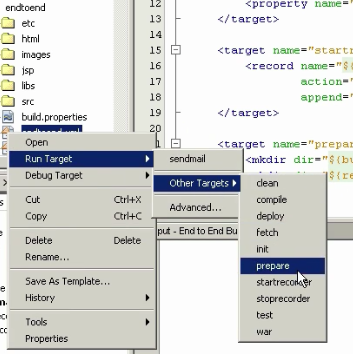
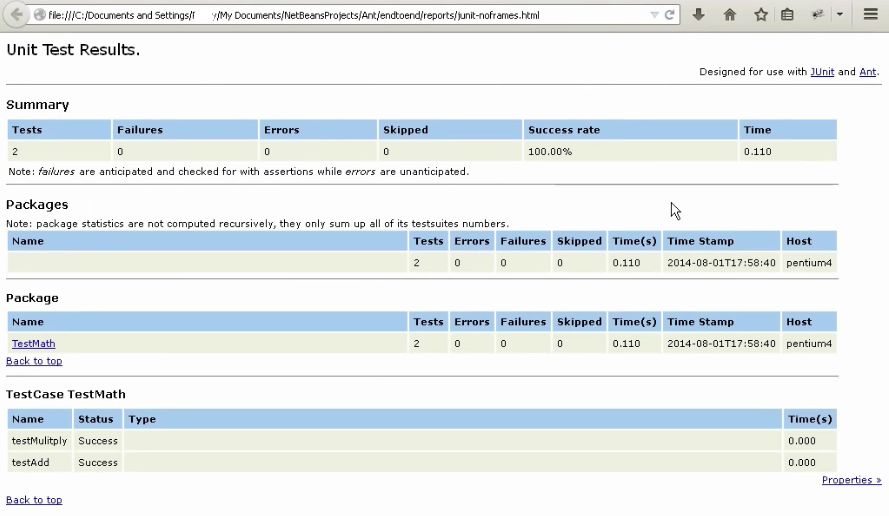
- When xml file is run, build and report directories are created automatically.


