 Introduction
The chapter Node.js web server demonstrates creating a simple and easy web server which handles the http requests, following are the concepts covered.
- Web Server
- Creating Node.js Web Server
- Building a Node.js web client
 Description
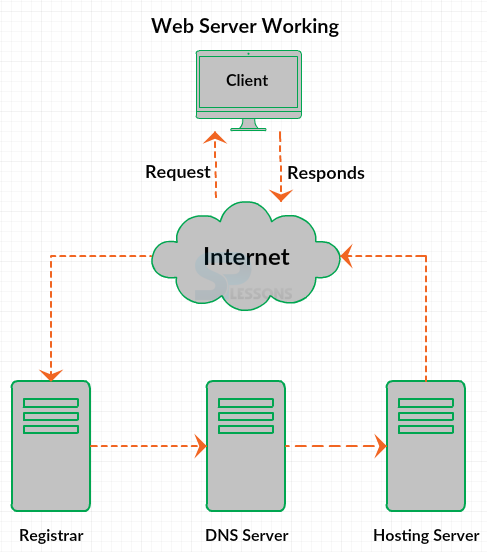
Web Servers are very useful in order to access the pages in a web application by handling the http requests sent by clients and send the responds for the request. Usually some web servers are supported by server-side scripts which uses the script languages such as web applications of ASP.NET support IIS web server, php and Java applications support Apache web server.
The figure below demonstrate the simple web server architecture.
 Description
A web server which handle http request asynchronously can be created using Node.js, the http modules are provided by Node.js in order to create the http client of a server in order to create a web server follow the step below.
 Step 1
First create a simple html file as shown below.
file.html
[html]<!DOCTYPE html>
<html>
<head>
<title>Page Title</title>
</head>
<body>
<h1>SPLessons Online Tutorials</h1>
<p>Node.js Web Server.</p>
</body>
</html>[/html]
 Step 2
Now, create a simple Node.js web server .js file with code shown below.
server.js
[c]
var http = require('http');
var fs = require('fs');
var url = require('url');
http.createServer( function (request, response) {
var pathname = url.parse(request.url).pathname;
console.log("Request for " + pathname + " received.");
fs.readFile(pathname.substr(1), function (err, data) {
if (err) {
console.log(err);
response.writeHead(404, {'Content-Type': 'text/html'});
}else {
response.writeHead(200, {'Content-Type': 'text/html'});
response.write(data.toString());
}
response.end();
});
}).listen(5000);
console.log('Server running at localhost 5000...');
[/c]
Compiling the above code will produce the output as shown in the image below.
Now, by running the file in browser using the http://localhost:5000/file.html, the output produced is as shown in the image below.
 More Info
From the above code, firstly the http module is imported using the
require() function and no need to install the module using NPM because the http module is the core module of Node.js.
The method createServer() of the http is used to call the specific callback function with the request and response parameters.
The method listen() of server object is to be used and is returned from the createServer() method with the given port number i.e. if the given port number is 8080 then the incoming request would be on port 8080. Finally in this way one can create a web server using this simple process.  Description
Creating the web client is as easy and interesting as creating a web server using the http modules in Node.js. In order to create a web client first create a simple html file as shown below.
file.html
[html]<!DOCTYPE html>
<html>
<head>
<title>Page Title</title>
</head>
<body>
<h1>SPLessons Online Tutorials</h1>
<p>Node.js Web Server.</p>
</body>
</html>[/html]
Now, create a .js file with the below code for creating a web client.
webClient.js
[c]
var http = require('http');
var options = {
host: 'localhost',
port: '5000',
path: '/html'
};
var callback = function(response){
var str = '';
response.on('data', function(chunk) {
str += chunk;
});
response.on('end', function() {
console.log(str);
});
}
var req = http.request(options, callback);
req.end();
[/c]
Compiling the above code will produce the output as shown in the image below.
 Key Points
- A web server is must to access the pages in a web application.
- The Node.js have the capacity to create one’s own web server.
- The Node.js web servers generally produce the html documents with script, style sheets.
- The Node.js web server handle the http request for the applications.


