 Introduction
What is Metrology and Engineering Inspection? Metrology is the science of measurement or scientific study of measurement. It can sometimes include calibration of instruments, Programming the Coordinate measuring machine (CMM), and the use of various other precision measuring and inspection machines. Metrology and Engineering Inspection is an important topic in Mechanical Engineering subjects.
Metrology and Engineering Inspection Quiz chapter, is, exceedingly important for candidates preparing for RRB Junior Engineer Recruitment, SSC Junior Engineer Recruitment, GATE, UPSC (Civil services exam including IAS) and all Mechanical Engineering Exams and etc. In this article, candidates can find different types of questions & solutions related to the Metrology and Engineering Inspection topic. The article Metrology and Engineering Inspection Quiz, will assist the students understanding of the type of questions expected from the topic Metrology and Engineering Inspection.
 Quiz
Quiz
1. The case with which observations can be made accurately is called
- A. readability
B. sensitivity
C. accuracy
D. reputability
- A. the closeness with which a measurement can be read directly from a measuring instrument
B. a measure of how close the reading is to the true size
C. the difference between measured value and actual value
D. the smallest change in measure that can be measured
- A. controllable errors
B. calibration errors
C. avoidable errors
D. random errors
- A. precise but not accurate
B. accurate but not precise
C. neither precise nor accurate
D. sensitive.
- A. to obtain desired fits
B. because it is not possible to manufacture in size exactly
C. to obtain high accuracy
D. to have proper allowance
- A. fidelity
B. accuracy
C. threshold sensitivity
D. precision
- A. to produce maximum number of components in unit time
B. equal to the mean value of component
C. equal to the three times the standard deviation
D. equal to six times the standard deviation
- A. steel rule
B. pneumatic gauges
C. micrometer
D. plug gauge
- A. change in scale reading to corresponding change in pointer deflection
B. least reading of scale to range of scale
C. least reading of scale to unit measurable quantity
D. least count of scale to range of scale
- A. 1 time
B. 2 time
C. 3 time
D. 4 time
- A. 0 time
B. 1 time
C. 2 time
D. 3 time
- A. new gauge
B. international reference standard
C. standard gauge for checking accuracy of gauges used on shop floors
D. gauge used by experienced technicians
- A. unilateral tolerance
B. bilateral tolerance
C. limiting dimensions
D. none of these
- A. an optical flat is placed over smooth surface
B. a microscope is used to observe surface texture
C. index grating is moved over scale grating
D. white light is diffused through a prism
- A. circles
B. squares
C. zig-zag lines
D. triangles
- A. half wave length
B. two wave length
C. one quarter wavelength
D. two wave lengths
- A. [latex]\frac{p sec \theta}{2}[/latex]
B. [latex]\frac{p cos \theta}{2}[/latex]
C. [latex]\frac{p cos \theta}{4}[/latex]
D. none of these
- A. lead = pitch
B. lead = 3 pitch
C. lead = [latex]\frac{1}{}[/latex]pitch
D. lead = 9 pitch
- A. measurement of end gauges
B. flatness of surface
C. linear displacement measurements
D. surface roughness measurement
- A. parallelism measurement
B. straightness measurement
C. flatness measurement
D. angular measurement
- A. [latex]{r}_{b} = {r}_{p} cos\alpha[/latex]
B. [latex]{r}_{b} = {r}_{p} sin \alpha[/latex]
C. [latex]{r}_{b} = {r}_{p} tan\alpha[/latex]
D. [latex]{r}_{b} = {r}_{p}(cos\alpha - \alpha)[/latex]
- A. randomly distributed
B. regularly repetitive in nature
C. distributed on both + ve and – ve sides of mean value
D. unpredictable
- A. correction
B. discrepancy
C. error
D. accuracy
- A. vernier calipers
B. screw gauge
C. hermaphrodite calipers
D. combination set
- A. Calibration errors
B. Environmental errors
C. Avoidable errors
D. Random errors
- A. linear scale
B. equidistant scale
C. regular scale
D. digital scale
- A. major diameter of the thread
B. minor diameter of the thread
C. effective diameter of the thread
D. root diameter of the thread
- A. roundness of a cylindrical work
B. surface roughness
C. taper on a job
D. none of these
- A. the closeness with which a measurement can be read directly from a measuring instrument
B. a measure of how close the reading is to the true size
C. difference between measured value and actual value
D. the capability to indicate the same reading again and again for a given measured
- A. lock a dimension
B. impart blow motion
C. maintain sufficient and uniform measuring pressure
D. take care of wear of screw threads.
1. External taper can be accurately measured with the help of
- A. sine bar and slip gauge
B. dividing head
C. combination set
D. clinometer
- A. bore of cylinders
B. longer external lengths
C. cylindricity
D. longer internal lengths
- A. its total length
B. centre distance between the two rollers
C. size of the rollers
D. weight of sine bar
- A. 87
B. 45
C. 103
D. 31
- A. flatness of upper surface
B. equality of size and roundness of rollers
C. exact distance between roller axes and mutual parallelism.
D. parallelism of rollers to upper surface and equality of axis distance as from surface
E. all of these
- A. from edge to edge
B. between inner circumferences of two rollers
C. between outer circumference of two rollers
D. between the centres of two rollers
- A. decreases appreciably with steep angle
B. is poor for small angles
C. is maximum when angle of measurement is 45ºC
D. none of these
- A. misalignment
B. axial run-out
C. radial run-out
D. squareness error
- A. gears
B. screw threads
C. flatness
D. surface finish
- A. screw pitch gauge
B. micrometer with V-anvil
C. tool room microscope
D. thread gauge
- A. is easier and quicker to use
B. is more accurate
C. can be used to make both inside and outside measurements over a range of sizes
D. all of these
- A. it will wipe off easily
B. the line will be too wide for accurate work
C. lines will smudge and be difficult to see
D. all of these
- A. degree
B. minute
C. second
D. right angle
- A. barrel
B. thimble
C. spindle
D. anvil
- A. anvil
B. barrel
C. ratchet
D. thimble
- A. combination gauge
B. limit gauge
C. Go and No Go gauge
D. progressive gauge
- A. repeat-ability of a measuring process
B. error of judgement in recording an observation
C. ability of instrument to reproduce same reading under identical situations
D. agreement of the result of a measurement with the true value of the measure quantity
- A. air gauge
B. micrometer screw gauge
C. optical projector
D. steel scale
- A. accurately calibrated scale
B. comparison with standard such as slip gauges
C. accurate micrometer gauge
D. optical devices
- A. repeat-ability of a measuring process
B. agreement of the result of a measurement with the true value of the measured quantity
C. ability of an instrument to reproduce same reading under identical conditions
D. all of these
- A. trace-ability
B. interchangeability
C. matched fits
D. selective assembly
- A. steel scale
B. micrometer screw gauge
C. vernier caliper
D. optical projector
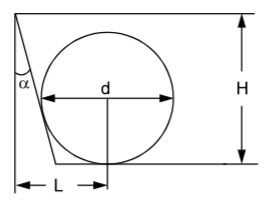
- A. [latex]L = H tan \frac{\alpha}{2} + \frac{d}{2} tan (45 - \alpha)[/latex]
B. [latex]L = H cot \frac{\alpha}{2} + \frac{d}{2} tan (45 - \frac{\alpha}{2})[/latex]
C. [latex]L = H tan \frac{\alpha}{2} \frac{d}{2} tan (45 - \alpha)[/latex]
D. None of these
- A. roundness
B. radius of curvature
C. cylindricity
D. flatness
- A. [latex]R = \frac{l - d}{8d}[/latex]
B. [latex]\frac{{(l - d)}^{2}}{4d}[/latex]
C. [latex]\frac{{(l - d)}^{2}}{8d}[/latex]
D. [latex]\frac{{(l - d)}^{2}}{2d}[/latex]
- A. [latex]\frac{{d}^{2}}{8h} + \frac{h}{2}[/latex]
B. [latex]\frac{{d}^{2}}{8h} - \frac{h}{2}[/latex]
C. [latex]\frac{{d}^{2}}{4h} + h[/latex]
D. [latex]\frac{{d}^{2}}{8h} + h[/latex]
- A. scribing and centre points
B. measuring jaws
C. holder
D. base
E. all of these
- A. [latex]\pm[/latex] 1 degree
B. [latex]\pm[/latex] 30 minutes
C. [latex]\pm[/latex] 10 minutes
D. [latex]\pm[/latex] 1 minutes
- A. 2
B. 3
C. 4
D. 5
- A. protect slip gauges when not is use
B. take up all the wear when in use
C. clean the slip gauges
D. facilitate wringing of slip gauges
1. The ratio of the surface area A and the volume V of a cylinder of diameter d and length l is
- A. [latex]\frac{A}{V} = \frac{6d}{l}[/latex]
B. [latex]\frac{A}{V} = \frac{4l}{d}[/latex]
C. [latex]\frac{A}{V} = \frac{1 + d}{dl}[/latex]
D. [latex]\frac{A}{V} = \frac{2d + 4l}{dl}[/latex]
- A. assembling
B. sliding
C. adhesion
D. wringing
- A. measure the diameter of the work pieces
B. measure the diameter of the holes in the work pieces
C. check diameter of the holes in the work pieces
D. check length of holes in the work pieces
- A. minimum clearance between shaft and hole
B. maximum clearance between shaft and hole
C. difference of tolerance of hole and shaft
D. difference between maximum size and minimum size of the hole
- A. [latex]\frac{{H}_{g}}{{g}_{7}}[/latex]
B. [latex]\frac{{g}_{7}}{{h}_{8}}[/latex]
C. [latex]\frac{50{H}_{g}}{{g}_{7}}[/latex]
D. [latex]\frac{{H}_{g}}{{g}_{7}} - 50[/latex]
- A. [latex]{H}_{5}, {H}_{11}[/latex]
B. [latex]{H}_{6}, {H}_{10}[/latex]
C. [latex]{H}_{8}, {H}_{6}[/latex]
D. [latex]{H}_{10}, {H}_{5}[/latex]
- A. closeness with which a measurement can be read directly from a measuring instrument
B. a measure of how close the reading is to the true size
C. difference between measured value and actual value
D. the smallest change in measure and that can be measured
- A. unilateral tolerance
B. bilateral tolerance
C. limiting dimensions
D. all of these
- A. triangles
B. circles
C. squares
D. rectangles
- A. combination set
B. slip gauge
C. height gauge
D. micrometer screw gauge
- A. centre gauge
B. height gauge
C. dial indicator
D. surface gauge
- A. lower deviation is zero
B. upper deviation is zero
C. minimum clearance is zero
D. maximum clearance is zero
- A. margins of the drill
B. flutes of the drill
C. lips of the drill
D. web of the drill
- A. unilateral tolerance
B. bilateral tolerance
C. limiting dimensions
D. none of these
- A. 25, 18
B. 25, 16
C. 18, 22
D. 18, 25
- A. + ve, – ve
B. – ve, + ve
C. zero, zero
D. none of these
- A. 0.45([latex]\sqrt [3]{D} [/latex]) + 0.001 D
B. 0.45([latex]\sqrt [4]{D} [/latex]) + 0.001 D
C. 0.45([latex]\sqrt [3]{D} [/latex]) + 0.01 D
D. 0.45([latex]\sqrt [4]{D} [/latex]) + 0.01 D
- A. calibration of slip gauges
B. absolute measurement of length of slip gauges
C. measurement of flatness
D. measurement of angles
- A. avoid injury to hands
B. protect the surfaces of slip gauges
C. insulate them from the heat of the hand
D. none of these
- A. 8i
B. 10 i
C. 16 i
D. 24 i
- A. testing flatness of surface
B. adding to utility of measurements on surface plate
C. angular measurement
D. all of these
- A. accuracy
B. least count
C. range
D. internal or external measurement and for marking purpose
- A. rectangular
B. circular
C. I-section
D. elliptical
- A. measure small linear displacements
B. measure surface profiles
C. measure surface roughness
D. set very small displacement by rotating the glass block through relatively large angles
- A. for mounting purposes
B. to achieve high accuracy
C. for ease of manufacture
D. to make them light
1. Precision polygons are calibrated from first principles using
- A. one autocollimator
B. two autocollimators
C. three autocollimators
D. two precision spirit levels
- A. angular measurement
B. linear measurement
C. height measurement
D. flatness measurement
- A. Engineer’s parallels
B. angle gauges
C. spirit level
D. bevel protractor
- A. needs to be calibrated
B. need not be calibrated
C. contains a calibrated scale
D. is highly accurate over its complete measuring range
- A. an air gap (a wedge) of varying thickness must exist between the two surfaces
B. an optical flat is required
C. work surface must be reflective
D. monochromatic source of light is required
E. all of these
- A. process capability study
B. machine accuracy study
C. both (a) and (b)
D. none of these
- A. to obtain desired fits
B. because it is not possible to manufacture a size exactly
C. to obtain high accuracy
D. to have proper allowance
- A. unilateral form
B. bilateral form
C. both (a) and (b)
D. none of these
- A. usually have plus and minus tolerance of equal amount
B. specifies the total tolerance on both sides of the basic dimension
C. may be expressed as 25.000 + 0.001 – 0.002 mm
D. system defines the theoretically desired size of the basic size
E. all of these
- A. dimension is allowed to vary only in one direction
B. total tolerance is related to a basic dimension
C. both (a) and (b)
D. none of these
- A. the closeness with which a measurement can be read directly from a measuring instrument
B. a measure of how close the reading is to the true size
C. the difference between measured value and actual value
D. the smallest change is measured that can be measured
- A. the closeness with which a measurement can be read directly from, a measuring instrument
B. a measure of how close the reading is to the true size
C. the difference between measured value and actual value
D. the smallest change in measure and that can be measured
- A. measure of how close the reading is to the true size
B. the difference between measured value and actual value
C. the smallest change in measure and that can be measured
D. the capability to indicate the same reading again and again for a given measure and.
- A. is easier and quicker to use
B. is more accurate
C. can be used to make both inside and outside measurements over a range of sizes
D. none of these
- A. check angular surfaces
B. draw circles and arcs
C. scribe lines
D. all of these
