


 Introduction
Thi chapter demonstrates about the jQuery UI Dialog which is used to display brief messages to the user and following are the concepts are covered in this chapter.
- jQuery UI Dialogs
Description
jQuery UI Dialog Widget is used to get the brief messages to the user or user can also put the questions to the user. In these dialog boxes, a user can also display the supplemental content like images and some interactive content and user can also add some buttons like OK and Cancel.
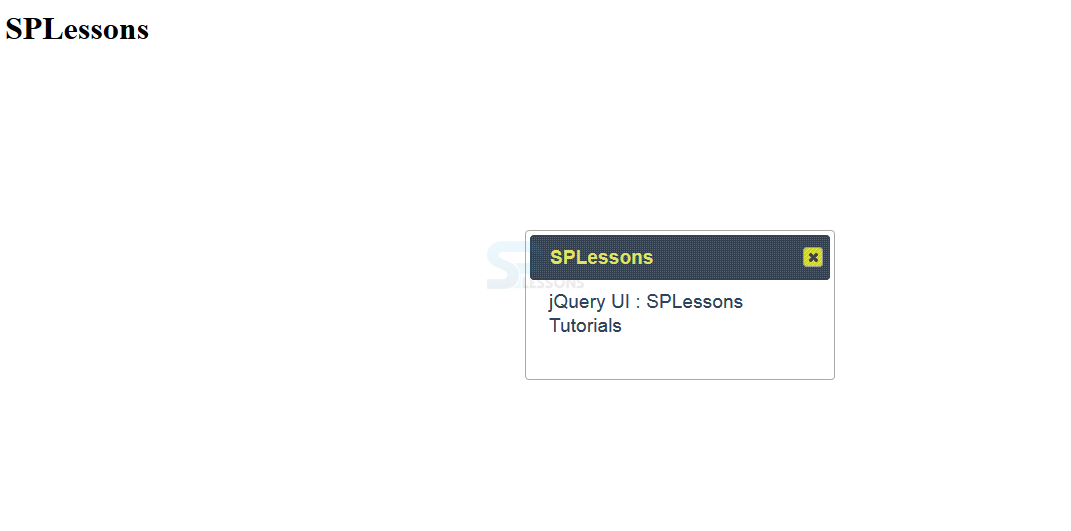
The user can create the jQuery Dialog widget with minimal markups by using div elements and then the user need to call dialog method. In which div element have little attribute and the value will be displayed in title bar of the dialogue box and the other part serves as a content of the dialogue box is as shown in below code.
[html]
<!DOCTYPE html>
<html>
<head>
<title>jQuery UI Dialog : Creating a Dialog Box</title>
<meta name="viewport" content="width=device-width, initial-scale=1">
<link rel="stylesheet" href="http://code.jquery.com/ui/1.11.3/themes/hot-sneaks/jquery-ui.css" />
<script src="http://code.jquery.com/jquery-2.1.3.js"></script>
<script src="http://code.jquery.com/ui/1.11.2/jquery-ui.js"></script>
<script>
$(document).ready(function() {
$("#demoDialog").dialog();
});
</script>
</head>
<body>
<h1>SPLessons</h1>
<div id="demoDialog" title="SPLessons">
jQuery UI : SPLessons Tutorials
</div>
</body>
</html>
[/html]
Result
By running the above code in a preferred browser user can get the following output as shown in below image.
 Enable and Disabling Tabs
The jQuery UI Dialog widget provides a rich set setting options which permit you to customize the panel showed the user which are shown in below table.
Enable and Disabling Tabs
The jQuery UI Dialog widget provides a rich set setting options which permit you to customize the panel showed the user which are shown in below table.
Showing the Dialog Box
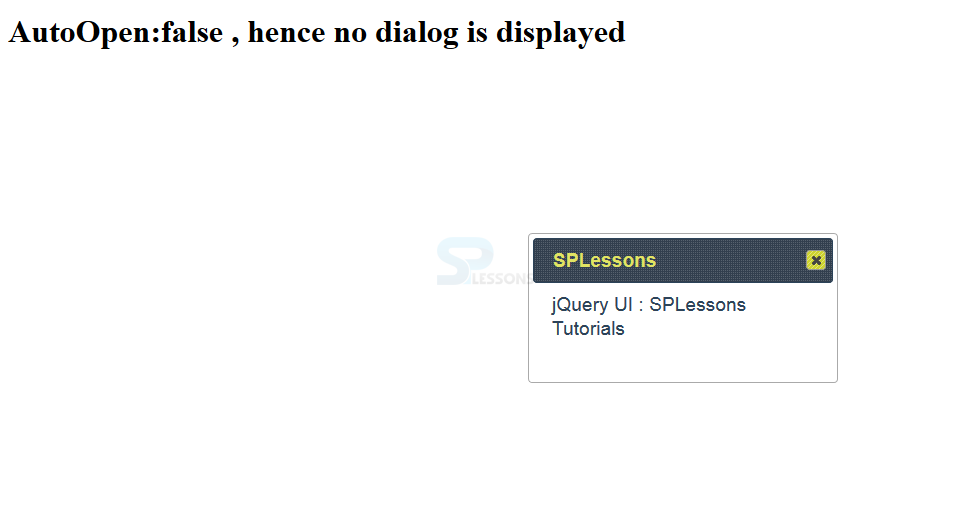
The jQuery UI Dialog widget is either show to user as presently because the page loads or we will additionally use a trigger to open the panel. The setting autoOpen is about to true by default, therefore the dialog is displayed as presently because the page is loaded. To disable this feature set the value to false. The code below demonstrates the showing the dialog box as shown.
[html]
<!DOCTYPE html>
<html>
<head>
<title>jQuery UI Dialog : Showing the Dialog Box</title>
<meta name="viewport" content="width=device-width, initial-scale=1">
<link rel="stylesheet" href="http://code.jquery.com/ui/1.11.3/themes/hot-sneaks/jquery-ui.css" />
<script src="http://code.jquery.com/jquery-2.1.3.js"></script>
<script src="http://code.jquery.com/ui/1.11.2/jquery-ui.js"></script>
<script>
$(document).ready(function() {
$("#demoDialog").dialog({
autoOpen: false
});
});
</script>
</head>
<body>
<h1>AutoOpen:false , hence no dialog is displayed</h1>
<div id="demoDialog" title="SPLessons">
jQuery UI : SPLessons Tutorials
</div>
</body>
</html>
[/html]
Result
By running the above code in a preferred browser user can get the following output as shown in below image.
 When the user set to autoOpen as true then dialog box will get appear as shown below.
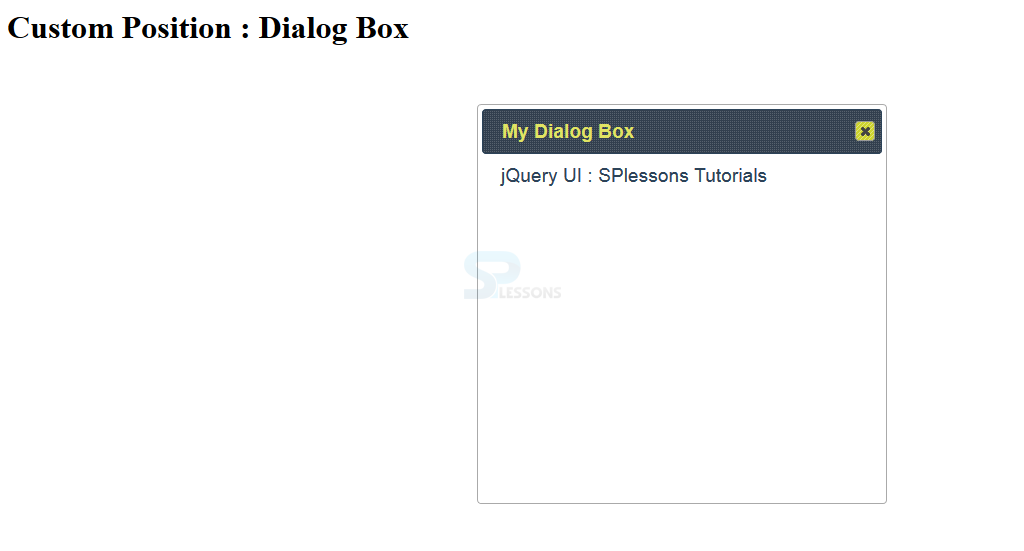
 Setting The Position of Dialog Box
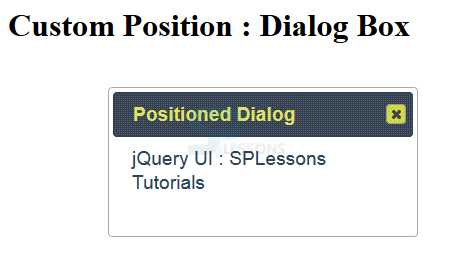
The jQuery UI Dialog position settings may be wont to specify the position on the screen wherever the Dialog may be located.The default position is center the code below demonstrates to setting the dialog box as shown.
[html]
<!DOCTYPE html>
<html>
<head>
<title>jQuery UI Dialog : Positioning Dialog Box</title>
<meta name="viewport" content="width=device-width, initial-scale=1">
<link rel="stylesheet" href="http://code.jquery.com/ui/1.11.3/themes/hot-sneaks/jquery-ui.css" />
<script src="http://code.jquery.com/jquery-2.1.3.js"></script>
<script src="http://code.jquery.com/ui/1.11.2/jquery-ui.js"></script>
<style>.myStyle{ color:#fa4b2a; font-family:Verdana; }</style>
<script>
$(document).ready(function() {
$("#demoDialog").dialog({
title: "Positioned Dialog",
position: ["left", "top"]
});
});
</script>
</head>
<body>
<h1>Custom Position : Dialog Box</h1>
<div id="demoDialog" title="SPLessons">
jQuery UI : SPLessons Tutorials
</div>
</body>
</html>
[/html]
Result
By running the above code in a preferred browser user can get the following output as shown in below image.
Setting The Position of Dialog Box
The jQuery UI Dialog position settings may be wont to specify the position on the screen wherever the Dialog may be located.The default position is center the code below demonstrates to setting the dialog box as shown.
[html]
<!DOCTYPE html>
<html>
<head>
<title>jQuery UI Dialog : Positioning Dialog Box</title>
<meta name="viewport" content="width=device-width, initial-scale=1">
<link rel="stylesheet" href="http://code.jquery.com/ui/1.11.3/themes/hot-sneaks/jquery-ui.css" />
<script src="http://code.jquery.com/jquery-2.1.3.js"></script>
<script src="http://code.jquery.com/ui/1.11.2/jquery-ui.js"></script>
<style>.myStyle{ color:#fa4b2a; font-family:Verdana; }</style>
<script>
$(document).ready(function() {
$("#demoDialog").dialog({
title: "Positioned Dialog",
position: ["left", "top"]
});
});
</script>
</head>
<body>
<h1>Custom Position : Dialog Box</h1>
<div id="demoDialog" title="SPLessons">
jQuery UI : SPLessons Tutorials
</div>
</body>
</html>
[/html]
Result
By running the above code in a preferred browser user can get the following output as shown in below image.
 Adding Icons to the Dialog Buttons
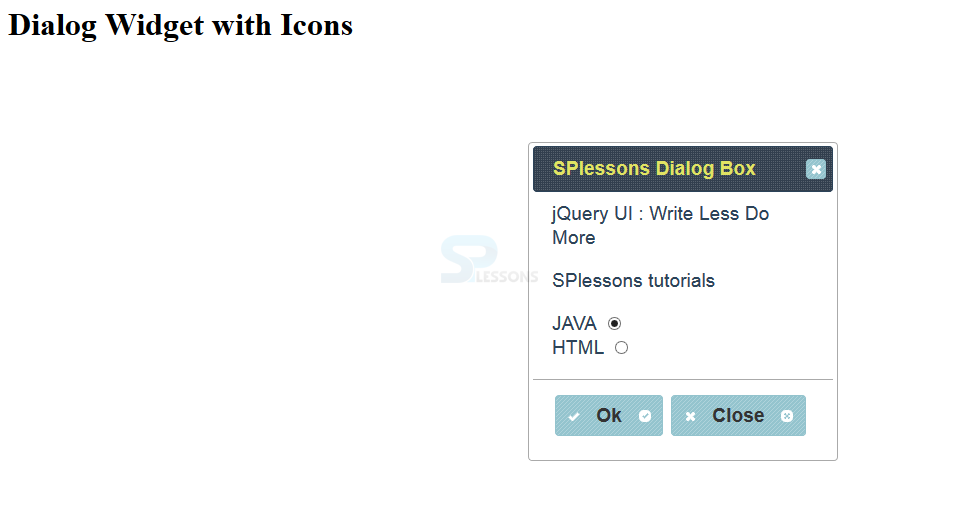
The jQuery UI Dialog widget Buttons is given Icons in order to produce users with a visible help for buttons. The code below demonstrates the specified the text, icons and therefore the action which should follow once the button is clicked.
[html]
<!DOCTYPE html>
<html>
<head>
<title>jQuery UI Dialog : Dialog Box Button with Icons</title>
<meta name="viewport" content="width=device-width, initial-scale=1">
<link rel="stylesheet" href="http://code.jquery.com/ui/1.11.3/themes/hot-sneaks/jquery-ui.css" />
<script src="http://code.jquery.com/jquery-2.1.3.js"></script>
<script src="http://code.jquery.com/ui/1.11.2/jquery-ui.js"></script>
<style>.myStyle{ color:#fa4b2a; font-family:Verdana; }</style>
<script>
$(document).ready(function() {
$("#demoDialog").dialog({
buttons: [
{
text: "Ok",
icons: { primary: "ui-icon-check", secondary: "ui-icon-circle-check" },
click: function() { }
},
{
text: "Close",
icons: { primary: "ui-icon-closethick", secondary: "ui-icon-circle-close" },
click: function() {$(this).dialog("close") }
}
],
draggable: false
});
});
</script>
</head>
<body>
<h1> Dialog Widget with Icons</h1>
<div id="demoDialog" title="SPlessons Dialog Box">
jQuery UI : Write Less Do More
<p>SPlessons tutorials</p>
<label for="JAVA">JAVA</label>
<input type="radio" id="JAVA" value="JAVA" name="question" checked="checked"><br>
<label for="HTML">HTML</label>
<input type="radio" id="HTML" value="HTML" name="question">
</div>
</body>
</html>
[/html]
Result
By running the above code in a preferred browser user can get the following output as shown in below image.
Adding Icons to the Dialog Buttons
The jQuery UI Dialog widget Buttons is given Icons in order to produce users with a visible help for buttons. The code below demonstrates the specified the text, icons and therefore the action which should follow once the button is clicked.
[html]
<!DOCTYPE html>
<html>
<head>
<title>jQuery UI Dialog : Dialog Box Button with Icons</title>
<meta name="viewport" content="width=device-width, initial-scale=1">
<link rel="stylesheet" href="http://code.jquery.com/ui/1.11.3/themes/hot-sneaks/jquery-ui.css" />
<script src="http://code.jquery.com/jquery-2.1.3.js"></script>
<script src="http://code.jquery.com/ui/1.11.2/jquery-ui.js"></script>
<style>.myStyle{ color:#fa4b2a; font-family:Verdana; }</style>
<script>
$(document).ready(function() {
$("#demoDialog").dialog({
buttons: [
{
text: "Ok",
icons: { primary: "ui-icon-check", secondary: "ui-icon-circle-check" },
click: function() { }
},
{
text: "Close",
icons: { primary: "ui-icon-closethick", secondary: "ui-icon-circle-close" },
click: function() {$(this).dialog("close") }
}
],
draggable: false
});
});
</script>
</head>
<body>
<h1> Dialog Widget with Icons</h1>
<div id="demoDialog" title="SPlessons Dialog Box">
jQuery UI : Write Less Do More
<p>SPlessons tutorials</p>
<label for="JAVA">JAVA</label>
<input type="radio" id="JAVA" value="JAVA" name="question" checked="checked"><br>
<label for="HTML">HTML</label>
<input type="radio" id="HTML" value="HTML" name="question">
</div>
</body>
</html>
[/html]
Result
By running the above code in a preferred browser user can get the following output as shown in below image.
 Setting Dimensions
The jQuery UI dialog widget has many options to line the size of the dialog box, and also the minimum and most size it is resized to. The code below demonstrates the dimension and height possibility set the initial dimensions of the dialog box, whereas the min-height and max-height option sets, however, tiny or large it is resized severally.
[html]
<!DOCTYPE html>
<html>
<head>
<title>jQuery UI Dialog : Dimensions of Dialog Box</title>
<meta name="viewport" content="width=device-width, initial-scale=1">
<link rel="stylesheet" href="http://code.jquery.com/ui/1.11.3/themes/hot-sneaks/jquery-ui.css" />
<script src="http://code.jquery.com/jquery-2.1.3.js"></script>
<script src="http://code.jquery.com/ui/1.11.2/jquery-ui.js"></script>
<style>.myStyle{ color:#fa4b2a; font-family:Verdana; }</style>
<script>
$(document).ready(function() {
$("#demoDialog").dialog({
width: 400,
height: 400,
minWidth: 100,
minHeight: 100,
maxWidth: 600,
maxHeight: 600
});
});
</script>
</head>
<body>
<h1>Custom Position : Dialog Box</h1>
<div id="demoDialog" title="My Dialog Box">
jQuery UI : SPlessons Tutorials
</div>
</body>
</html>
[/html]
Result
By running the above code in a preferred browser user can get the following output as shown in below image.
Setting Dimensions
The jQuery UI dialog widget has many options to line the size of the dialog box, and also the minimum and most size it is resized to. The code below demonstrates the dimension and height possibility set the initial dimensions of the dialog box, whereas the min-height and max-height option sets, however, tiny or large it is resized severally.
[html]
<!DOCTYPE html>
<html>
<head>
<title>jQuery UI Dialog : Dimensions of Dialog Box</title>
<meta name="viewport" content="width=device-width, initial-scale=1">
<link rel="stylesheet" href="http://code.jquery.com/ui/1.11.3/themes/hot-sneaks/jquery-ui.css" />
<script src="http://code.jquery.com/jquery-2.1.3.js"></script>
<script src="http://code.jquery.com/ui/1.11.2/jquery-ui.js"></script>
<style>.myStyle{ color:#fa4b2a; font-family:Verdana; }</style>
<script>
$(document).ready(function() {
$("#demoDialog").dialog({
width: 400,
height: 400,
minWidth: 100,
minHeight: 100,
maxWidth: 600,
maxHeight: 600
});
});
</script>
</head>
<body>
<h1>Custom Position : Dialog Box</h1>
<div id="demoDialog" title="My Dialog Box">
jQuery UI : SPlessons Tutorials
</div>
</body>
</html>
[/html]
Result
By running the above code in a preferred browser user can get the following output as shown in below image.
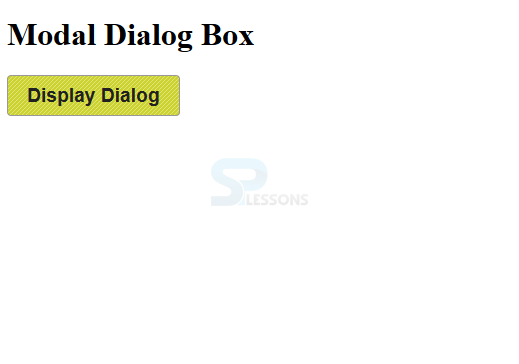
 Creating Modals
The jQuery UI Dialog Modals area unit wont to forestall the user from interacting with the elements inside the document till the dialog is closed. To create a modal set the value of the modal setting to true, the overlay is removed as presently because the dialog modal is closed The code below demonstrates the Dialog Modals as shown.
[html]
<!DOCTYPE html>
<html>
<head>
<title>jQuery UI Dialog : Modal on Dialog Box</title>
<meta name="viewport" content="width=device-width, initial-scale=1">
<link rel="stylesheet" href="http://code.jquery.com/ui/1.11.3/themes/hot-sneaks/jquery-ui.css" />
<script src="http://code.jquery.com/jquery-2.1.3.js"></script>
<script src="http://code.jquery.com/ui/1.11.2/jquery-ui.js" ></script>
<style>.myStyle{ color:#fa4b2a; font-family:Verdana; }</style>
<script>
$(document).ready(function() {
$('#demoDialog').dialog({
buttons: [{text: "OK", click: function() {$(this).dialog("close")}}],
modal: true,
autoOpen: false
})
$('#display').button().click(function() {
$('#demoDialog').dialog("open");
})
});
</script>
</head>
<body>
<h1>Modal Dialog Box</h1>
<div id="demoDialog" title="My Dialog Box">
jQuery UI : SPlessons Tutorials
</div>
<button id="display">Display Dialog</button>
</body>
</html>
[/html]
Result
By running the above code in a preferred browser user can get the following output as shown in below image.
Creating Modals
The jQuery UI Dialog Modals area unit wont to forestall the user from interacting with the elements inside the document till the dialog is closed. To create a modal set the value of the modal setting to true, the overlay is removed as presently because the dialog modal is closed The code below demonstrates the Dialog Modals as shown.
[html]
<!DOCTYPE html>
<html>
<head>
<title>jQuery UI Dialog : Modal on Dialog Box</title>
<meta name="viewport" content="width=device-width, initial-scale=1">
<link rel="stylesheet" href="http://code.jquery.com/ui/1.11.3/themes/hot-sneaks/jquery-ui.css" />
<script src="http://code.jquery.com/jquery-2.1.3.js"></script>
<script src="http://code.jquery.com/ui/1.11.2/jquery-ui.js" ></script>
<style>.myStyle{ color:#fa4b2a; font-family:Verdana; }</style>
<script>
$(document).ready(function() {
$('#demoDialog').dialog({
buttons: [{text: "OK", click: function() {$(this).dialog("close")}}],
modal: true,
autoOpen: false
})
$('#display').button().click(function() {
$('#demoDialog').dialog("open");
})
});
</script>
</head>
<body>
<h1>Modal Dialog Box</h1>
<div id="demoDialog" title="My Dialog Box">
jQuery UI : SPlessons Tutorials
</div>
<button id="display">Display Dialog</button>
</body>
</html>
[/html]
Result
By running the above code in a preferred browser user can get the following output as shown in below image.
 When ever user clicked on the Display Dialog button the Dialog box will gets appear as shown in below image.

| Options | Description |
|---|---|
| appendTo | Is used to specify which element the dialog should be appended to and the default element is a body. |
| buttons | Is used to add buttons in a dialog box and function should be invoked when the buttons are clicked. |
| autoOpen | When it is set to true then the dialog get automatically displayed when it is created and the default value is true. |
| closeOnEscape | When it is set to true the dialogue box get closed by clicking the ESC button. |
| draggable | When it is set to true then a user can make the dialog box as draggable. |
| dialogClass | Is used to set the additional class names of the dialog box for theming Process. |
| hide | Which is used to hide the dialog box to set the animation. |
| height | Is used to set the initial height of the dialog box and the default value is auto. |
| maxHeight | Which is used to set the max height in px of the dialog box default is false i.e no maximum height. |
| minHeight | Which is used to set the min-height in px of the dialog box default is false i.e no minimum height. |
| maxWidth | Which is used to set the max Width in px of the dialog box default is false i.e no maximum width. |
| minWidth | Which is used to set the min-width in px of the dialog box default is false i.e no minimum width. |
| modal | When it is set to true then Dialog box converted to a modal. |
| show | To specify the animation effects to show the dialog box and the default is true. |
| title | Is used to set the title of the dialog box. |
Key Points
- The advantage of Modal Dialog box is whne dialog is closed before the underlying features get interactive again.
- Dialog Box manipulation is not a good webdevelopment practice.
- The icons are styled based on the themes used.