


 Introduction
This Chapter demonstrates about the CSS Margin which are used to control the space in between the element borders and surrounding elements and following are the concepts covered in this chapter.
- CSS Margin
- Types of CSS Margins
Description
The CSS Margins enables user to adjust the space in between content and surrounding elements. Which does not have any background color and opacity its just a vacant space to appear neat. The image below demonstrates the CSS margins as shown below.
 There some properties to the CSS margins which are tabulated below.
| Property | Description | Values |
|---|---|---|
| margin-top | Which is the contents top edge margin. | auto length(px, em, cm) percentage(%). |
| margin-bottom | Which is the contents bottom edge margin. | auto length(px, em, cm) percentage(%). |
| margin-right | Which is the contents right edge margin. | auto length(px, em, cm) percentage(%). |
| margin-left | Which is the contents left edge margin. | auto length(px, em, cm) percentage(%). |
| margin | Which is the shorthand to set margin for all edges at once. | auto length(px, em, cm) percentage(%). |
Description
CSS margins have the different types of margins to set margin to the edges in which some margins are listed below.
Individual margin
User can also set the different types of margin values to the individual edges which are independent of each other. User can set the CSS Property to set margins for top, bottom, left, right are shown below.
The code below demonstrates the individual margins as shown below.
[html]
<!DOCTYPE HTML>
<html>
<head>
<style>
img{border:5px solid #ccc;
margin:10px 2px 5px 8px;/*margin: top right bottom left*/
}
</style>
</head>
<body>
<img src="splessons-logo.png" alt="splessons"/>
<img src="splessons-logo.png" alt="splessons"/>
</body>
</html>
[/html]
Result
By running the above code in a preferred browser user can get the following output as shown in below image.
 CSS Center content using margin
User can set the any block level element as centered by placing its left and right margins are "auto". The code below demonstrates the CSS center content using margin as shown below.
[html]
<!DOCTYPE HTML>
<html>
<head>
<style>
p{font-family:Verdana;
border:3px solid #ccc;
width:420px;
margin:10px auto; /* left and right margins set as auto */
}
</style>
</head>
<body>
<p>Simple Programming Lessons CSS Tutorials. (SPLESSONS)</p>
</body>
</html>
[/html]
Result
By running the above code in a preferred browser user can get the following output as shown in below image.
CSS Center content using margin
User can set the any block level element as centered by placing its left and right margins are "auto". The code below demonstrates the CSS center content using margin as shown below.
[html]
<!DOCTYPE HTML>
<html>
<head>
<style>
p{font-family:Verdana;
border:3px solid #ccc;
width:420px;
margin:10px auto; /* left and right margins set as auto */
}
</style>
</head>
<body>
<p>Simple Programming Lessons CSS Tutorials. (SPLESSONS)</p>
</body>
</html>
[/html]
Result
By running the above code in a preferred browser user can get the following output as shown in below image.
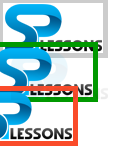
 shorthand margin
User can set the margins of all edges of the content st once in a single direction by using the shorthand. In which the value set as margin of the content it can be same or different for all edges. The code below demonstrates the CSS Margin Shorthand as shown below.
[html]
<!DOCTYPE HTML>
<html>
<head>
<style>
.demo1{border:5px solid #ccc;
margin:10px;/*set a margin of 10px for all edges*/
}
.demo2{border:5px solid #009900;
margin:10px 20px;/*set a margin of 10px for top and bottom
edges and 20px for left and right edges*/
}
.demo3{border:5px solid #fa4b2a;
margin:10px 20px 30px 40px /*set a margin in order
(top, right, bottom, left)*/
}
</style>
</head>
<body>
<img class="demo1" src="splessons-logo.png" alt="splessons"/><br>
<img class="demo2" src="splessons-logo.png" alt="splessons"/><br>
<img class="demo3" src="splessons-logo.png" alt="splessons"/>
</body>
</html>
[/html]
Result
By running the above code in a preferred browser user can get the following output as shown in below image.
shorthand margin
User can set the margins of all edges of the content st once in a single direction by using the shorthand. In which the value set as margin of the content it can be same or different for all edges. The code below demonstrates the CSS Margin Shorthand as shown below.
[html]
<!DOCTYPE HTML>
<html>
<head>
<style>
.demo1{border:5px solid #ccc;
margin:10px;/*set a margin of 10px for all edges*/
}
.demo2{border:5px solid #009900;
margin:10px 20px;/*set a margin of 10px for top and bottom
edges and 20px for left and right edges*/
}
.demo3{border:5px solid #fa4b2a;
margin:10px 20px 30px 40px /*set a margin in order
(top, right, bottom, left)*/
}
</style>
</head>
<body>
<img class="demo1" src="splessons-logo.png" alt="splessons"/><br>
<img class="demo2" src="splessons-logo.png" alt="splessons"/><br>
<img class="demo3" src="splessons-logo.png" alt="splessons"/>
</body>
</html>
[/html]
Result
By running the above code in a preferred browser user can get the following output as shown in below image.
 Indent Text
User can intend the text by using CSS margin property whic is used to create exact amount of vacant space on each side of the text. The code below demonstrates the CSS margins indent text as shown below.
[html]
<!DOCTYPE HTML>
<html>
<head>
<style>
body{font-family:Verdana;}
.indent{
margin:0px 10px 15px 40px
}
</style>
</head>
<body>
<p class="indent">Simple Programming Lessons CSS Tutorials. (SPLESSONS)</p>
<p>SPLESSONS misson is to enhance our knowledge of programming by presenting several different articles to the viewers and by participating in knowledge enriching discussions on the website.</p>
</body>
</html>
[/html]
Result
By running the above code in a preferred browser user can get the following output as shown in below image.
Indent Text
User can intend the text by using CSS margin property whic is used to create exact amount of vacant space on each side of the text. The code below demonstrates the CSS margins indent text as shown below.
[html]
<!DOCTYPE HTML>
<html>
<head>
<style>
body{font-family:Verdana;}
.indent{
margin:0px 10px 15px 40px
}
</style>
</head>
<body>
<p class="indent">Simple Programming Lessons CSS Tutorials. (SPLESSONS)</p>
<p>SPLESSONS misson is to enhance our knowledge of programming by presenting several different articles to the viewers and by participating in knowledge enriching discussions on the website.</p>
</body>
</html>
[/html]
Result
By running the above code in a preferred browser user can get the following output as shown in below image.
 CSS Negative Margins
By using CSS User can generate elements with negative margins which are used to generate the gap in between the elements to further reduce than in normal case with no margins. If elements with negative margins which does not overlap each other and these can be hidden from the display.
[html]
<!DOCTYPE HTML>
<html>
<head>
<style>
.demo1{border:5px solid #ccc;
margin:-10px;/*set a margin of -10px for all edges*/
}
.demo2{border:5px solid #009900;
margin:-10px -20px;/*set a margin of -10px for top and bottom
edges and -20px for left and right edges*/
}
.demo3{border:5px solid #fa4b2a;
margin:-10px -20px -30px -40px /*set a negative margin in order
(top, right, bottom, left)*/
}
</style>
</head>
<body>
<img class="demo1" src="splessons-logo.png" alt="splessons"/><br>
<img class="demo2" src="splessons-logo.png" alt="splessons"/><br>
<img class="demo3" src="splessons-logo.png" alt="splessons"/>
</body>
</html>
[/html]
Result
By running the above code in a preferred browser user can get the following output as shown in below image.
CSS Negative Margins
By using CSS User can generate elements with negative margins which are used to generate the gap in between the elements to further reduce than in normal case with no margins. If elements with negative margins which does not overlap each other and these can be hidden from the display.
[html]
<!DOCTYPE HTML>
<html>
<head>
<style>
.demo1{border:5px solid #ccc;
margin:-10px;/*set a margin of -10px for all edges*/
}
.demo2{border:5px solid #009900;
margin:-10px -20px;/*set a margin of -10px for top and bottom
edges and -20px for left and right edges*/
}
.demo3{border:5px solid #fa4b2a;
margin:-10px -20px -30px -40px /*set a negative margin in order
(top, right, bottom, left)*/
}
</style>
</head>
<body>
<img class="demo1" src="splessons-logo.png" alt="splessons"/><br>
<img class="demo2" src="splessons-logo.png" alt="splessons"/><br>
<img class="demo3" src="splessons-logo.png" alt="splessons"/>
</body>
</html>
[/html]
Result
By running the above code in a preferred browser user can get the following output as shown in below image.
- Individual margin
- CSS Center content using margin
- shorthand margin
- Indent Text
- Negative Margins
- margin-top
- margin-bottom
- margin-right
- margin-left
- margin : 5px 10px 15px 20px top, right, bottom, left which is clockwise direction starts from top.
- margin : 5px 10px 15px top, right, bottom which is clockwise direction starts from top.
- margin : 5px 10px top and bottom (5px), right and left (10px) , which is clockwise direction starts from top.<
- margin : 5px which all sides of content.
key Points
- Google warns developer not to hide element using CSS negative margins.
- Indent text similar effects will be achieved by using blockquote element.
- Individual edges have different margin values.