 Introduction
The current chapter gives an overview about AWT Menu. The following concepts are covered in AWT Menu chapter:
- Introduction to MenuComponent.
- Ways to create a frame.
- Steps to add menu components to a frame.
 Description
 More Info
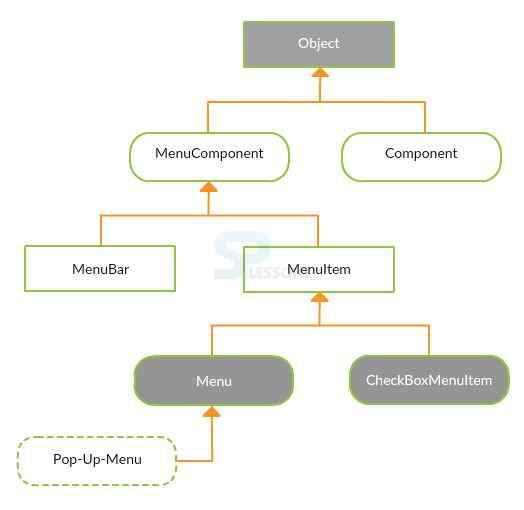
As shown in the above figure, MenuItem and MenuBar are not components because their super class is the MenuComponent, and not the Component class. As MenuItem and MenuBar are not components, they cannot be placed in any container. Infact, they occupy a very less space in the frame.
Menu Placing Ways: Since, Menu is not a component, it cannot be placed in a component directly. To overcome this, menu classes can be placed in an applet without inheriting the setMenuBar() method. This can be done in 3 simple ways:
- MenuBar : It is placed at the top of the screen and consists of menu items.
- MenuItem : It represents the selection made on menu items.
- Menu : It gives the drop-down list of menu items present in the MenuBar.
- CheckBoxMenuItem : MenuItems can be made visible or invisible using the CheckBoxMenuItem.
- Applet opening a frame having MenuBar, when clicked on a button.
- Applet using the created pop-up menu.
- Applet having menu in a web page with the rectangle shaped drop-down box.
 Advantages
AWT Menu can be loaded faster when incorporated in an applet as it is not required to load the class from the network. Moreover, if Menus are used with Applet, they can have great look and feel.
 Steps
Steps
As Applet cannot contain Menus directly in it, it must be placed in a Frame initially.
- Find the frame of the applet using the below code.
Object f = getParent (); while (! (f instanceof Frame)) f = ((Component) f).getParent (); Frame frame = (Frame) f; - Create the menu bar and add it to the frame found.
- Develop menus and push them to the menu bar.
- Create Menu items and attach them to menus in the menu bar.
- Perform event-handling.
 Examples
[java]
import java.applet.*;
import java.awt.*;
import java.lang.*;
import java.util.*;
public class Splesson extends Applet {
private Frame frame;
private MenuBar mbar;
private Menu fm, hm;
private MenuItem ol, of, pr, hi, hc;
private Label message = new Label("Welcome to SPlessons.");
private Label message1 = new Label("Select an option from menu");
public void init() {
setLayout(new BorderLayout());
add("North", message);
add("Center", message1);
Object f = getParent ();
while (! (f instanceof Frame))
f = ((Component) f).getParent();
frame = (Frame) f;
mbar = new MenuBar();
mbar.add(fm = new Menu("File"));
mbar.add(hm = new Menu("Help"));
mbar.setHelpMenu(hm);
fm.add(ol = new MenuItem("Open Location"));
fm.add(of = new MenuItem("Open File"));
fm.addSeparator();
fm.add(pr = new MenuItem("Print"));
hm.add(hi = new MenuItem("Index"));
hm.add(hc = new MenuItem("Content"));
frame.setMenuBar(mbar);
frame.pack();
}
public boolean action(Event e, Object arg) {
if (e.target == ol || e.target == of || e.target == pr ||
e.target == hi || e.target == hc) {
message.setText((String) arg);
return true;
}
return super.action(e,arg);
}
}
[/java]
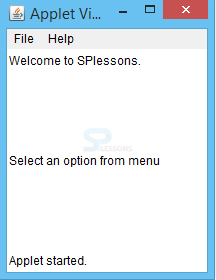
Output
 Key Points
- MenuBar consists of Menu and MenuItems.
- Menus are not the components.
- Applet contains a frame consisting of MenuItems.


