 Introduction
A service is a class with a focused purpose. One can create a service to implement functionality that is independent from any particular component, to share data or logic across components, or encapsulate external interactions, such as data access. By shifting these responsibilities from the component to a service, the code is easier to test, debug, and reuse. Following are the major components covered in this chapter.
- Working of Services and Dependency injection in angular.
- Building a Service.
- Registering the Service.
- Injecting the Service.
 Description
Services -
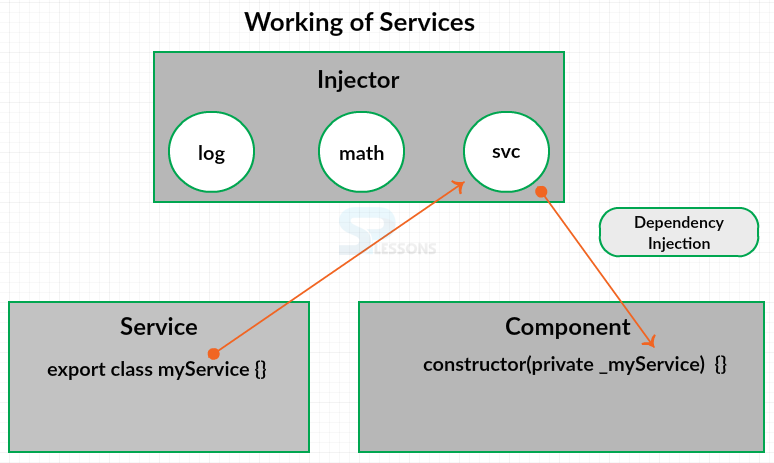
The figure below explains the working of services, the component can work with the service in two ways. The component can create an instance of the service class and use it. That simple, and it works. But the instance is local to the component, so one can't share data or other resources, and it will be more difficult to mock the service for testing.
Alternatively, one can register the service with Angular. Angular then creates a single instance of this service class, called a singleton, and holds onto it. Specifically, Angular provides a built-in injector. One can register the services with the Angular injector, which maintains a container of created service instances. The injector creates and manages the single instance, or singleton, of each registered service as required.
In this example, the Angular injector is managing instances of three different services, log, math, and myService, which is abbreviated svc. If the component needs a service, the component class defines the service as a dependency. The Angular injector then provides, or injects, the service class instance when the component class is instantiated. This process is called dependency injection. Since Angular manages the single instance, any data or logic in that instance is shared by all of the classes that use it. This technique is the recommended way to use services, because it provides better management of service instances. It allows sharing of data and other resources, and it's easier to mock the services for testing purposes.
Dependency injection -
Dependency injection is a coding pattern in which a class receives the instances of objects it needs, called its dependencies, from an external source rather than creating them itself. In Angular, this external source is the Angular injector.
 Description
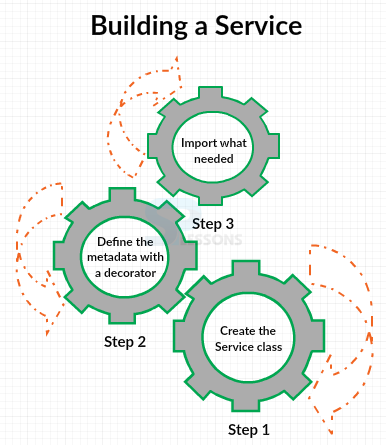
In order to build a Service in angular, first one need to create the service class then define the metadata with a decorator and should import what one need.
The snippet code below is the code for a simple service in angular.
[c]
import { Injectable } from '@angular/core'
@Injectable()
export class ProductService {
getProducts(): IProdcut[] {
}
}
[/c]
In the above code a class is defined and exported so that the service can be used from any other parts of the application. This class currently has one method, getProducts. This method returns an array of products. Next, add a decorator for the service metadata. When building services, use the Injectable decorator. This decorator is only really required if the service itself has an injected dependency. However, it is recommended that every service class use the Injectable decorator for clarity and consistency. Lastly, import what one need. In this case, Injectable.
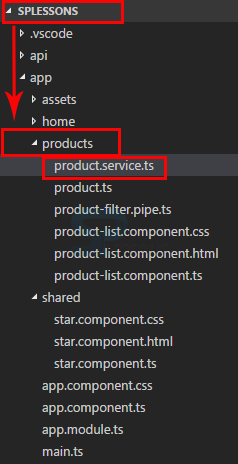
In the sample application under the products folder create a new file and name it as product.service.ts as shown in the image below.
Now, build a service class by defining the class name and exporting the class, since the service providing products assume the class name as ProductService as shown in the code below.
product.service.ts
[c]
import { Injectable } from '@angular/core';
import { IProduct } from './product';
@Injectable()
export class ProductService {
getProducts(): IProduct[] {
return [
{
"productId": 1,
"productName": "Angular 2",
"productCode": "SPL-0011",
"releaseDate": "March 19, 2016",
"description": "A Practical Introduction to the new Web Development Platform Angular 2",
"price": 19.95,
"starRating": 3.2,
"imageUrl": "./app/assets/images/angular_2.png"
},
{
"productId": 2,
"productName": "Word Press",
"productCode": "SPL-0023",
"releaseDate": "March 18, 2016",
"description": "This ebook allows you to create a WordPress website on your domainfrom scratch.",
"price": 32.99,
"starRating": 4.2,
"imageUrl": "./app/assets/images/wordpress-logo.png"
},
{
"productId": 5,
"productName": "GitHub",
"productCode": "SPL-0048",
"releaseDate": "May 21, 2016",
"description": "Become a professional coder",
"price": 8.9,
"starRating": 4.8,
"imageUrl": "./app/assets/images/github_logo.png"
},
{
"productId": 8,
"productName": "NodeJs",
"productCode": "SPL-0022",
"releaseDate": "May 15, 2016",
"description": "The content ramps up nicely from basic to advanced.",
"price": 11.55,
"starRating": 3.7,
"imageUrl": "./app/assets/images/nodejs_logo.png"
}
];
}
}
[/c]
Here in the code, the class is decorated with the injectable decorator and the import statement is added for the injectable decorator, the injected decorator is an optional unless the service has an injected dependency of its own, but it is good practice to add it to every service.
The properties or methods are added to the class as needed. Unless marked private or protected, the properties and methods defined in the class are accessible to any class that uses this service. For the product service, a getProducts method is needed that returns the list of products. So strongly typed the return value using the IProduct interface and imported.
Notice that no properties are defined in this class, so this particular service is not used to share data but using it to encapsulate the data access features. By using this service to provide the list of products, one take the responsibility for managing the data away from the individual component. That makes it easier to modify or reuse this logic.
So now done with building a service but in order to use the created service register it with Angular injector.
 Description
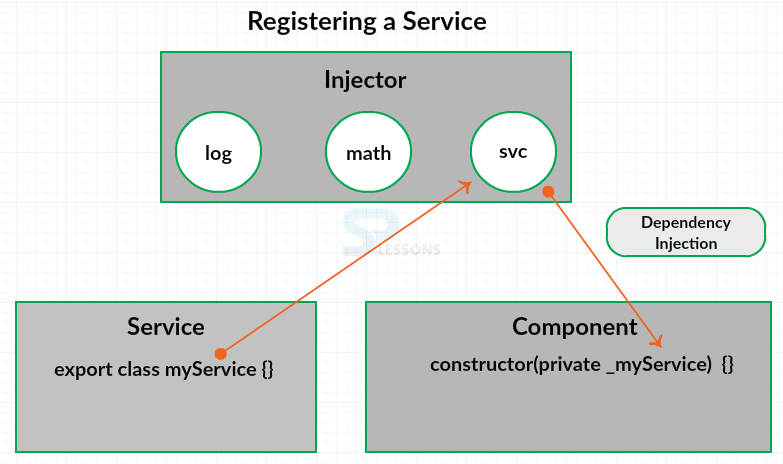
As illustrated in the below diagram, one can register the service with an Angular injector, and the injector provides the service instance to any class that defines it as a dependency.
To register a service, one must register a provider. A provider is code that can create or return a service, typically the service class itself. In order to register a provider define it as part of the component or Angular module metadata. By registering a provider in a component's metadata, the Angular injector can inject this service into the component and any of its children. So one should take care to register the provider at the appropriate level of the application component tree. If a provider registered in an Angular module, the service is registered with the Angular injector at the application's root, making the service available everywhere in the application.
From the sample application open the app component root file, in order to register a provider that creates the service, add the provider property to the component decorator. The provider’s property is an array, so one can register multiple providers. So, for registering provider for the product service specify the ProductService and import the service as shown in the code below.
app.component.ts
[c]
import { Component } from '@angular/core';
import { ProductService } from './products/product.service';
@Component({
selector: 'pm-app',
template: `<div><h1>{{pageTitle}}</h1>
<pm-products></pm-products>
</div>`,
providers: [ ProductService ]
})
export class AppComponent {
pageTitle: string = 'SPLessons Product Managment';
}
[/c]
 Description
After registering the service with Angular injector, it need to be define as a dependency. So, the injector will provide the instance in the classes that need it. So in order to do dependency injection in Angular use a Constructor in a TypeScript.
Every class has a constructor that is executed when an instance of the class is created. If there is no explicit constructor defined for the class, an implicit constructor is used. So far, an explicit class constructor is not needed, but if one want to inject dependencies, such as an instance of a service, need an explicit constructor.
In TypeScript, a constructor is defined with a constructor function. Since the constructor function is executed when the component is created, it is primarily used for initialization, and not for code that has side effects or takes time to execute. One can identify the dependencies by specifying them as parameters to the constructor function as shown in the code below.
[c]
import { ProductService } from './products/product.service';
@Component({
selector: 'pm-products',
templateUrl: 'product-list.component.html'
})
export class ProductListComponent {
constructor(private _productService: ProductService) {
}
}
[/c]
Here, a private variable is defined to hold the injected service instance. Create another variable as the constructor parameter. When this class is constructed, the Angular injector sets this parameter to the injected instance of the requested service and then assign the injected service instance to the local variable. One can then use this variable anywhere in the class to access service properties or methods. This is such a common pattern that TypeScript defined a shorthand syntax for all of this code. So, simply add the accessor keyword, such as private, to the constructor parameter. Then, it is the shortcut for declaring the variable, defining a parameter, and setting the variable to the parameter.
 Example
Now open the product list component in the sample application, in order to use the service to get products in the product list component, define the product service as a dependency in the product list component and no need of adding the providers array, because the product service is already registered in the app component, which is the parent of this component. All need is a constructor. The constructor is normally defined after all of the properties as shown in the code below.
product-list.component.ts
[c]
import { Component, OnInit } from '@angular/core';
import { IProduct } from './product';
import { ProductService } from './product.service';
@Component({
selector: 'pm-products',
templateUrl: 'app/products/product-list.component.html',
styleUrls: ['app/products/product-list.component.css']
})
export class ProductListComponent implements OnInit{
pageTitle: string = 'Product List!';
imageWidth: number = 50;
imageMargin: number = 2;
showImage: boolean = false;
listFilter: string;
products: IProduct[];
constructor(private _productSerive: ProductService){
}
toggleImage(): void{
this.showImage = !this.showImage;
}
ngOnInit(): void {
this.products = this._productSerive.getProducts();
}
onRatingClicked(message: string): void {
this.pageTitle = 'Product List: ' + message;
}
}
[/c]
Here in the code, the shorthand syntax is used to define the dependency, private_productService. Use an underscore to denote that this is a private variable. Then, because of using TypeScript, type colon and the type, which is ProductService. Note that the accessor doesn't have to be private. This shorthand syntax works with public and protected as well.
Import ProductService so that one can use it as the data type. Now, when an instance of the product list component is created, the Angular injector injects in the instance of the product service.
If the code which call the service put in constructor the product service will go out to the back-end server to get the data. So, the other way to get the data is by using the lifecycle hooks. The OnInit lifecycle hook provides a place to perform any component initialization. And it's a great place to retrieve the data for the template. So, use the OnInit lifecycle hook.
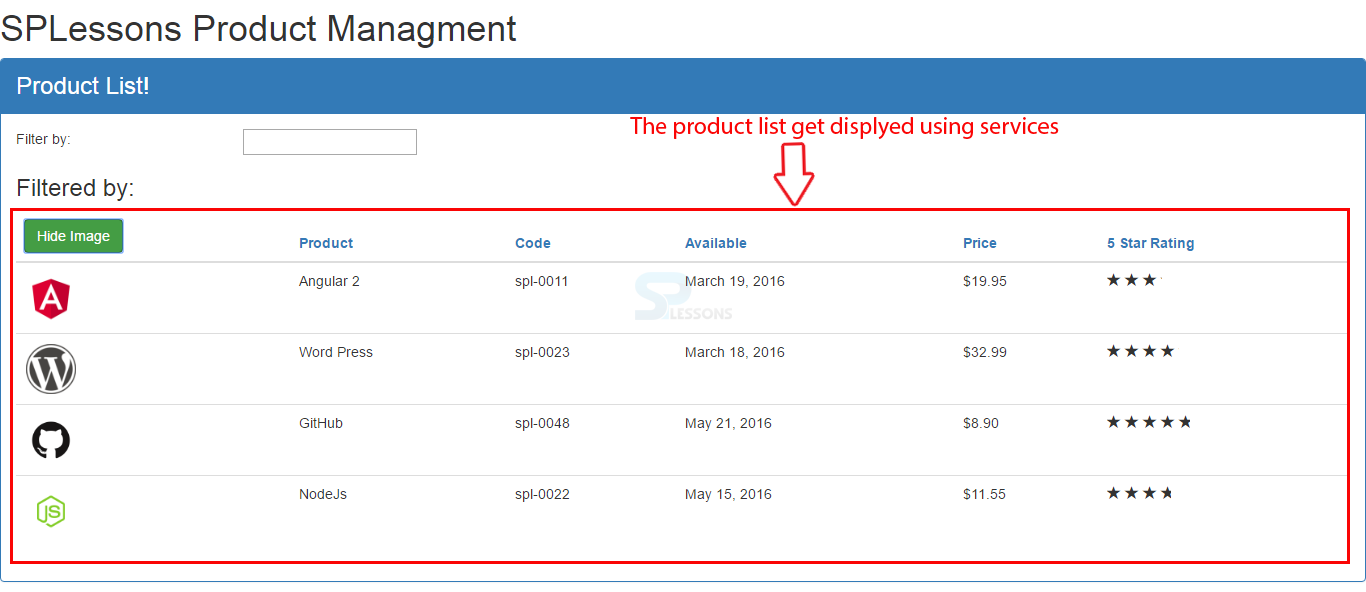
Set the product's property to the product's return from the service. To call the service, use the private variable containing the injected server instance, this._productService. Then type a dot, and the name of the method to be called as shown in the code.
 Output
 Key Points
- Using the services the code get easier to test, debug and reuse.
- The build services should register with the Angular injector.
- The dependency injection in Angular is done using the constructor.


