 Introduction
Users like to have all of the information they need at their fingertips, so the applications often provide multiple sets of data in multiple layouts across multiple views. Routing provides a way for the user to navigate between those many views of the application, whether there are five, 10, or hundreds. Following are the major concepts covered.
- How Routing Works
- Configuring Routes
- Tying Routes to Actions
- Placing the views
 Description
An Angular application is a single page application. That means all of the views are displayed within one page, normally defined in the index.html file. So each of the five, ten, or hundreds of views take turns appearing on that one page. The purpose of routing is to manage which view is to display when.
One should configure a route for each component that wants to display its view on the page. As part of the application design, one can provide a menu, a toolbar, buttons, images, or data links that allow the user to select the view to display. Tie a route to each option or action. When the user selects the option or performs the action, the associated route is activated. Activating a component's route displays that component's view. So for example, the user selects a menu option to display the product list. The product list route is activated and it displays its view.
 Example
In the sample application, build a Product Detail Component. In this case one need to focus on routing not building another component, so just create shell for the Product Detail Component so that one can route to it.
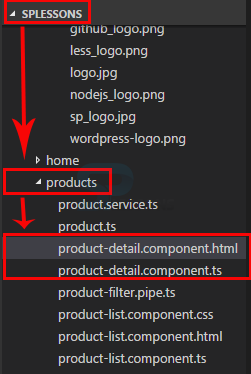
So in the products folder, create a new file called product-detail.component.ts and a new template file called product-detail.component.html as shown in the image below.
In the html file, put some placeholder text and use the interpolation to bind a page title as shown in the code below.
product-detail.component.html
[html]
<div class='panel panel-primary'>
<div class='panel-heading'>
{ {pageTitle} }
</div>
</div>
[/html]
Now, build the Product Detail Component, import a component decorator and import the IProduct interface so that one can use it as the data type of the product property, export the Product Detail Component class, define the properties for the page title and product.
product-detail.component.ts
[c]
import { Component } from '@angular/core';
import { IProduct } from './product';
@Component({
templateUrl: 'app/products//product-detail.component.html'
})
export class ProductDetailComponent {
pageTitle: string = 'Product Detail';
product: IProduct;
}
[/c]
Decorate the class with the component decorator, define the view using the template URL. Notice the code don’t have a sector property, the selector property is only required if the component will be nested within another component. So, in this case instead of nesting the component display the component’s view as part of routing.
Every time adding a component to the application, one should declare that component in an Angular module. In this case the Angular module is AppModule. So, add the Product Detail and Welcome Component to the declaration’s array for the app module as shown in the code below.
app.module.ts
[c]
import { NgModule } from '@angular/core';
import { BrowserModule } from '@angular/platform-browser';
import { FormsModule } from '@angular/forms';
import { HttpModule } from '@angular/http';
import { AppComponent } from './app.component';
import { WelcomeComponent } from './home/welcome.component';
import { ProductListComponent } from './products/product-list.component';
import { ProductDetailComponent } from './products/product-detail.component';
import { ProductFilterPipe } from './products/product-filter.pipe';
import { StarComponent } from './shared/star.component';
@NgModule({
imports: [
BrowserModule,
FormsModule,
HttpModule
],
declarations: [
AppComponent,
WelcomeComponent,
ProductListComponent,
ProductDetailComponent,
ProductFilterPipe,
StarComponent ],
bootstrap: [ AppComponent ]
})
export class AppModule { }
[/c]
 Description
Routing is component-based, so one should identify the set of components which provide as routing targets and define a route for each one. The snippet code below demonstrate how the route configuration is done.
app.module.ts
[c]
...
import { RouteModule } from '@angular/router';
@NgModule({
import: [
BrowserModule,
FromsModule,
HttpModule,
RouterModule.forRoot([], { useHash: true})
],
declarations: [
...
],
bootstrap: [ AppComponent ]
})
export class AppModule { }
[/c]
An Angular application has one router that is managed by Angular's router service and before using that service, one need to register the service provider in an Angular module, similar to the http module, Angular provides a RoutherModule in the Angular router package that registers the router service provider. To include the features of this external module in the application, one need to add it to the imports array of the application's Angular module. In addition to registering the router service provider, the RoutherModule also declares the router directives.
By importing the RoutherModule, the component templates can use the router directive. RoutherModule also exposes the routes one configured. Before navigating to a route, one need to ensure that the routes are available to the application and this can be done by passing the routes to RoutherModule as shown below.
RouterModule.forRoot([])
Call the RoutherModules forRoot method and pass the array of routes to that method. This establishes the routes for the root of the application. If one want to use hash style routes instead of html five style routes, change the code to set useHash as show.
RouterModule.forRoot([], { useHash: true})
Finally, one can now configure some routes.
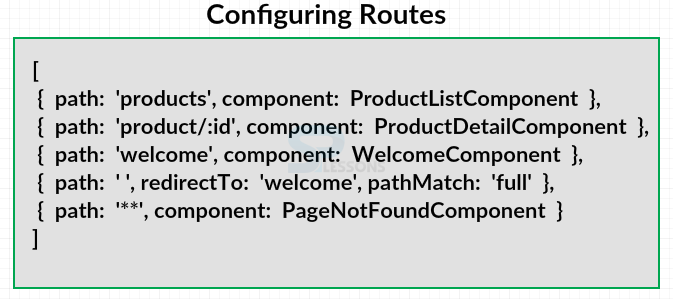
The router must be configured with a list of route definitions. Each definition specifies a route object. Each route requires a path. The path property defines the URL segment for the route. When the route is activated, the URL path segment is appended to the URL of the application. The user can type in or bookmark the resulting URL to return directly to the associated components view. In most cases one can also specify a component, which is the component associated with the route.
The above image give the examples of route definitions. The first route simply maps a specific URL path segment to a specific component. So the URL displays the template from the Product List Component.
The colon ID in the second route represents a route parameter. The Product Detail Page displays the detail for one product so it needs to know which product to display. The Product Detail Component reads the ID from the path segment and displays the defined product. One can define any number of parameters separated wit slashes.
The third route display the template from the Welcome Component using the URL.
The fourth route defines the default route. The redirect translates the empty route to the desired default path segment. In this example, the welcome route. A redirect route requires a path match property to tell the router how to match the URL path segment to the path of a route. This default route is only used when the entire client side portion of the path is empty, so set the path match to full.
The asterisks(**) in the last route denote a wildcard path. The router matches this path if the requested URL doesn't match any prior paths defined in the configuration. This is useful for displaying a 404 Not Found Page or redirecting to another route.
A few things to note in all of this route definitions. There are no leading slashes in the path segments and the order of the routes in this array matters. The router uses a first match win strategy when matching the routes. This means that more specific routes should always be before less specific routes, such as the wildcard route.  Example
Open the index.html in the sample application and add a base element just after the head tag as shown in the below code.
index.html
[html]
<!DOCTYPE html>
<html>
<head lang="en">
<base href="/">
<title>Product Management</title>
<meta charset="UTF-8">
<meta name="viewport" content="width=device-width, initial-scale=1">
<link href="node_modules/bootstrap/dist/css/bootstrap.css" rel="stylesheet" />
<link href="app/app.component.css" rel="stylesheet" />
<!-- Polyfill(s) for older browsers -->
<script src="node_modules/core-js/client/shim.min.js"></script>
<script src="node_modules/zone.js/dist/zone.js"></script>
<script src="node_modules/reflect-metadata/Reflect.js"></script>
<script src="node_modules/systemjs/dist/system.src.js"></script>
<!-- Configure SystemJS -->
<script src="systemjs.config.js"></script>
<script>
System.import('app').catch(function(err){ console.error(err); });
</script>
</head>
<body>
<pm-app>Loading App...</pm-app>
</body>
</html>
[/html]
This element tells the router how to compose the navigation URLs. Since the app folder is the application route, set the hRef for the base tag to slash.
Now, in order to configure the route definition, go to the Angular Module and add the appropriate import statements, then add the RouterModule to the import array as shown in the code below.
app.module.ts
[c]
import { NgModule } from '@angular/core';
import { BrowserModule } from '@angular/platform-browser';
import { FormsModule } from '@angular/forms';
import { HttpModule } from '@angular/http';
import { RouterModule } from '@angular/router';
import { AppComponent } from './app.component';
import { WelcomeComponent } from './home/welcome.component';
import { ProductListComponent } from './products/product-list.component';
import { ProductDetailComponent } from './products/product-detail.component';
import { ProductFilterPipe } from './products/product-filter.pipe';
import { StarComponent } from './shared/star.component';
@NgModule({
imports: [
BrowserModule,
FormsModule,
HttpModule,
RouterModule.forRoot([
{ path: 'products', component: ProductListComponent },
{ path: 'product/:id', component: ProductDetailComponent },
{ path: 'welcome', component: WelcomeComponent },
{ path: '', redirectTo: 'welcome', pathMatch: 'full' },
{ path: '**', redirectTo: 'welcome', pathMatch: 'full' }
])
],
declarations: [
AppComponent,
WelcomeComponent,
ProductListComponent,
ProductDetailComponent,
ProductFilterPipe,
StarComponent ],
bootstrap: [ AppComponent ]
})
export class AppModule { }
[/c]
This registers the router's service provider, declares the router directives, and exposes the configured routes. The RouterModule know about the configured routes by passing them into the RouterModule by calling forRoot method.
The routes are passed by using an array. For each route, specify the path and a reference to the component. The template defined in the specified component will display when the router navigates to this path.
 Description
With routing, the user can navigate through the application in several ways. The user can click a menu option link, image, or button that activates, or navigates to, a route. The user can type the associated URL segment in the address bar after the application URL or use a bookmark to that URL, or the user can click the browser's forward or back buttons.
First one need to decide how to show the routing options to the user. One could also display a navigation pane with links and can provide a toolbar or images or can build a navigation menu.
The snippet code below explain defining a menu in a component’s template.
[c]
@Component({
selector: 'pm-app',
template: `
<ul class='nav navbar-nav'>
<li><a [routerLink]="['/welcome']">Home</a></li>
<li><a [routerLink]="['/products']'>Product List</a></li>
</ul>
`
})
[/c]
Each menu option is tied with a route using the router link directive. The router link is an attribute directive so add it to an element such as the anchor tag and enclose it in square brackets. Bind it to a template expression that returns a link parameters array. The first element of this array is the string path of a route. Additional elements can be added to the array to specify optional route parameters. The router uses the array to locate the associated route and build up the appropriate URL based on any provided parameters. When the user selects the option, the associated route is activated. Activating a component route displays that component's view.
 Example
In the sample application, first decide how to show the routing options to the user. Build a menu for the sample application. So, add the menu at the root of application, app component. In the app component replace the nested Product List Component with the navigation menu as shown in the code below.
app.component.ts
[c]
import { Component } from '@angular/core';
import { ProductService } from './products/product.service';
@Component({
selector: 'pm-app',
template: `
<div>
<nav class='navbar navbar-default'>
<div class='container-fluid'>
<a class='navbar-brand'>{ {pageTitle} }</a>
<ul class='nav navbar-nav'>
<li><a>Home</a></li>
<li><a>Product List</a></li>
</ul>
</div>
</nav>
</div>
`,
providers: [ ProductService ]
})
export class AppComponent {
pageTitle: string = 'SPLessons Product Managment';
}
[/c]
This menu uses the nav element and the navbar classes from the Twitter bootstraps styling framework.
Now, check the output in the browser, the new menu options get display as shown in the image below but clicking on the menu options don’t do anything yet.
Use the router link directive to tie a route to each of these menu options as shown in the code below.
app.component.ts
[c]
import { Component } from '@angular/core';
import { ProductService } from './products/product.service';
@Component({
selector: 'pm-app',
template: `
<div>
<nav class='navbar navbar-default'>
<div class='container-fluid'>
<a class='navbar-brand'>{ {pageTitle} }</a>
<ul class='nav navbar-nav'>
<li><a [routerLink]="['/welcome']">Home</a></li>
<li><a [routerLink]="['/products']">Product List</a></li>
</ul>
</div>
</nav>
</div>
`,
providers: [ ProductService ]
})
export class AppComponent {
pageTitle: string = 'SPLessons Product Managment';
}
[/c]
For the Home menu option, add the router link to the anchor element, but could use any clickable element. Tie the welcome route to the Home menu option, so specify Welcome. Notice the syntax. Assign the router link's directive to an array defined within quotes. The first element of the array is a string, so it is also enclosed in quotes. Use similar syntax to tie the product's route to the Product List menu option. The Product List Component selector can be removed as it is no longer nesting.
 Description
When a route is activated, the associated component's view is displayed and this can be done using the router outlet directive. Place the directive in the host component’s template. Add the router outlet to the sample application.
 Example
Open the App component as it is the host for the router, add the router outlet in the template as shown in the code below.
app.component.ts
[c]
import { Component } from '@angular/core';
import { ProductService } from './products/product.service';
@Component({
selector: 'pm-app',
template: `
<div>
<nav class='navbar navbar-default'>
<div class='container-fluid'>
<a class='navbar-brand'>{ {pageTitle} }</a>
<ul class='nav navbar-nav'>
<li><a [routerLink]="['/welcome']">Home</a></li>
<li><a [routerLink]="['/products']">Product List</a></li>
</ul>
</div>
</nav>
<div class='container'>
<router-outlet></router-outlet>
</div>
</div>
`,
providers: [ ProductService ]
})
export class AppComponent {
pageTitle: string = 'SPLessons Product Managment';
}
[/c]
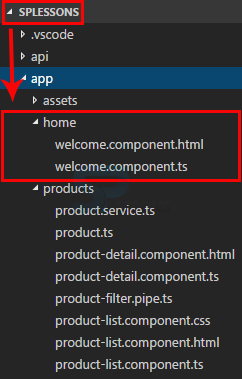
Now, create a folder and name it as home, create two files and name the files as welcome.component.html and welcome.component.ts as shown in the image below.
Now build the welcome component template as shown in the code.
welcome.component.html
[html]
<div class="panel panel-primary">
<div class="panel-heading">
{ {pageTitle} }
</div>
<div class="panel-body" >
<div class="row" >
<img src="./app/assets/images/sp_logo.jpg"
class="img-responsive center-block"
style="max-height:300px;padding-bottom:50px"/>
</div>
<div class="row" >
<div class="text-center">Developed by:</div>
<h3 class="text-center">Team SPLessons</h3>
<div class="text-center">@SPLessonsTutorials</div>
<div class="text-center">
<a href="http://www.splessons.com/">www.splessons.com</a>
</div>
</div>
</div>
</div>
[/html]
Define the class for the Welcome Component and add a decorator for the class, then import the decorator from the Angular core as shown in the code below.
welcome.component.ts
[c]
import { Component } from '@angular/core';
@Component({
templateUrl: 'app/home/welcome.component.html'
})
export class WelcomeComponent {
public pageTitle: string = 'Welcome';
}
[/c]
 Output
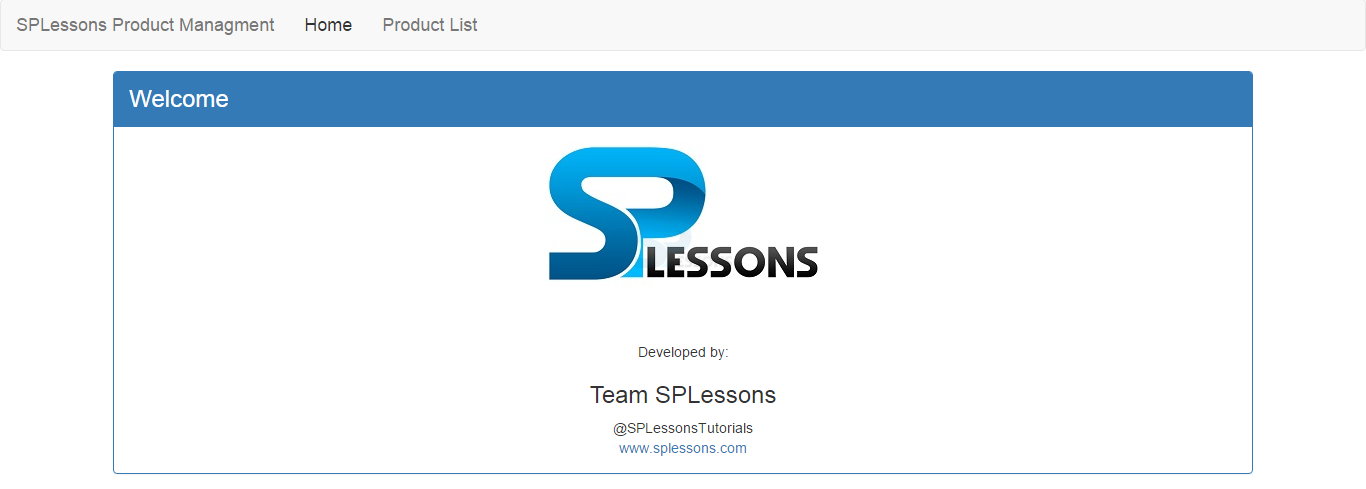
Now, check the output in the browser, the welcome page get displayed which is provided in the created home folder. When the application launches, the default route is activated and the welcome view displayed as shown in the image below.
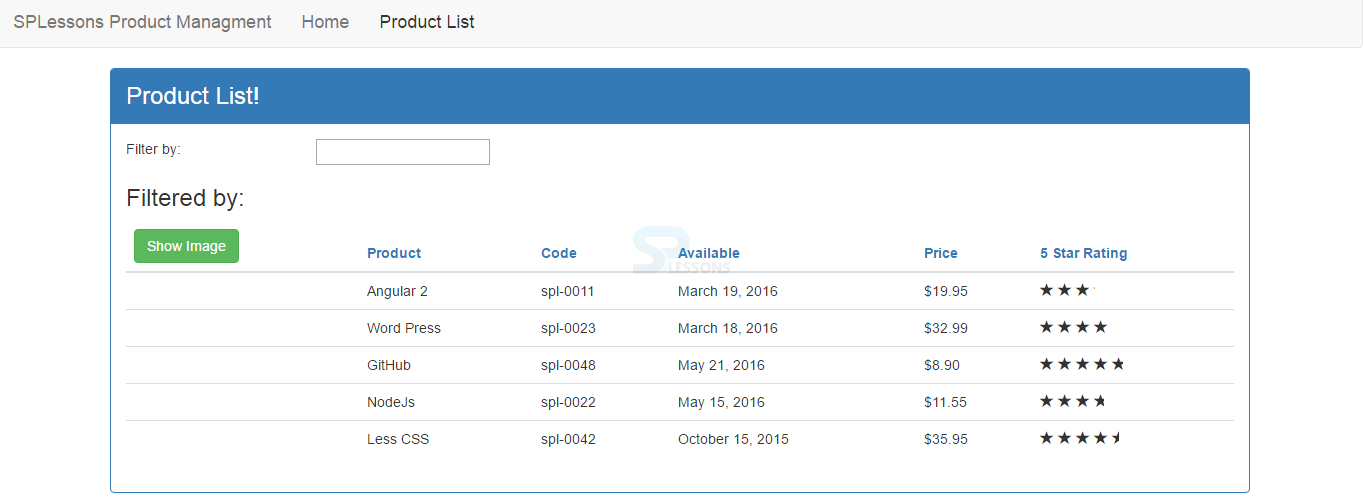
By clicking on the Product List menu in the output, the router link directive activates and the Product List route and the list view appears as shown in the image below.
 Key Points
- When nesting one component into another component one should define a selector.
- The route should be configured for each component that wants to display its view.
- Routing is based on component.
- Using routing user can navigate through the application in several ways.


