 Introduction
Directives as a custom HTML element or attribute used to power up and extend the HTML. When Angular renders templates, it transforms the DOM according to instructions from directives. Following are the major concepts covered.
- Directives
 Description
A Directive modifies the DOM to vary appearance, behavior or layout of DOM elements. Directives are one of the core building blocks Angular 2 uses to create applications. In fact, Angular 2 components are in large part directives with templates. From an Angular 1 perspective, Angular 2 components have assumed plenty of the roles directives used to. The bulk of problems that involve templates and dependency injection rules are going to be done through components, and problems that involve modifying generic behavior is completed through directives.
There are 3 main sorts of directives in Angular 2 -
- Attribute directives - directives that change the behavior of a element or component however do not have an effect on the template
- Structural directives - directives that change the behavior of a element or component by affecting however the template is rendered
- Component - directive with a template.
 Description
Attribute directives are some way of changing the looks or behavior of a component or a native DOM element. Ideally, a directive ought to work in a way that's component agnostic and not absolute to implementation details.
For example, Angular 2 has built-in attribute directives such as ngClass and ngStyle that work on any element or component.
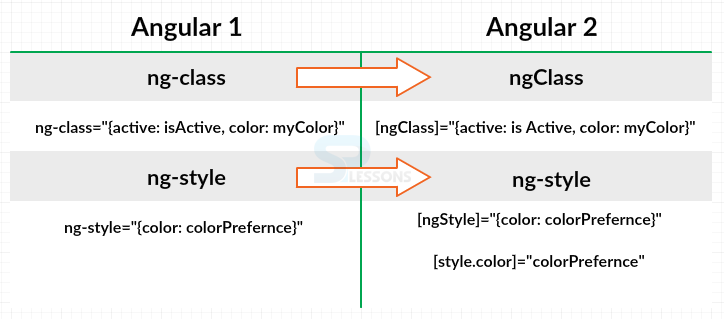
The image below show the difference between the Angular Class and Style Directives.
Angular 1 have things like ngClass and ngStyle, the figure shows the Class and Style Directives with the syntax. Angular 2, actually have something very similar and these are pretty similar syntax. So to identify the ngClass in Angular 2 one can use camel case, and wrap it with the box with the square brackets and then use a very similar syntax that had before where one set the active class if isActive is true and then the color class is myColor is true.
For Style, one can have two alternatives to choose. Actually one used to have just ngStyle and can still do it with ngStyle with camel case with the square brackets and then bind it to maybe an object literal where the style of color are set it colorPreference, which is a model binding. Or could just say style.color and bind that one property to colorPreference.
 Description
Structural Directives are the way of handling how an element or element renders through the use of the template tag. This enables developer to run some code that decides what the ultimate rendered output are. Angular 2 includes a few built-in structural directives like ngIf, ngFor, and ngSwitch.
In addition to building own custom directives, one can use Angular's built-in directives. The built-in Angular directives are structural directives. A structural directive modifies the structure or layout of a view by adding, removing, or manipulating elements and their children. They help developer to power up the HTML with If logic and For loops. Notice the asterisk (*) in front of the directive name. That marks the directive as a structural directive.
The image below show the difference between the Angular 1 and Angular 2 Structural Directives.
 Description
ngIf is a structural directive that removes or recreates a portion of the dom tree based on an expression. If the expression assigned to the ngIf evaluates to a false value, the element and its children are removed from the dom. If the expression evaluates to a true value, a copy of the element and its children are reinserted into the dom.
For example, say if one wanted to show the HTML table and there are some products in a list of products. Use ngIf on the table element and set it to “products && products.length”. If the products variable has a value and the products list has length, the table appears in the dom. If not, the table element and all of its children are removed from the dom.
So, first define a product property in the components class, and just define the product as an array of any as shown in the below code.
product-list.component.ts
[c]
import { Component } from '@angular/core';
@Component({
selector: 'pm-products',
templateUrl: 'app/products/product-list.component.html'
})
export class ProductListComponent {
products: any[];
}
[/c]
In TypeScript, any is used as the data type if one don’t know or don’t care what the specific data type is. In many case one will communicate with a back end server to get the data but as of now just enter few product details as shown in the code below.
product-list.component.ts
[c]
import { Component } from '@angular/core';
@Component({
selector: 'pm-products',
templateUrl: 'app/products/product-list.component.html'
})
export class ProductListComponent {
products: any[] = [
{
"productId": 1,
"productName": "Angular 2",
"productCode": "GDN-0011",
"releaseDate": "March 19, 2016",
"description": "A Practical Introduction to the new Web Development Platform Angular 2",
"price": 19.95,
"starRating": 3.2
},
{
"productId": 2,
"productName": "Word Press",
"productCode": "GDN-0023",
"releaseDate": "March 18, 2016",
"description": "This ebook allows you to create a WordPress website on your domainfrom scratch.",
"price": 32.99,
"starRating": 4.2
}
];
}
[/c]
Now after placing the product property one can use it in HTML by putting in the on the table element so that it can be added or removed from the dom. Type *ngIf equals and then the expression enclose the “products && products.lenght” in single quotes as shown in the code below.
product-list.component.html
[html]
<div class='panel panel-primary'>
<div class='panel-heading'>
Product List
</div>
<div class='panel-body'>
<div class='row'>
<div class='col-md-2'>Filter by:</div>
<div class='col-md-4'>
<input type='text' />
</div>
</div>
<div class ='row'>
<div class='col-md-6'>
<h3>Filtered by: </h3>
</div>
</div>
<div class='table-responsive'>
<table class='table'
*ngIf='products && products.length'>
<thead>
<tr>
<th>
<button class='btn btn-success'>
Show Image
</button>
</th>
<th>Product</th>
<th>Code</th>
<th>Available</th>
<th>Price</th>
<th>5 Star Rating</th>
</tr>
</thead>
<tbody>
</tbody>
</table>
</div>
</div>
[/html]
Check the output in browser, one can see the table header, so the table is displayed as shown in the image below.
Now, just comment out the product property assignment in the product-list.component.ts file as shown in the below code.
product-list.component.ts
[c]
import { Component } from '@angular/core';
@Component({
selector: 'pm-products',
templateUrl: 'app/products/product-list.component.html'
})
export class ProductListComponent {
// products: any[] = [
// {
// "productId": 1,
// "productName": "Angular 2",
// "productCode": "SPL-0011",
// "releaseDate": "March 19, 2016",
// "description": "A Practical Introduction to the new Web Development Platform Angular 2",
// "price": 19.95,
// "starRating": 3.2
// },
// {
// "productId": 2,
// "productName": "WordPress",
// "productCode": "SPL-0023",
// "releaseDate": "March 18, 2016",
// "description": "This ebook allows you to create a WordPress website on your domainfrom scratch.",
// "price": 32.99,
// "starRating": 4.2
// }
// ];
}
[/c]
Check the output in the browser, one can notice that the table get disappeared.
 Description
ngFor repeats a portion of the dom tree once for each item in an iterable list. So first define a block of HTML which defines how to display a single item and then tell Angular to use that block for displaying each item in the list.
For example, say one want to display each product in a row of a table. Define one table row and its child table data elements. That table row element and its children are then repeated for each product in the list of products as shown in the snippet code below.
[c]
<tr *ngFor='let product of products'>
<td></td>
<td>{ { product.productName } }</td>
<td>{ { product.productCode } }</td>
<td>{ { product.releaseDate } }</td>
<td>{ { product.price } }</td>
<td>{ { product.starRating } }</td>
</tr>
[/c]
The let keyword in the above code, creates a template input variable called product. One can reference this variable anywhere on this element, on any sibling element, or on any child element. And notice the of instead of in.
Now, open the product-list.component.html file and place the above code inside the table body as shown in the below code.
[html]
<div class='panel panel-primary'>
<div class='panel-heading'>
Product List
</div>
<div class='panel-body'>
<div class='row'>
<div class='col-md-2'>Filter by:</div>
<div class='col-md-4'>
<input type='text' />
</div>
</div>
<div class ='row'>
<div class='col-md-6'>
<h3>Filtered by: </h3>
</div>
</div>
<div class='table-responsive'>
<table class='table'
*ngIf='products && products.length'>
<thead>
<tr>
<th>
<button class='btn btn-success'>
Show Image
</button>
</th>
<th>Product</th>
<th>Code</th>
<th>Available</th>
<th>Price</th>
<th>5 Star Rating</th>
</tr>
</thead>
<tbody>
<tr *ngFor='let product of products'>
<td></td>
<td>{ { product.productName } }</td>
<td>{ { product.productCode } }</td>
<td>{ { product.releaseDate } }</td>
<td>{ { product.price } }</td>
<td>{ { product.starRating } }</td>
</tr>
</tbody>
</table>
</div>
</div>
[/html]
Now, check the output in the browser, one can notice that the product list is displayed in the table body as shown in the image below.
 Description
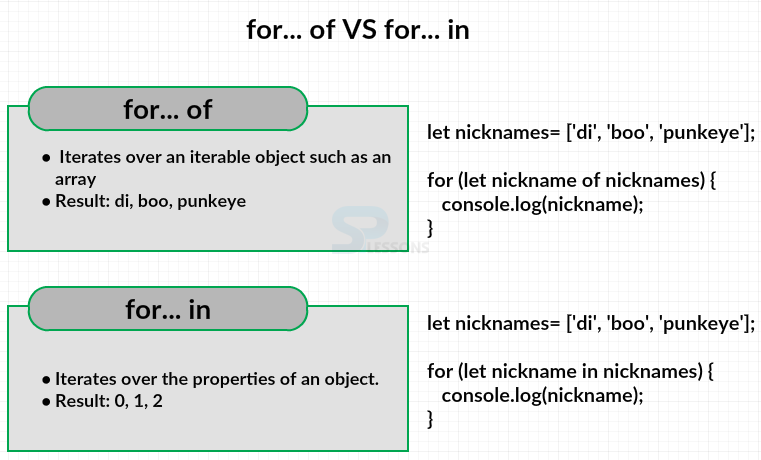
The syntax of ngFor is product of products and not product in products because of ES 2015 For loops. The ES 2015 has both a for of loop and a for in loop. The image below explains the difference between for of and for in loops.
Form the above image, The for of loop is similar to a for each style loop. It iterates over an iterable object such as an array. For example, say if one have array of person's nicknames. Then use for of to iterate over the list, one can see each nickname logged to the console.
The for in loop interates over the properties of an object. When working with an array such as this example, the array indexes are innumerable properties with integer names and are otherwise identical to general object properties. So one can see each array index logged to the console. To help remember the difference, think of in as iterating the index. Since the ngFor directive iterates over iterable objects, not their properties, Angular selected to use the of keyword in the ngFor expression.
 Key Points
- The behavior and appearance of a DOM is modified be a directive.
- Attribute directives are some way of changing the looks or behavior of a component or a native DOM element.
- Structural Directives are the way of handling how an element or element renders through the use of the template tag.


