 Introduction
Data binding, one among the foremost wanted and despised concepts of Angular 1, created its way to Angular 2. There are some ways to bind data in Angular: interpolation, one-way binding (unidirectional), two-way binding and event binding. These four sorts of data binding were already available in Angular 1, however now in Angular 2, the syntax has modified a bit. The following are the major concepts covered in the chapter.
- Data binding
- Binding with interpolation
- Property binding
- Event Binding
- Two Way Binding
Note:
You can check your wordpress website and server speed at Bitcatcha.
 Description
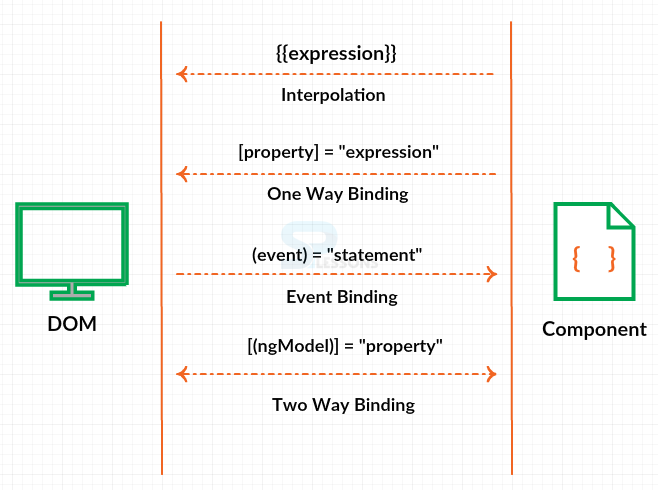
Data Binding is used to help coordinate communication between a component and its template that means one can send property values from the component up into the template to display them, and then also can take the values that a user types into the template and send them back down to a component. The image below explains the ways of data binding.
One may use interpolation to send data from the component up to the DOM, using double curly braces. So put an expression inside the braces and then it renders in the template. One can also bind to properties, and really interpolation is just a shorthand syntax which gets turned into a one way binding to a property.
Now, suppose a user wants to click a button or do some other action inside of the template and communicate back to the component and one can take some action on it. That's where an event binding is used. So the event get bind and the parenthesis is used around the name of that event and then a statement get called that lives in the component. So notice property bindings use square brackets and event bindings use the parenthesis. It's important to see that all the communication is in a single direction. Either going from the component to the template or going from the template back to the component as a unidirectional data flow.
There is a shorthand syntax that one can use to do that. It is actually a combination of the property and the event bindings. There's a special built-in directive that Angular 2 gives to users called ngModel, which is very familiar in Angular 1, it is the same name just operates a little differently. And it takes a value from the component, displays it in the template, and also accepts any input values that are in that binding to go back to the component. And to do that we use the square brackets and then inside of that the parenthesis wrapped around ngModel as shown in the image above.
 Description
Interpolation is that the easiest and also the best – known way of data binding, the syntax below show the interpolation in Angular 1 and Angular 2.
Angular 1 -
[c]<h1>{ { vm.product.name } }</h1>[/c]
Angular 2 -
[c]<h1>{ { product.name } }</h1>[/c]
In Angular 2, curly braces can be still used and can omit vm, because one can already get the context which is not really an enormous difference and can also save keystrokes.
 Example
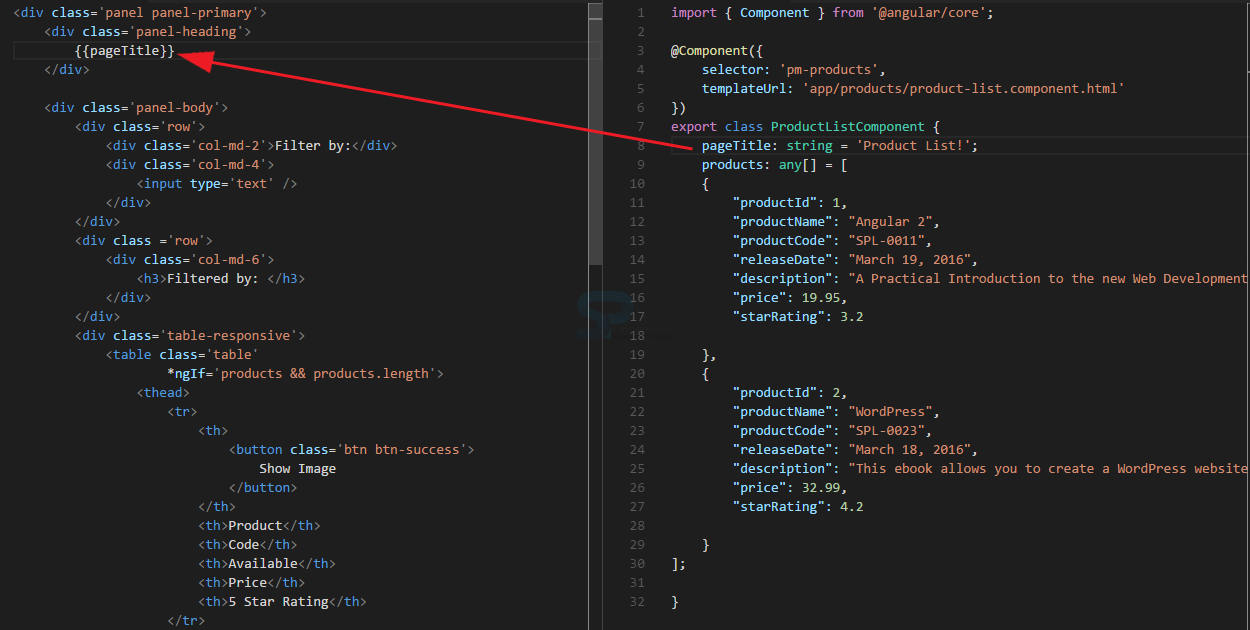
From the project Product management open the file product-list.component.ts and inside the class specify the property name as pageTitle and define the property type as string and assign some default value as Product List.
Now bind the defined pageTitle property in the template using interpolation as shown in the image below.
One can get the output with the given property name as shown in the image below.
 Description
Property binding allows users to set a property of an element to the value of a template expression.
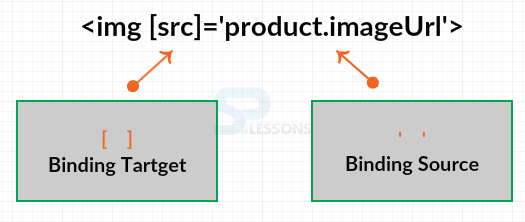
The Binding target is always enclosed in square brackets to left of the equal symbol and identifies a property of the element and the binding source is always enclosed in quotes to the right of the equal symbol and specifies the template expression as shown in the image below.
 Example
From the sample project Product management open the product list component and it’s associated template and use property binding to bind the source of the product image.
Use an image element to display the product image and use property binding to bind the image's source or SRC property so enclose the SRC in square brackets. On the right side of the equals, define the template expression in quotes. Suppose if one want to bind to the product's image URL property from the product list component class. One can also use property binding to bind the title, width and margin property of the image to the product's name as shown in the code below.
product-list.component.html
[html]
<div class='panel panel-primary'>
<div class='panel-heading'>
{ {pageTitle} }
</div>
<div class='panel-body'>
<div class='row'>
<div class='col-md-2'>Filter by:</div>
<div class='col-md-4'>
<input type='text' />
</div>
</div>
<div class ='row'>
<div class='col-md-6'>
<h3>Filtered by: </h3>
</div>
</div>
<div class='table-responsive'>
<table class='table'
*ngIf='products && products.length'>
<thead>
<tr>
<th>
<button class='btn btn-success'>
Show Image
</button>
</th>
<th>Product</th>
<th>Code</th>
<th>Available</th>
<th>Price</th>
<th>5 Star Rating</th>
</tr>
</thead>
<tbody>
<tr *ngFor='let product of products'>
<td>
<img [src]='product.imageUrl'
='product.productName'
[style.width.px]='imageWidth'
[style.margin.px]='imageMargin'>
</td>
<td>{ { product.productName } }</td>
<td>{ { product.productCode } }</td>
<td>{ { product.releaseDate } }</td>
<td>{ { product.price } }</td>
<td>{ { product.starRating } }</td>
</tr>
</tbody>
</table>
</div>
</div>
[/html]
Now, open the file containing the class for the product list component and give the source or SRC for image URL and also give the image width and margin inside the class as shown in the code below.
[c]
import { Component } from '@angular/core';
@Component({
selector: 'pm-products',
templateUrl: 'app/products/product-list.component.html'
})
export class ProductListComponent {
pageTitle: string = 'Product List!';
imageWidth: number = 50;
imageMargin: number = 2;
products: any[] = [
{
"productId": 1,
"productName": "Angular 2",
"productCode": "SPL-0011",
"releaseDate": "March 19, 2016",
"description": "A Practical Introduction to the new Web Development Platform Angular 2",
"price": 19.95,
"starRating": 3.2,
"imageUrl": "./app/assets/images/angular_2.png"
},
{
"productId": 2,
"productName": "WordPress",
"productCode": "SPL-0023",
"releaseDate": "March 18, 2016",
"description": "This ebook allows you to create a WordPress website on your domainfrom scratch.",
"price": 32.99,
"starRating": 4.2,
"imageUrl": "./app/assets/images/wordpress-logo.png"
}
];
}
[/c]
Now check the output in the browser, the images get displayed using property binding as shown in the image below.
 Description
One can do event binding with any valid html event obtainable, like click, focus or blur. In Angular 1 user need built-in directives to use event binding. for instance, for binding to a click, one would use:
[c]<button ng-click="vm.toggleImage()">Show Image</h1>[/c]
In Angular 2, one can simply take constant property that is on the html part (click within the previous example) and wrap it in parenthesis. So, with properties one should use square braces, however with events parenthesis are used:
[c]<button (click)="toggleImage()">Show Image</h1>[/c]
 Example
In order to implement the Show image button in the demo project product management, first define a class property that keeps track of whether the images are currently displayed. The property can be called as show image, since the property is true or false, define the property type as Boolean and set the default value to false. So, the images are not displayed when the page is first loaded
Next, build the method that the event binding will call. By convention the methods are defined after all of the properties are defined, so put the method down of all properties. Assume the method name as toggle image and notice that typescript does not require any keyword like function, following with the method name with open and closing parentheses will identifies it as a method, the method won’t have a return type so just specify the return type as void and the body of the method simply toggles the state of the show image property.
The code below contain the defined class property showImage and its method toggleImage at the bottom of all properties.
product-list.component.ts
[c]
import { Component } from '@angular/core';
@Component({
selector: 'pm-products',
templateUrl: 'app/products/product-list.component.html'
})
export class ProductListComponent {
pageTitle: string = 'Product List!';
imageWidth: number = 50;
imageMargin: number = 2;
showImage: boolean = false;
products: any[] = [
{
"productId": 1,
"productName": "Angular 2",
"productCode": "SPL-0011",
"releaseDate": "March 19, 2016",
"description": "A Practical Introduction to the new Web Development Platform Angular 2",
"price": 19.95,
"starRating": 3.2,
"imageUrl": "./app/assets/images/angular_2.png"
},
{
"productId": 2,
"productName": "WordPress",
"productCode": "SPL-0023",
"releaseDate": "March 18, 2016",
"description": "This ebook allows you to create a WordPress website on your domainfrom scratch.",
"price": 32.99,
"starRating": 4.2,
"imageUrl": "./app/assets/images/wordpress-logo.png"
}
];
toggleImage(): void{
this.showImage = !this.showImage;
}
}
[/c]
Now, setup the event binding in the template, open the associate template file and on the button class element define the click as target event by enclosing it in parentheses and assign it to the created method i.e. toggleImage enclosed in quotes. So, when the user click on the button the binding calls the method.
Using interpolation the button text can be changed to hide image when the show image is true and when the show image is false the button text display the show image and this can be done using JavaScript conditional operator as shown in the syntax.
[c]{ { showImage ? ‘Hide’ : ‘Show’} } Image[/c]
Basically the above syntax can be read as, if show image is true display hide otherwise display show. Place the above syntax in the button class element as shown in the code below.
[html]
<div class='panel panel-primary'>
<div class='panel-heading'>
{ {pageTitle} }
</div>
<div class='panel-body'>
<div class='row'>
<div class='col-md-2'>Filter by:</div>
<div class='col-md-4'>
<input type='text' />
</div>
</div>
<div class ='row'>
<div class='col-md-6'>
<h3>Filtered by: </h3>
</div>
</div>
<div class='table-responsive'>
<table class='table'
*ngIf='products && products.length'>
<thead>
<tr>
<th>
<button class='btn btn-success'
(click)='toggleImage()'>
{ {showImage ? 'Hide' : 'Show'} } Image
</button>
</th>
<th>Product</th>
<th>Code</th>
<th>Available</th>
<th>Price</th>
<th>5 Star Rating</th>
</tr>
</thead>
<tbody>
<tr *ngFor='let product of products'>
<td>
<img *ngIf='showImage'
[src]='product.imageUrl'
='product.productName'
[style.width.px]='imageWidth'
[style.margin.px]='imageMargin' />
</td>
<td>{ { product.productName } }</td>
<td>{ { product.productCode } }</td>
<td>{ { product.releaseDate } }</td>
<td>{ { product.price } }</td>
<td>{ { product.starRating } }</td>
</tr>
</tbody>
</table>
</div>
</div>
[/html]
Next in order to hide or show the image add a logic called ngIf directive to the image element. The ngIf directive is used to add or remove the HTML elements from the DOM.
 Output
 Description
The two way binding in Angular is mostly used in an input filed or any other kind elements. Once user type something within the input on one side, the worth goes to the controller and so back and forth. In Angular 1 the ng-model directive is used on the element and bind it to the value:
[c]<input ng-model="product.name"/>[/c]
In Angular 2 a special directive is used called as ngModel.
[c]<input [(ngModel)]="product.name"/>[/c]
But notice how the syntax is simply a bit totally different. One should use the square brackets because it is a property, however one should also use the parenthesis. This syntax is called Banana in a Box ([()]). What this suggests is when user see this syntax, it's two-way binding at work.
In the demo project, product management open the product list component and its associated template
First, add a component class property for the list filter, this property is a string and set a default initial value for filtering the list products as shown in the code below.
product-list.component.ts
[c]
import { Component } from '@angular/core';
@Component({
selector: 'pm-products',
templateUrl: 'app/products/product-list.component.html'
})
export class ProductListComponent {
pageTitle: string = 'Product List!';
imageWidth: number = 50;
imageMargin: number = 2;
showImage: boolean = false;
listFilter: string = 'angular';
products: any[] = [
{
"productId": 1,
"productName": "Angular 2",
"productCode": "SPL-0011",
"releaseDate": "March 19, 2016",
"description": "A Practical Introduction to the new Web Development Platform Angular 2",
"price": 19.95,
"starRating": 3.2,
"imageUrl": "./app/assets/images/angular_2.png"
},
{
"productId": 2,
"productName": "WordPress",
"productCode": "SPL-0023",
"releaseDate": "March 18, 2016",
"description": "This ebook allows you to create a WordPress website on your domainfrom scratch.",
"price": 32.99,
"starRating": 4.2,
"imageUrl": "./app/assets/images/wordpress-logo.png"
}
];
toggleImage(): void{
this.showImage = !this.showImage;
}
}
[/c]
Now, setup the two-way binding in the template, define a Filter by element along with an input text box, on the input element draw a banana [()] in a box and specify the ngModel directive inside the banana and bind it to the component class list filter property.
In order to display the list filter below the filter box use interpolation as shown in the code below.
product-list.component.html
[html]
<div class='panel panel-primary'>
<div class='panel-heading'>
{ {pageTitle} }
</div>
<div class='panel-body'>
<div class='row'>
<div class='col-md-2'>Filter by:</div>
<div class='col-md-4'>
<input type='text'
[(ngModel)]='listFilter' />
</div>
</div>
<div class ='row'>
<div class='col-md-6'>
<h3>Filtered by: { {listFilter} } </h3>
</div>
</div>
<div class='table-responsive'>
<table class='table'
*ngIf='products && products.length'>
<thead>
<tr>
<th>
<button class='btn btn-success'
(click)='toggleImage()'>
{{showImage ? 'Hide' : 'Show'}} Image
</button>
</th>
<th>Product</th>
<th>Code</th>
<th>Available</th>
<th>Price</th>
<th>5 Star Rating</th>
</tr>
</thead>
<tbody>
<tr *ngFor='let product of products'>
<td>
<img *ngIf='showImage'
[src]='product.imageUrl'
='product.productName'
[style.width.px]='imageWidth'
[style.margin.px]='imageMargin' />
</td>
<td>{ { product.productName } }</td>
<td>{ { product.productCode } }</td>
<td>{ { product.releaseDate } }</td>
<td>{ { product.price } }</td>
<td>{ { product.starRating } }</td>
</tr>
</tbody>
</table>
</div>
</div>
[/html]
The ngModel directive is part of the Angular module for forms called FormsModule. To expose this directive to the product list component, one need to import the FormsModule in the module that owns the product list component which is the AppModule. Start by importing FormsModule from Angular forms and then add FormsModule to the imports array for the NG module decorator as shown in the code below.
app.module.ts
[c]
import { NgModule } from '@angular/core';
import { BrowserModule } from '@angular/platform-browser';
import { FormsModule } from '@angular/forms';
import { AppComponent } from './app.component';
import { ProductListComponent } from './products/product-list.component';
@NgModule({
imports: [
BrowserModule,
FormsModule],
declarations: [
AppComponent,
ProductListComponent ],
bootstrap: [ AppComponent ]
})
export class AppModule { }
[/c]
 Output
 Key Points
- Data binding are used to help coordinate communication between a component and its template.
- Event binding can be done with any valid html event obtainable, like click, focus or blur.
- The property binding allow users to set a property of an element to the value is a template expression
- The two way binding in Angular is mostly used in an input filed or any other kind elements.


