


 Description
Swing Components, A component is an object having a graphical representation that can be displayed on the screen and that can interact with the user. Examples of components are the buttons, checkboxes, and scrollbars of a typical graphical user interface. Swing components are fundamental building pieces of an application. Swing has an extensive variety of different segments, including buttons, check boxes, sliders, and list boxes. SPLesson tutorial will explain the various kind of components as follows.
- JLabel
- JCheckBox
- JSlider
- JComboBox
- JProgressBar
- JToggleButton
JLabel is the component utilized to expose the text, images.
Example
[java]
package splessons;
import java.awt.Color;
import java.awt.Container;
import java.awt.EventQueue;
import java.awt.Font;
import javax.swing.GroupLayout;
import javax.swing.JComponent;
import javax.swing.JFrame;
import javax.swing.JLabel;
public class LabelEx extends JFrame {
public LabelEx() {
initUI();
}
private void initUI() {
String lyrics = "<html>Gothrough splessons where you will fing easy solutions, Thank you...!</html>";
JLabel label = new JLabel(lyrics);
label.setFont(new Font("Serif", Font.PLAIN, 14));
label.setForeground(new Color(50, 50, 25));
createLayout(label);
setTitle("SPLessons");
setLocationRelativeTo(null);
setDefaultCloseOperation(EXIT_ON_CLOSE);
}
private void createLayout(JComponent... arg) {
Container pane = getContentPane();
GroupLayout gl = new GroupLayout(pane);
pane.setLayout(gl);
gl.setAutoCreateContainerGaps(true);
gl.setHorizontalGroup(gl.createSequentialGroup()
.addComponent(arg[0])
);
gl.setVerticalGroup(gl.createParallelGroup()
.addComponent(arg[0])
);
pack();
}
public static void main(String[] args) {
EventQueue.invokeLater(new Runnable() {
@Override
public void run() {
LabelEx ex = new LabelEx();
ex.setVisible(true);
}
});
}
}
[/java]
In our example, One can use HTML tags in JLabel component. We use the
tag to separate lines. [java]JLabel label = new JLabel(lyrics); label.setFont(new Font("Serif", Font.PLAIN, 14));[/java] The pack() method resizes the window. [java]pack()[/java] Output When compile the code following output will be generated.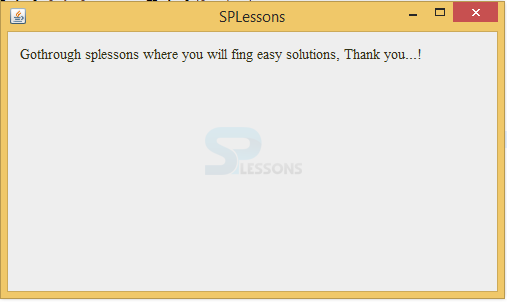
tag to separate lines. [java]JLabel label = new JLabel(lyrics); label.setFont(new Font("Serif", Font.PLAIN, 14));[/java] The pack() method resizes the window. [java]pack()[/java] Output When compile the code following output will be generated.
Generally check box will have two functionalities that ON mode and OFF mode, when user click on the check box that means it has to be true otherwise false.
Example
[java]
package splessons;
import java.awt.Container;
import java.awt.EventQueue;
import java.awt.event.ItemEvent;
import java.awt.event.ItemListener;
import javax.swing.GroupLayout;
import javax.swing.JCheckBox;
import javax.swing.JComponent;
import javax.swing.JFrame;
public class CheckBoxEx extends JFrame
implements ItemListener {
public CheckBoxEx() {
initUI();
}
private void initUI() {
JCheckBox cb = new JCheckBox("SPLessons", true);
cb.addItemListener(this);
createLayout(cb);
setSize(280, 200);
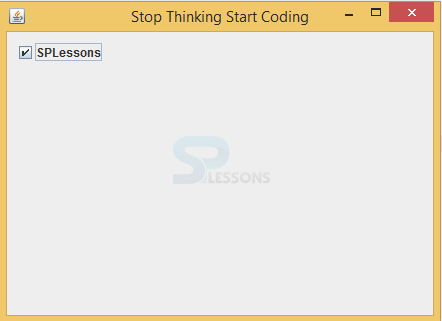
setTitle("Stop Thinking Start Coding");
setLocationRelativeTo(null);
setDefaultCloseOperation(JFrame.EXIT_ON_CLOSE);
}
@Override
public void itemStateChanged(ItemEvent e) {
int sel = e.getStateChange();
if (sel==ItemEvent.SELECTED) {
setTitle("Stop Thinking Start Coding");
} else {
setTitle("Check it man");
}
}
private void createLayout(JComponent... arg) {
Container pane = getContentPane();
GroupLayout gl = new GroupLayout(pane);
pane.setLayout(gl);
gl.setAutoCreateContainerGaps(true);
gl.setHorizontalGroup(gl.createParallelGroup()
.addComponent(arg[0])
);
gl.setVerticalGroup(gl.createSequentialGroup()
.addComponent(arg[0])
);
}
public static void main(String[] args) {
EventQueue.invokeLater(new Runnable() {
@Override
public void run() {
CheckBoxEx ex = new CheckBoxEx();
ex.setVisible(true);
}
});
}
}
[/java]
This class implemented the ItemListener, why because to provide itemStateChanged() method.
[java]public class CheckBoxEx extends JFrame
implements ItemListener {[/java]
JCheckBox is created. This constructor takes a text and the state of the check box as parameters. The check box is initially selected.
[java]JCheckBox checkbox = new JCheckBox("Show title", true);[/java]
Here called the ItemEvent's getStateChange() method to determine the state of the check box. ItemEvent is a semantic event which indicates that an item was selected or deselected. It is sent to the registered observer. Depending on the state of the check box, we show or hide the title of the window using the setTitle() method.
[java]@Override
public void itemStateChanged(ItemEvent e) {
int sel = e.getStateChange();
if (sel == ItemEvent.SELECTED) {
setTitle("Stop Thinking Start Coding");
} else {
setTitle("Check it man");
}
} [/java]
Output
When compile the code following is the output will be generated.
Combo box is used to select single element from multiple, here user can select an element from the drop down list.
Example
[java]
package splessons;
import java.awt.Container;
import java.awt.EventQueue;
import java.awt.event.ItemEvent;
import java.awt.event.ItemListener;
import javax.swing.GroupLayout;
import static javax.swing.GroupLayout.Alignment.BASELINE;
import javax.swing.JComboBox;
import javax.swing.JComponent;
import javax.swing.JFrame;
import javax.swing.JLabel;
public class ComboBoxEx extends JFrame
implements ItemListener {
private JLabel display;
private JComboBox<String> box;
private String[] distros;
public ComboBoxEx() {
initUI();
setTitle("SPLessons-JComboBox");
setDefaultCloseOperation(JFrame.EXIT_ON_CLOSE);
setLocationRelativeTo(null);
}
private void initUI() {
distros = new String[]{"Ubuntu", "Redhat", "Arch",
"Debian", "Mint"};
box = new JComboBox<>(distros);
box.addItemListener(this);
display = new JLabel("Ubuntu");
createLayout(box, display);
}
private void createLayout(JComponent... arg) {
Container pane = getContentPane();
GroupLayout gl = new GroupLayout(pane);
pane.setLayout(gl);
gl.setAutoCreateContainerGaps(true);
gl.setAutoCreateGaps(true);
gl.setHorizontalGroup(gl.createSequentialGroup()
.addComponent(arg[0])
.addComponent(arg[1])
);
gl.setVerticalGroup(gl.createParallelGroup(BASELINE)
.addComponent(arg[0])
.addComponent(arg[1])
);
pack();
}
@Override
public void itemStateChanged(ItemEvent e) {
if (e.getStateChange() == ItemEvent.SELECTED) {
display.setText(e.getItem().toString());
}
}
public static void main(String[] args) {
EventQueue.invokeLater(new Runnable() {
@Override
public void run() {
ComboBoxEx ex = new ComboBoxEx();
ex.setVisible(true);
}
});
}
}
[/java]
The JComboBox will hold these string values.
[java]distros = new String[] {"Ubuntu", "Redhat", "Arch",
"Debian", "Mint"};[/java]
To display the selected element.
[java]display = new JLabel("Ubuntu");[/java]
Output
When compile the code following is the output will be generated.
 Here user can select the an element.

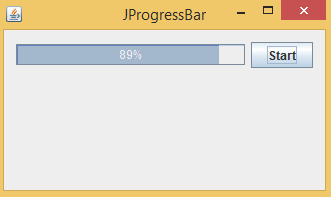
ProgressBar represents the progress of the task in percent format. Before digital marketing progressBar was used in computer environment to know the status of the transferring data from one system to other devices such as pen drive. Following is the syntax.
[java]public class JProgressBar extends
JComponent implements
SwingConstants, Accessible[/java]
Example
Create the package and import Swing containers to inherit the properties and methods.
[java]package swing;
import java.awt.Container;[/java]
Create a class ProgressBar that should extend JFrame, ProgressBar will hire the properties from the JFrame.
[java]public class ProgressBar extends JFrame[/java]
Create required events i.e create timer to check the status, create ProgressBar to scroll from starting to ending, Create button such as start or stop .
[java]private Timer timer;
private JProgressBar pbar;
private JButton sBtn;[/java]
Create a constructor that should be same as class name and create the method inside the constructor.
[java]public ProgressBar() {
initUI();
}[/java]
Call the created method and create object to Progress bar, add paint to the progress scrolling status.
[java]pbar = new JProgressBar();
pbar.setStringPainted(true);[/java]
Create object to the start button and implement ActionInterface interface. When user click on start button, action will be performed.
[java]sBtn = new JButton("Start");
sBtn.addActionListener(new ClickAction());[/java]
Add listener to the timer that is UpdateBarListener().
[java]timer = new Timer(50, new UpdateBarListener());[/java]
Create layout to the ProgressBar and start button and create title to the window, add termination method to the window.
[java]createLayout(pbar, sBtn);
setTitle("JProgressBar");
setDefaultCloseOperation(EXIT_ON_CLOSE);
setLocationRelativeTo(null);[/java]
Create the group layout.
[java]Container pane = getContentPane();
GroupLayout gl = new GroupLayout(pane);
pane.setLayout(gl); [/java]
Turn on gaps between the components automatically.
[java]gl.setAutoCreateContainerGaps(true);[/java]
Create the sequential group at horizontal axis and create parallel group at vertical axis.
[java]gl.setHorizontalGroup(gl.createSequentialGroup()
.addComponent(arg[0])
.addComponent(arg[1])
);
gl.setVerticalGroup(gl.createParallelGroup(CENTER)
.addComponent(arg[0])
.addComponent(arg[1])
); [/java]
Implement ActionListener on start button and set the percent to 100. If status crosses the 100 then automatically terminates program.
[java] private class UpdateBarListener implements ActionListener {
@Override
public void actionPerformed(ActionEvent e) {
int val = pbar.getValue();
if (val >= 100) {
timer.stop();
sBtn.setText("End");
return;
}
pbar.setValue(++val); [/java]
ProgressBar.java
[java]package swing;
import java.awt.Container;
import java.awt.EventQueue;
import java.awt.event.ActionEvent;
import java.awt.event.ActionListener;
import javax.swing.AbstractAction;
import javax.swing.GroupLayout;
import static javax.swing.GroupLayout.Alignment.CENTER;
import javax.swing.JButton;
import javax.swing.JComponent;
import javax.swing.JFrame;
import javax.swing.JProgressBar;
import javax.swing.Timer;
public class ProgressBar extends JFrame {
private Timer timer;
private JProgressBar pbar;
private JButton sBtn;
public ProgressBar() {
initUI();
}
private void initUI() {
pbar = new JProgressBar();
pbar.setStringPainted(true);
sBtn = new JButton("Start");
sBtn.addActionListener(new ClickAction());
timer = new Timer(50, new UpdateBarListener());
createLayout(pbar, sBtn);
setTitle("JProgressBar");
setDefaultCloseOperation(EXIT_ON_CLOSE);
setLocationRelativeTo(null);
}
private void createLayout(JComponent... arg) {
Container pane = getContentPane();
GroupLayout gl = new GroupLayout(pane);
pane.setLayout(gl);
gl.setAutoCreateContainerGaps(true);
gl.setAutoCreateGaps(true);
gl.setHorizontalGroup(gl.createSequentialGroup()
.addComponent(arg[0])
.addComponent(arg[1])
);
gl.setVerticalGroup(gl.createParallelGroup(CENTER)
.addComponent(arg[0])
.addComponent(arg[1])
);
pack();
}
private class UpdateBarListener implements ActionListener {
@Override
public void actionPerformed(ActionEvent e) {
int val = pbar.getValue();
if (val >= 100) {
timer.stop();
sBtn.setText("End");
return;
}
pbar.setValue(++val);
}
}
private class ClickAction extends AbstractAction {
@Override
public void actionPerformed(ActionEvent e) {
if (timer.isRunning()) {
timer.stop();
sBtn.setText("Start");
} else if (!"End".equals(sBtn.getText())) {
timer.start();
sBtn.setText("Stop");
}
}
}
public static void main(String[] args) {
EventQueue.invokeLater(new Runnable() {
@Override
public void run() {
ProgressBar ex = new ProgressBar();
ex.setVisible(true);
}
});
}
}[/java]
Output:
Output will be as follows, when click on start button data transferring will be started in percent format, after completion of the progress it will be ended.
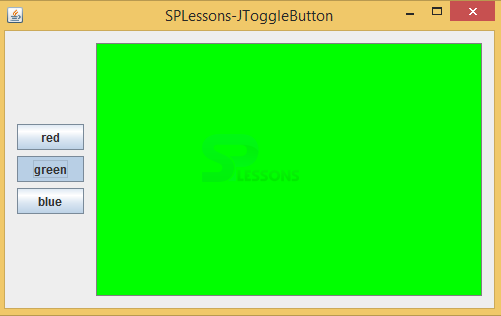
This button will have two states such as pressed or not pressed. Following is an example which describes more about this.
Example
[java]
package splessons;
import java.awt.Color;
import java.awt.Container;
import java.awt.Dimension;
import java.awt.EventQueue;
import java.awt.event.ActionEvent;
import java.awt.event.ActionListener;
import javax.swing.GroupLayout;
import static javax.swing.GroupLayout.Alignment.CENTER;
import javax.swing.JComponent;
import javax.swing.JFrame;
import javax.swing.JPanel;
import javax.swing.JToggleButton;
import static javax.swing.LayoutStyle.ComponentPlacement.UNRELATED;
import javax.swing.border.LineBorder;
public class ToggleButtonEx extends JFrame
implements ActionListener {
private JToggleButton redBtn;
private JToggleButton greenBtn;
private JToggleButton blueBtn;
private JPanel display;
public ToggleButtonEx() {
initUI();
}
private void initUI() {
redBtn = new JToggleButton("red");
redBtn.addActionListener(this);
greenBtn = new JToggleButton("green");
greenBtn.addActionListener(this);
blueBtn = new JToggleButton("blue");
blueBtn.addActionListener(this);
display = new JPanel();
display.setPreferredSize(new Dimension(120, 120));
display.setBorder(LineBorder.createGrayLineBorder());
display.setBackground(Color.black);
createLayout(redBtn, greenBtn, blueBtn, display);
setTitle("SPLessons-JToggleButton");
setLocationRelativeTo(null);
setDefaultCloseOperation(JFrame.EXIT_ON_CLOSE);
}
private void createLayout(JComponent... arg) {
Container pane = getContentPane();
GroupLayout gl = new GroupLayout(pane);
pane.setLayout(gl);
gl.setAutoCreateContainerGaps(true);
gl.setAutoCreateGaps(true);
gl.setHorizontalGroup(gl.createSequentialGroup()
.addGroup(gl.createParallelGroup()
.addComponent(arg[0])
.addComponent(arg[1])
.addComponent(arg[2]))
.addPreferredGap(UNRELATED)
.addComponent(arg[3])
);
gl.setVerticalGroup(gl.createParallelGroup(CENTER)
.addGroup(gl.createSequentialGroup()
.addComponent(arg[0])
.addComponent(arg[1])
.addComponent(arg[2]))
.addComponent(arg[3])
);
gl.linkSize(redBtn, greenBtn, blueBtn);
pack();
}
@Override
public void actionPerformed(ActionEvent e) {
Color color = display.getBackground();
int red = color.getRed();
int green = color.getGreen();
int blue = color.getBlue();
if (e.getActionCommand().equals("red")) {
if (red == 0) {
red = 255;
} else {
red = 0;
}
}
if (e.getActionCommand().equals("green")) {
if (green == 0) {
green = 255;
} else {
green = 0;
}
}
if (e.getActionCommand().equals("blue")) {
if (blue == 0) {
blue = 255;
} else {
blue = 0;
}
}
Color setCol = new Color(red, green, blue);
display.setBackground(setCol);
}
public static void main(String[] args) {
EventQueue.invokeLater(new Runnable() {
@Override
public void run() {
ToggleButtonEx ex = new ToggleButtonEx();
ex.setVisible(true);
}
});
}
}[/java]
Output
When compile the code following is the output will be displayed where user press any button then corresponding functionality will be exposed.
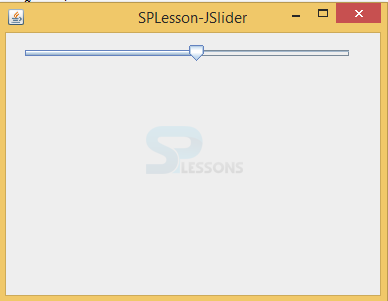
The JSlider is the Swing Components utilized to represent the graphical data between a particular interval of time.
Example
[java]package splessons;
import java.awt.Container;
import java.awt.EventQueue;
import javax.swing.GroupLayout;
import static javax.swing.GroupLayout.Alignment.CENTER;
import javax.swing.ImageIcon;
import javax.swing.JComponent;
import javax.swing.JFrame;
import javax.swing.JLabel;
import javax.swing.JSlider;
import javax.swing.event.ChangeEvent;
import javax.swing.event.ChangeListener;
public class SliderEx extends JFrame {
private JSlider slider;
private JLabel lbl;
private ImageIcon mute;
private ImageIcon min;
private ImageIcon med;
private ImageIcon max;
public SliderEx() {
initUI();
}
private void initUI() {
loadImages();
slider = new JSlider(0, 150, 0);
slider.addChangeListener(new ChangeListener() {
@Override
public void stateChanged(ChangeEvent event) {
int value = slider.getValue();
if (value == 0) {
lbl.setIcon(mute);
} else if (value > 0 && value <= 30) {
lbl.setIcon(min);
} else if (value > 30 && value < 80) {
lbl.setIcon(med);
} else {
lbl.setIcon(max);
}
}
});
lbl = new JLabel(mute, JLabel.CENTER);
createLayout(slider, lbl);
setTitle("SPLesson-JSlider");
setDefaultCloseOperation(EXIT_ON_CLOSE);
setLocationRelativeTo(null);
}
private void loadImages() {
mute = new ImageIcon("mute.png");
min = new ImageIcon("min.png");
med = new ImageIcon("med.png");
max = new ImageIcon("max.png");
}
private void createLayout(JComponent... arg) {
Container pane = getContentPane();
GroupLayout gl = new GroupLayout(pane);
pane.setLayout(gl);
gl.setAutoCreateContainerGaps(true);
gl.setAutoCreateGaps(true);
gl.setHorizontalGroup(gl.createSequentialGroup()
.addComponent(arg[0])
.addComponent(arg[1])
);
gl.setVerticalGroup(gl.createParallelGroup(CENTER)
.addComponent(arg[0])
.addComponent(arg[1])
);
pack();
}
public static void main(String[] args) {
EventQueue.invokeLater(new Runnable() {
@Override
public void run() {
SliderEx ex = new SliderEx();
ex.setVisible(true);
}
});
}
}[/java]
In the code example, a value selected from a slider is displayed in a label component. A JSlider is created with the minimum, maximum, and current values are parameters.
[java]slider = new JSlider(0, 150, 0);[/java]
Output
Following is the output will be generated when compile the code.
Key Points
- Swing Components - JComboBox combines a button or editable field and a drop-down list.
- Swing Components - To create the gap between the Swing Components developer will use setAutoCreateContainerGaps(true);.
- Swing Components - While fetching the data from one device to another device, data will be visible in percent format.